Facebook Pixel is a robust tool that lets you track and share user activity on your website with Facebook. Simply by placing a tiny piece of code (commonly referred to as a pixel) on your site, you can gather data related to actions users take, like page views, product purchases, or form submissions. This information is then returned to Facebook and assists you in optimizing sales with Facebook ads, retargeting visitors, tracking views (and thereby improving your ad campaigns), and generating a deliberate audience for perfect targeting of Facebook ads.
But at that time we will do it through Google Tag Manager. Really simply, with the pixel ID through GTM, we can install our Facebook pixel on our website.
Types of Conversion Tracking
To complete the conversion tracking for Facebook, we have to follow two different ways. One is browser-side tracking, and the other one is server-side tracking.
Browser-side tracking (including Facebook\’s own Pixel), which tracks what users do on websites in the browser and sends it to FB. It’s simple to install but can be thwarted by ad blockers or privacy settings, which result in lost data.
Server-side tracking is when you send data from your server to Facebook using the Conversions API. It’s more accurate, immune to ad blockers, and provides more control of the data, but it’s harder to set up. The combination of both approaches provides the most precise tracking.
At that time we will complete the browser-side tracking first. You want to do the browser-side tracking first because it’s easier to do and will have immediate results on using user behavior related data. Facebook Pixel collects real-time data such as page views, clicks or purchases, allowing you to easily access intelligence that will help you enhance your ads.
There are easier steps to start with, adding browser-side tracking will allow you to test performance before throwing even more complicated server-side events into the mix. It also makes sure that you are getting important client-side data the server-side tracking might miss (such as events which occur before your server processes the data). Once that is working you can also implement server-side tracking for more reliable and accurate tracking.
Let’s start with the setup
Facebook Pixel Setup Through GTM
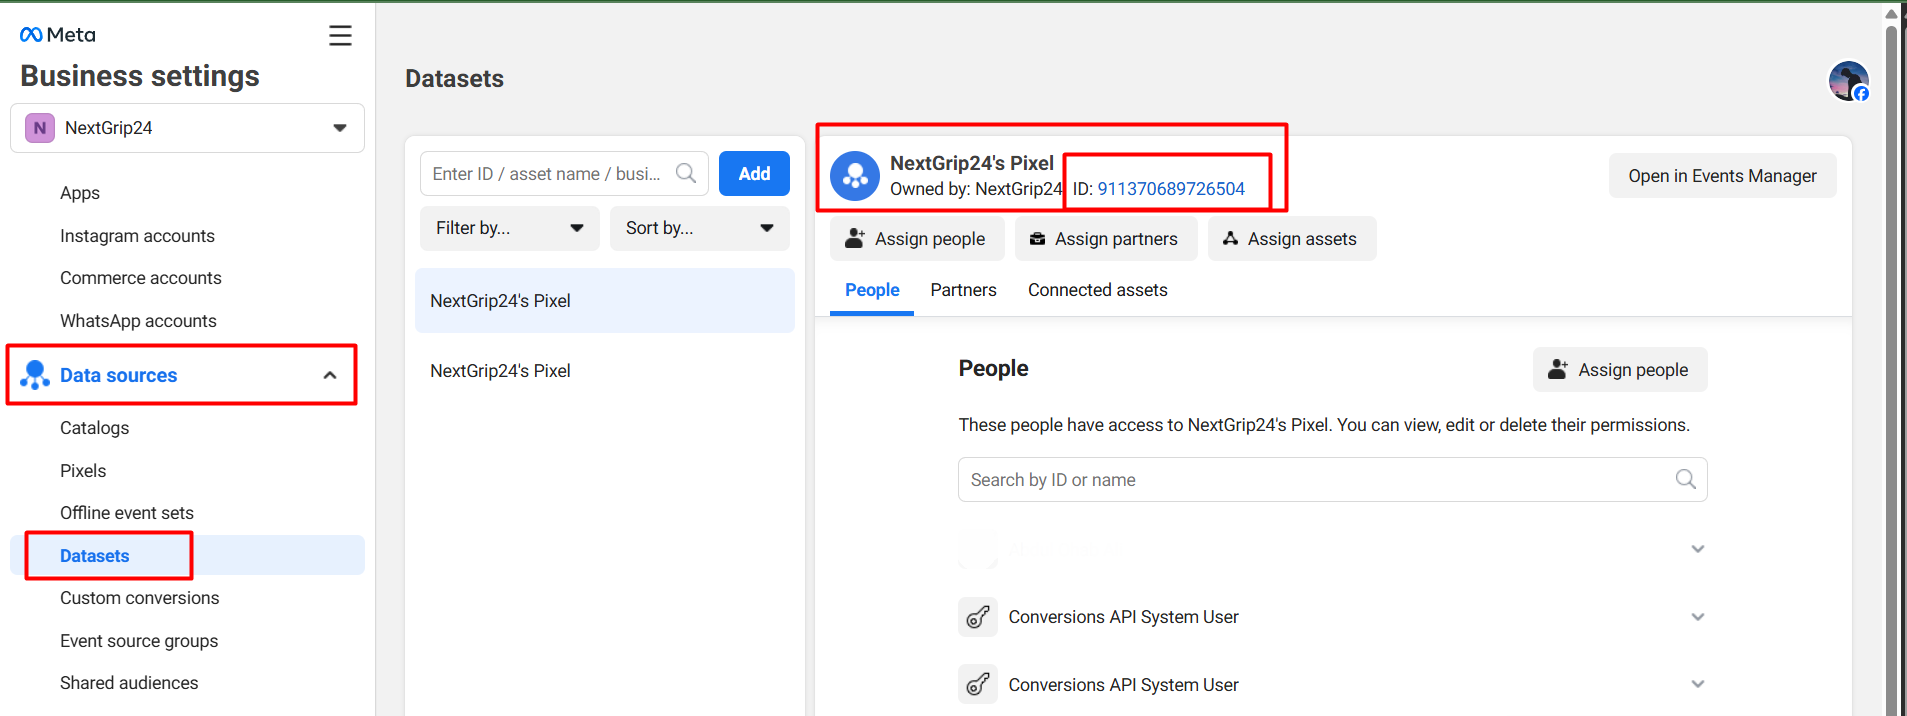
To complete the setup, we have to start it from the Facebook Business Manager. Because at first, from the business manager, we have to collect the pixel ID.
So first go to your business manager and collect the Facebook Pixel ID.
Now get back to the GTM. To set up the Facebook pixel with your website through the GTM, first we have to add one template in our workshop.
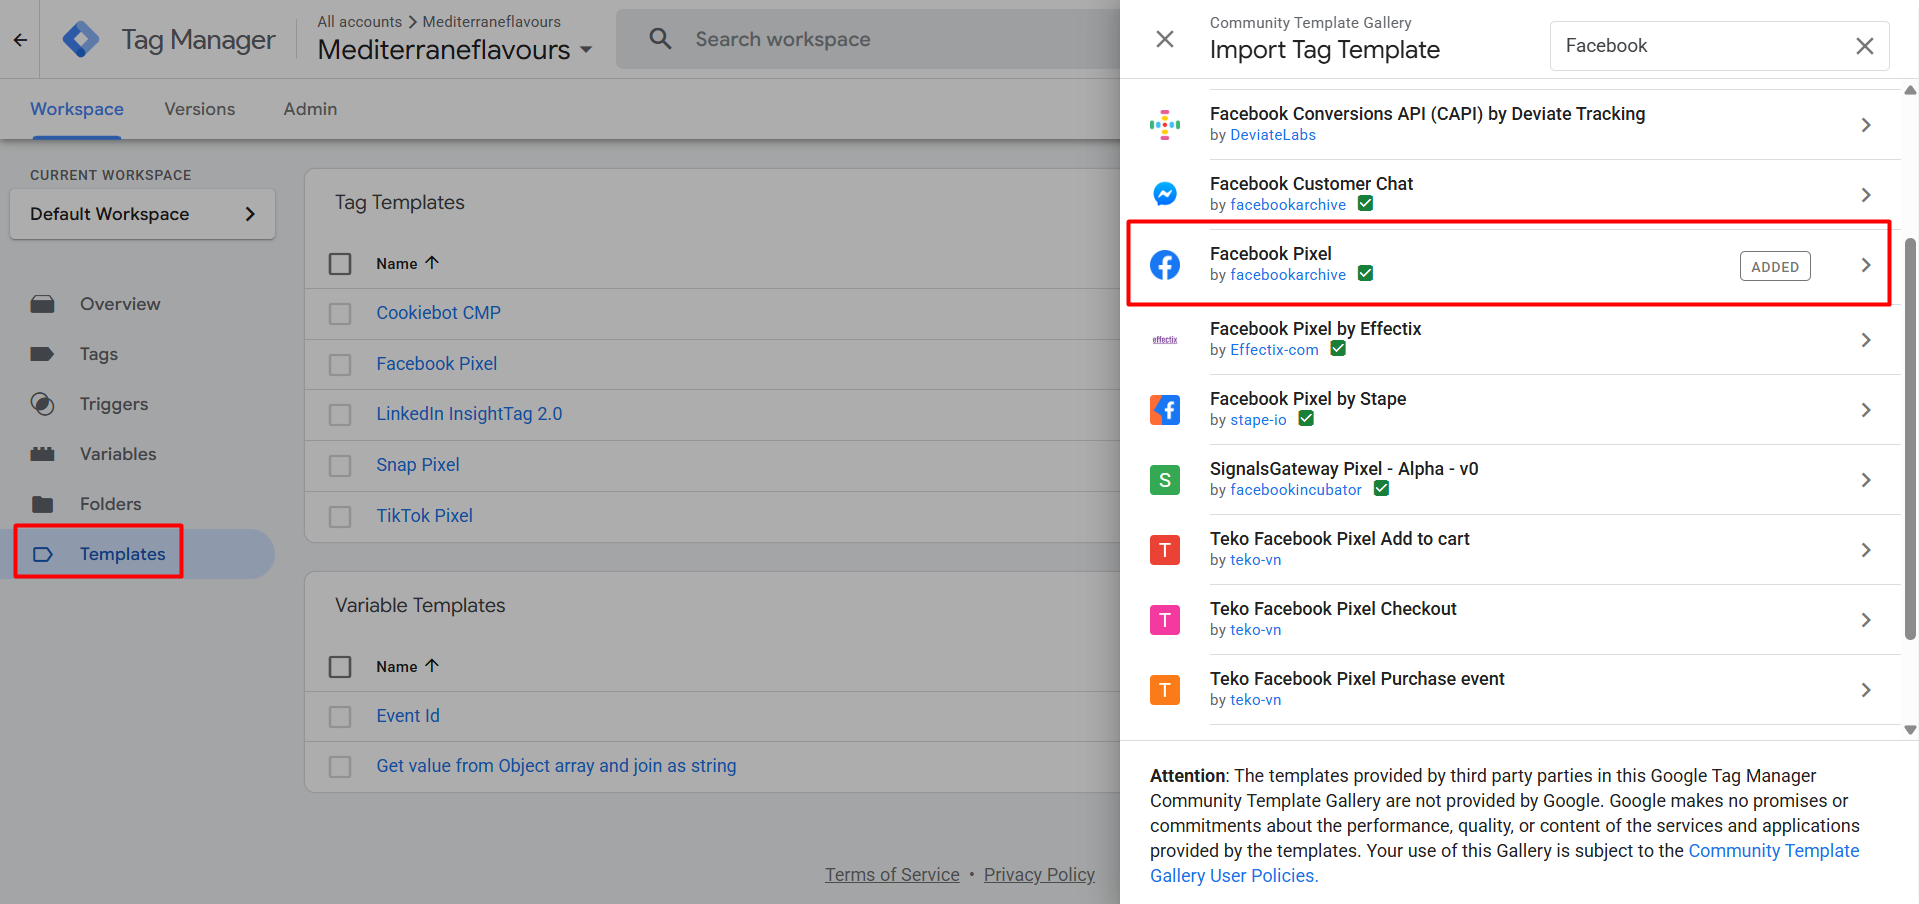
To do it, first go to your GTM; from there, click on the templates > search gallery, then search the new templates and add it in your workshop.
This is the template through which we will install our pixel on our site without any coding. Templates work as a pre-created frame that we can use to do our job.
Facebook has a lot of standard events, but at the time, we will set up the e-commerce standard events. To do it, we have to create 5 different tags to cover 5 different events (PageView, ViewContent, AddToCart, InitiateCheckout, and Purchase) that we have to send to Facebook. Let’s do it one by one.
Facebook Events setup through GTM
PageView: First of all, you’ll want to send the “PageView” event to Facebook. This tells Facebook that a person has visited a specific page on your site. By logging the PageView event, Facebook can collect significant information, like the URL of the page that was viewed, which content specifically was viewed, and how long a given user stayed on that page.
The move helps Facebook learn more about how people behave and enables the company to target ads using this knowledge, track ad performance with metrics like engagement, and make better audiences for campaigns in the future. It’s a pivotal event, the one you absolutely need to have in place to track activity and give Facebook important data on which to base your ad game plan.
So to do it, let’s go to the tag section from the GTM. Create a new tag, and in the tag type, select the “Facebook Pixel” template as your tag type.
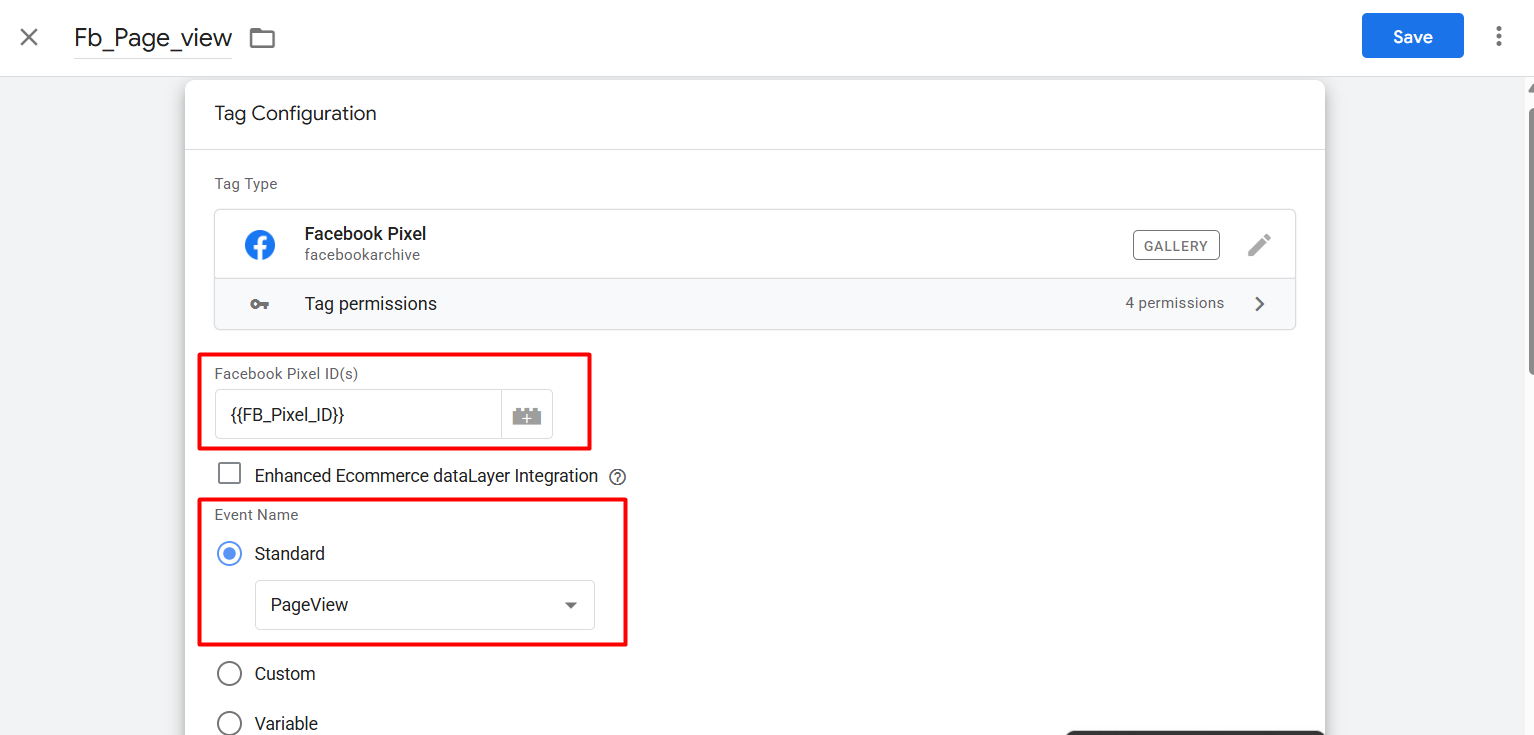
Here in the first place, paste your Facebook pixel ID, as we copied it first. Then in the next place, “Event Name,” here from the standard section, select the “PageView” as the event. Now it’s done.

Now to set up the trigger, select “All pages” as your trigger type. A trigger is a rule that defines when and where a tag should fire based on specific conditions or user actions. With the way your tracking is now done for the “PageView” events.
ViewContent: The “ViewContent” is a standard event for Facebook tracking. It is fired every time a user views a particular product page on your site. And when forwarding this event to Facebook, important information concerning the product being looked at is included—such as its ID, name, category, and price.
That way, Facebook can help you deliver more relevant ads to the right people who have demonstrated an interest in a specific product so that your ad campaigns perform better. It’s an important event for understanding product-level engagement and delivering more sophisticated retargeting strategies.
To do it, create one more new tag from the tag section of your GTM, and this time again select the same tag type like we did before.
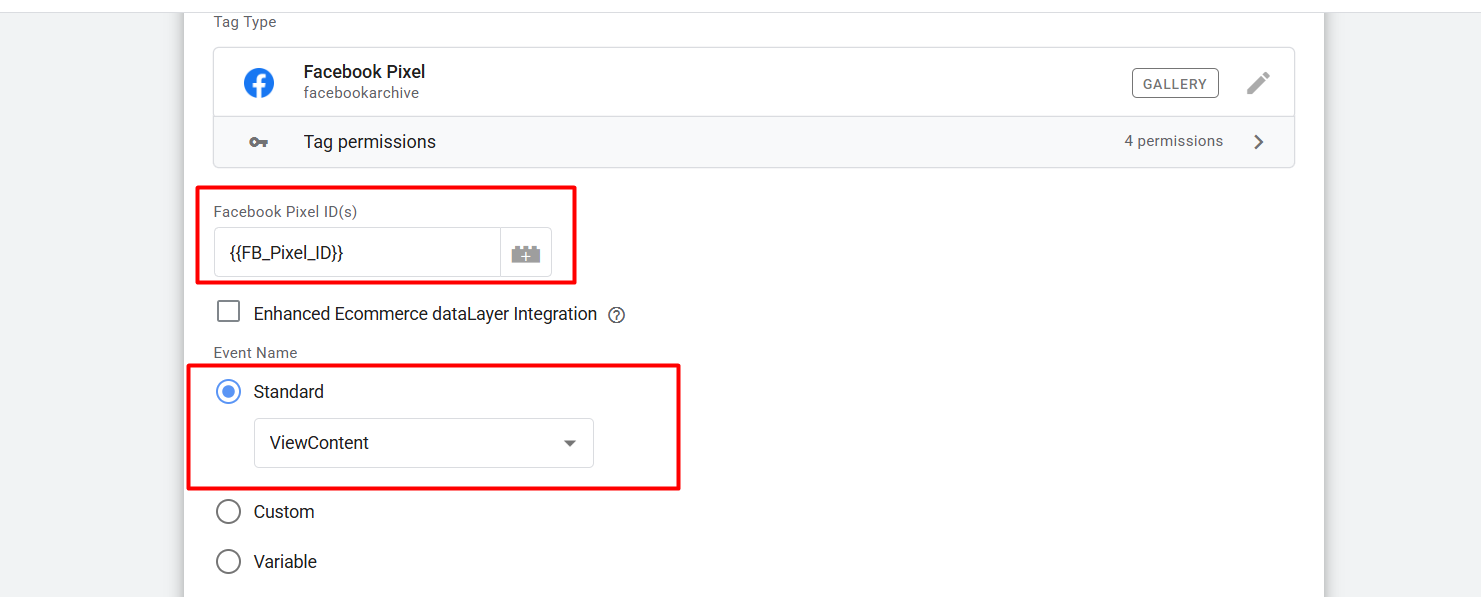
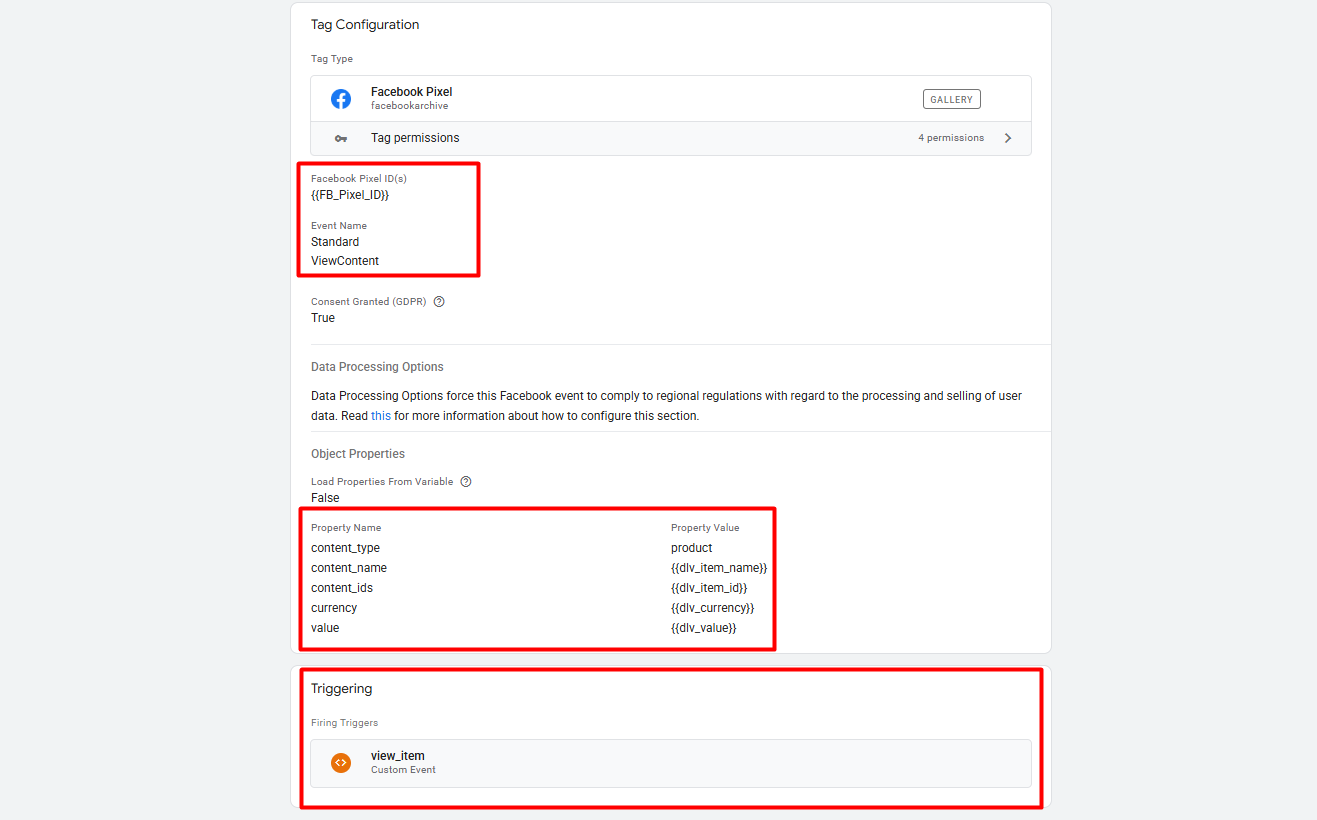
Now here you again paste your pixel ID, and then in the event name, select the “ViewContent” event.
But we already know that we call viewContent whenever we view one product page. So that’s why with the “ViewContent” we have to send some more parameters about our product.
In Facebook events, parameters are extra bits of data that you send with an event to give more context about the user action. These are simply variables that will help Facebook understand and categorize an event in context for more accurate tracking, reporting, and ad targeting.
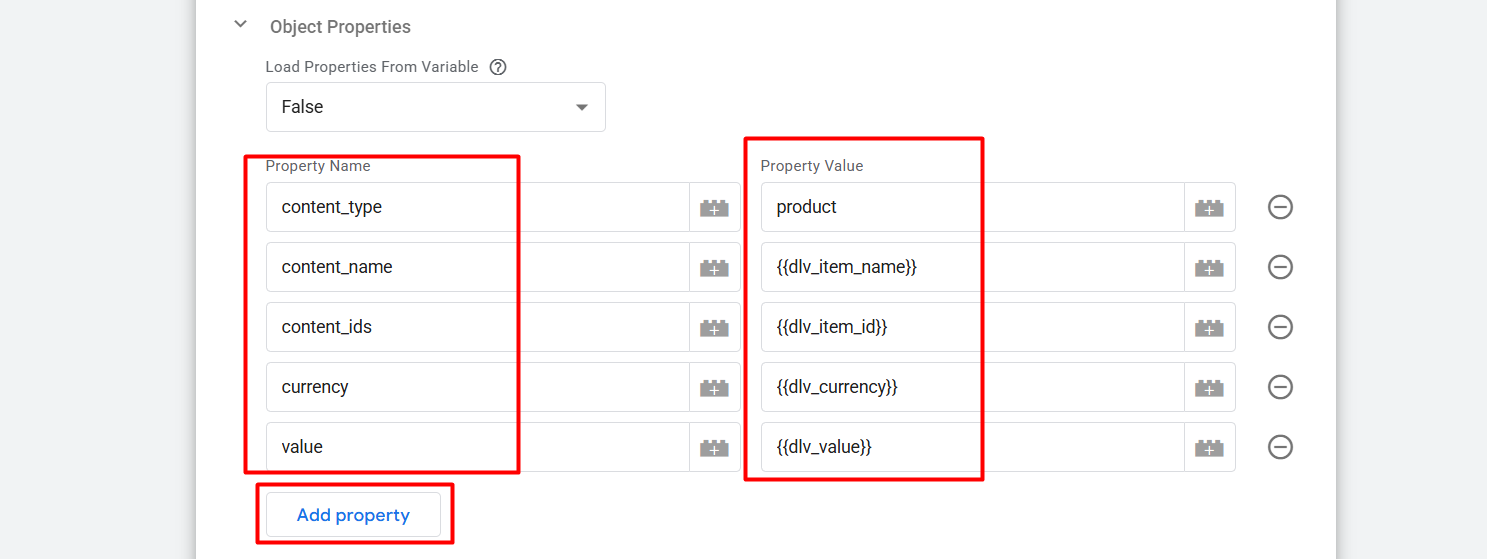
With the “ViewContent” we have to send all these values to Facebook. Here with the first property, “content_type,” we are sending data about our content type; with the next one we are sending the item name, and with the “id” we are sending the item id, and I think you can guess which type of value we are sending with the “currency,” and with the “value” we are sending the total value.
To create all these variables, you can follow this article.
Now it’s time to set up the trigger. Every time we set up the trigger perfectly, we have to follow the data layer. Because every time after viewing one product or making a purchase, we can see some custom events in our data layer.
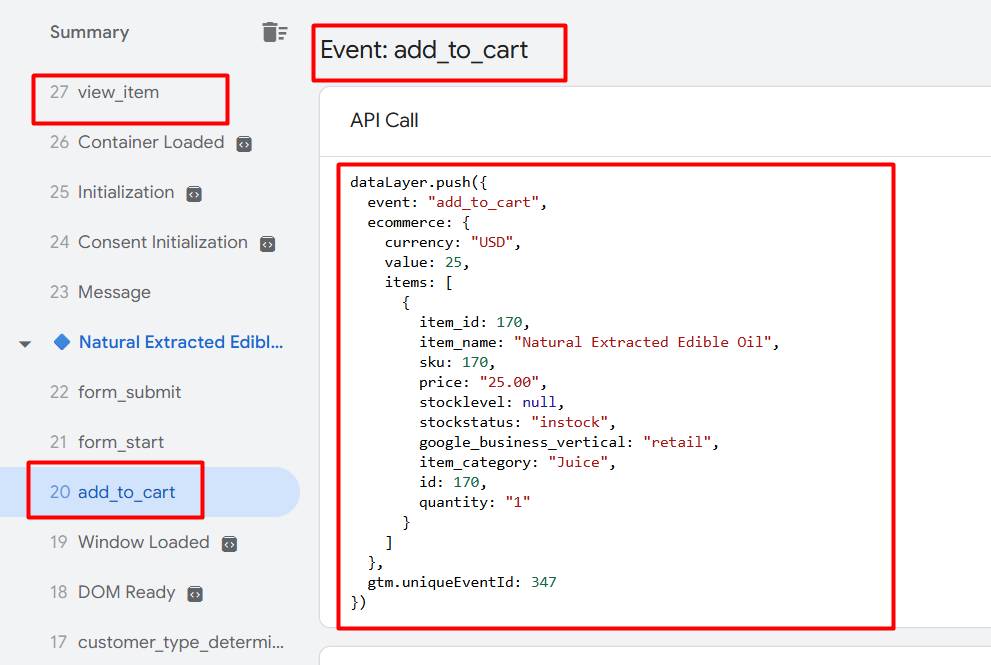
Here to create a perfect trigger, we have to use these events from time to time through the “Custom Event” type. Because, right after completing the checkout or purchase, we will get a new event name in the data layer.
So in the data layer you can see after viewing one product we got one event in the name of “view_item.” So we have to copy the event name and get back to the trigger section. From the trigger section, you have to create a new trigger.

To create a new trigger, click on the plus icon, and now you have to select the trigger type.
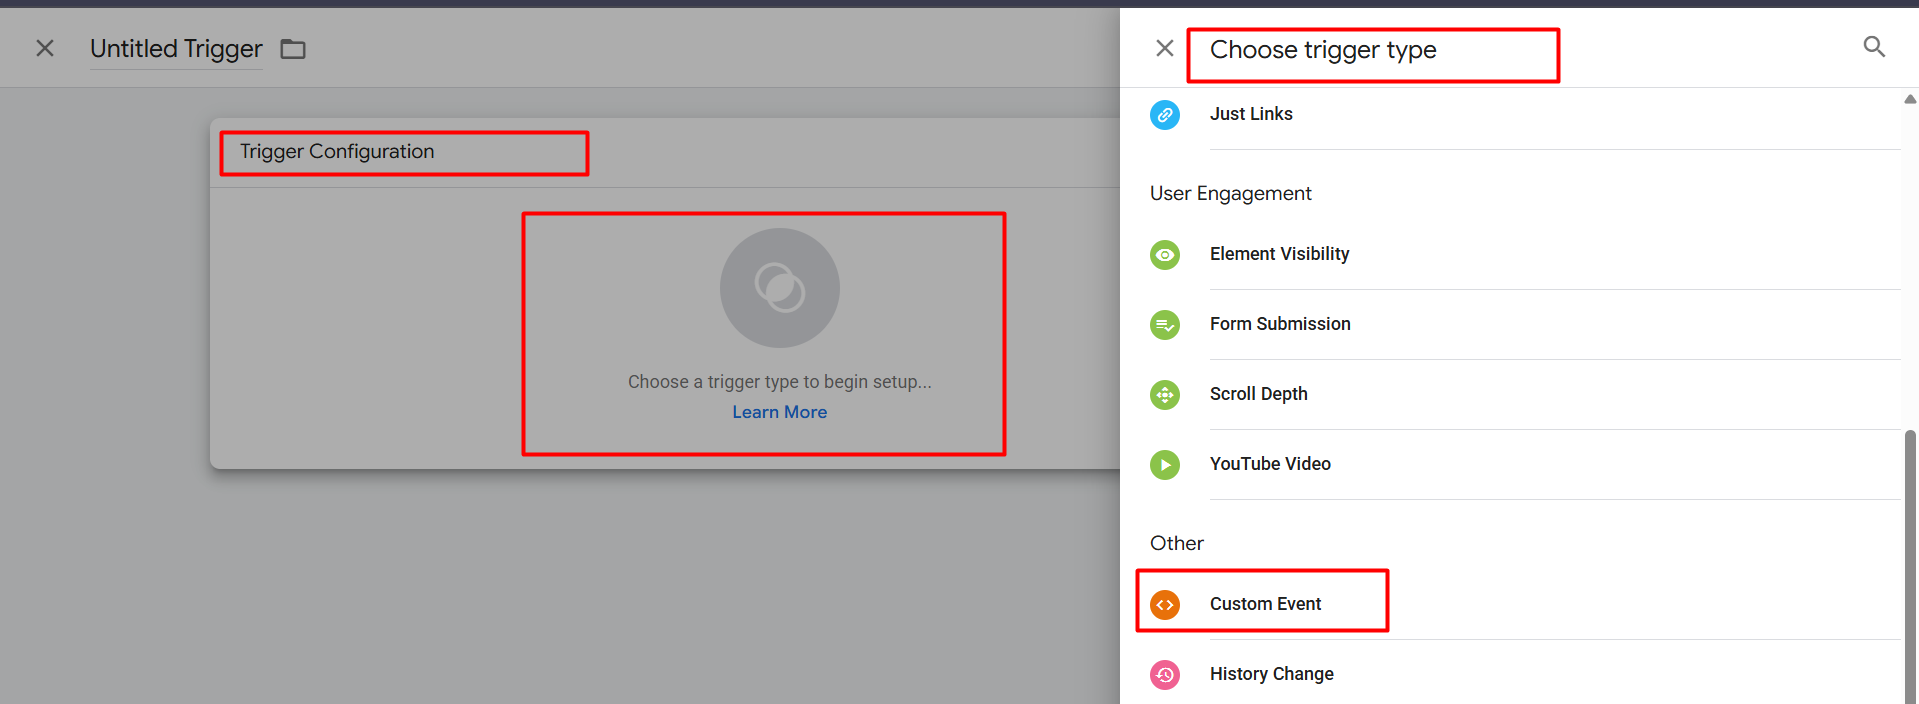
Select the trigger type and complete the setup of your trigger.
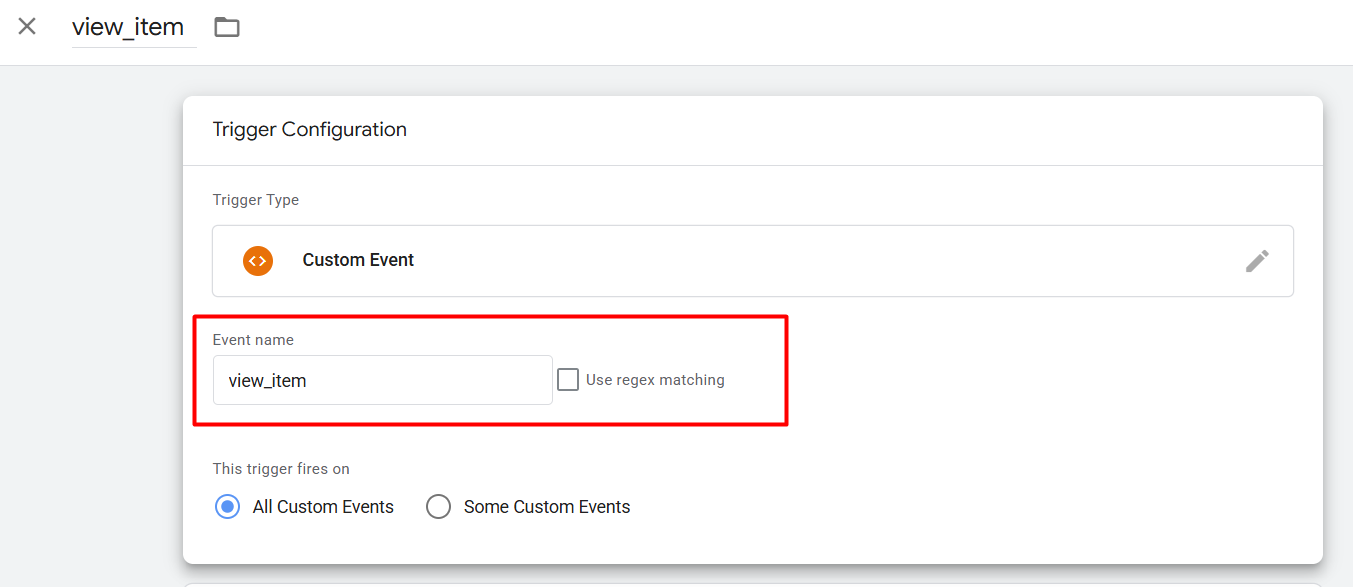
Here you can see in the place of the event name, we paste the event name that we copied from the data layer. So now your “ViewContent” event tag creation is done.
The Clear Concept Of GTM DataLayer
AddToCart: AddToCart This event gets fired whenever a visitor adds an product to their basket on your site. It’s an important event for observing user intent and product interest in eCommerce.
In the same way as “ViewContent,” we can set up the tag for this new event. But we just have to make changes as per the data layer in the trigger.
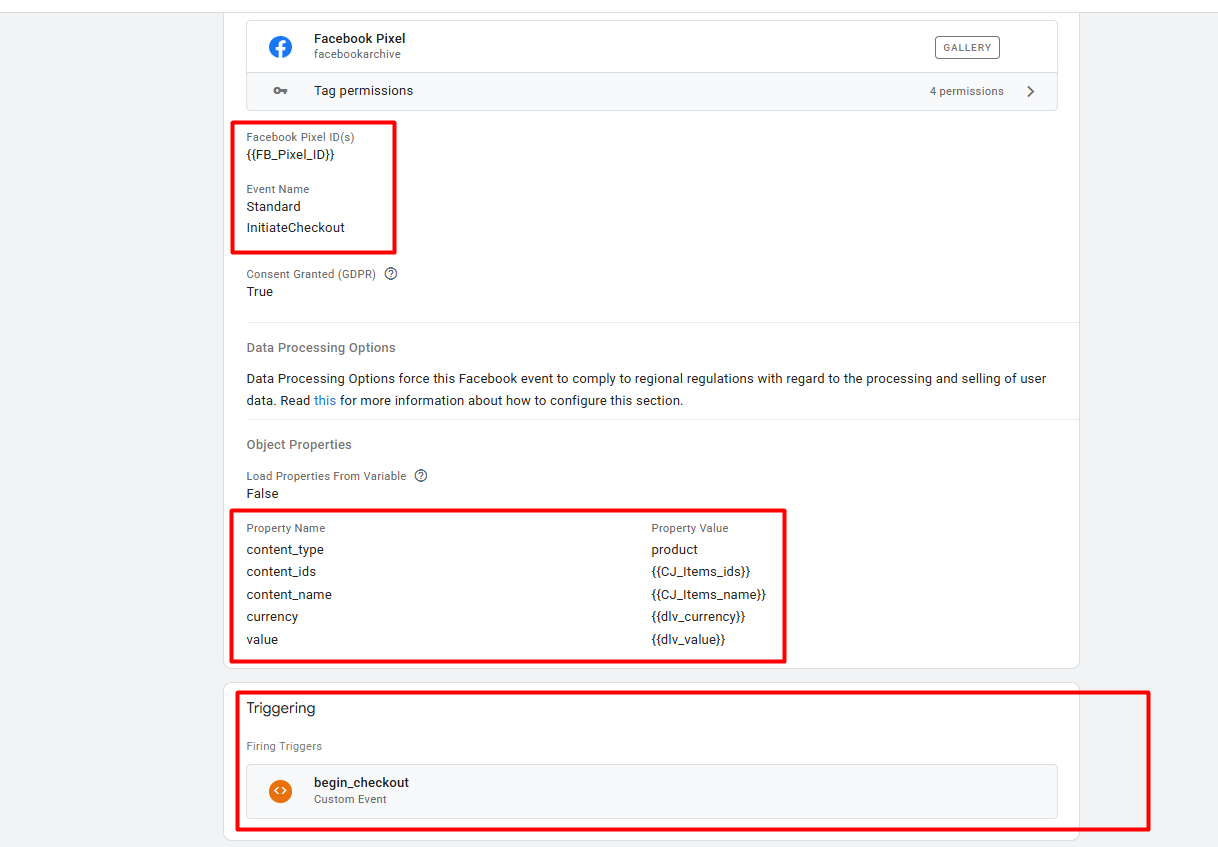
InitiateCheckout: The “InitiateCheckout” event is triggered when a user begins the checkout process on your website, typically when they click on the “checkout” button or reach the checkout page.
This tag setup process is also the same as the other. But here in the parameters we have to make some changes. Because I think sometimes a single customer can check out with a lot of products, not with a single product.
So that’s why we have to make a variable that will help us to collect all of the content names and IDs in a time.
By the way, do you know what the variable is?! In Google Tag Manager (GTM), a variable is a dynamic value that stores data (like page URL, product ID, or user actions) and can be used to customize tags and triggers based on specific conditions.
So at first we have to create one variable that will collect the total array of “items.” So go to the variable section > from the User-Defined Variables > create a new variable. To create the variable, you have to select the variable type.
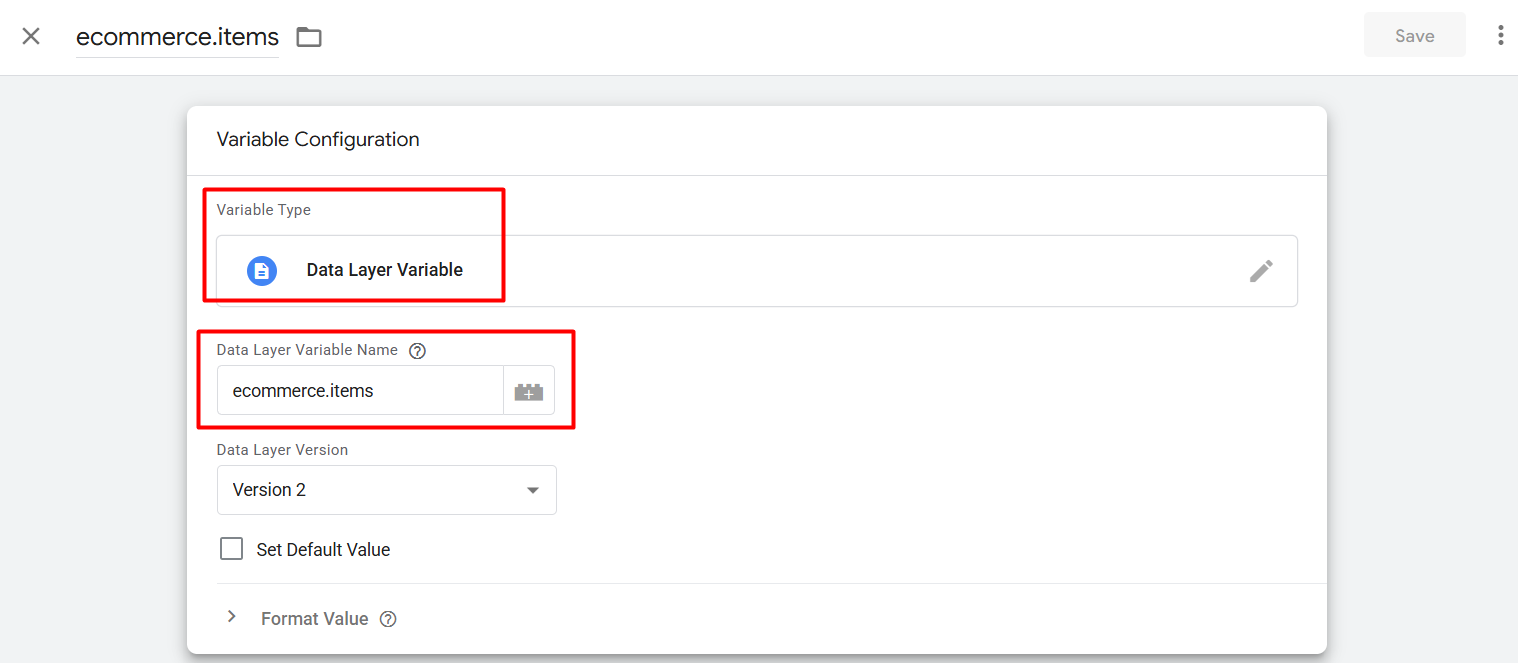
Select “Data Layer Variable” as your variable type and set up the variable like this. Now remember the variable name and one more new variable, but this time select “Custom JavaScript” as your variable type.
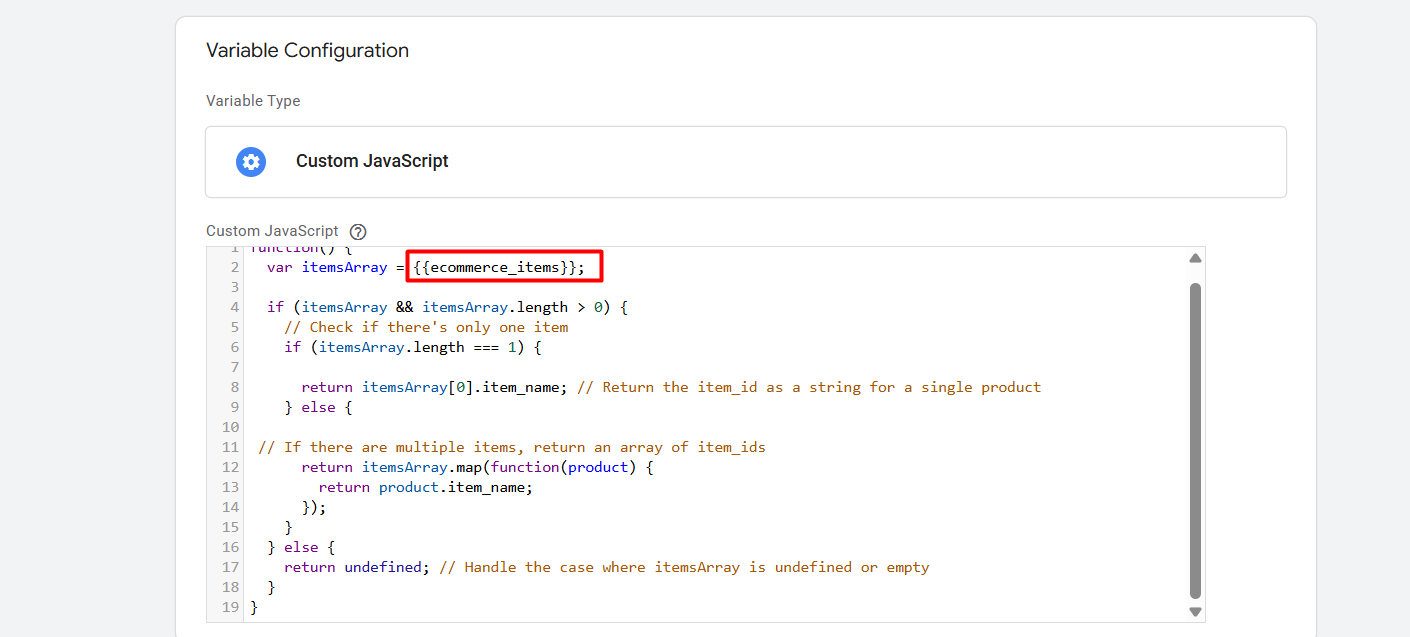
After selecting the variable type here, paste the code, and in the red mark place, change it as per your variable name. Save it; it will help you to collect the items’ names.
function() {
  var itemsArray = {{dlv - ecommerce_items}};

  if (itemsArray && itemsArray.length > 0) {
    // Check if there's only one item
    if (itemsArray.length === 1) {

      return itemsArray[0].item_name; // Return the item_id as a string for a single product
    } else {

 // If there are multiple items, return an array of item_ids
      return itemsArray.map(function(product) {
        return product.item_name;
      });
    }
  } else {
    return undefined; // Handle the case where itemsArray is undefined or empty
  }
}
Now we have to create one more variable to collect all of the items’ IDs. So again, go to variable and select the same variable type to create a new variable, but at this time use this new code.
function() {
  var itemsArray = {{dlv - ecommerce_items}};

  if (itemsArray && itemsArray.length > 0) {
    // Check if there's only one item
    if (itemsArray.length === 1) {

      return itemsArray[0].item_id; // Return the item_id as a string for a single product
    } else {

 // If there are multiple items, return an array of item_ids
      return itemsArray.map(function(product) {
        return product.item_id;
      });
    }
  } else {
    return undefined; // Handle the case where itemsArray is undefined or empty
  }
}
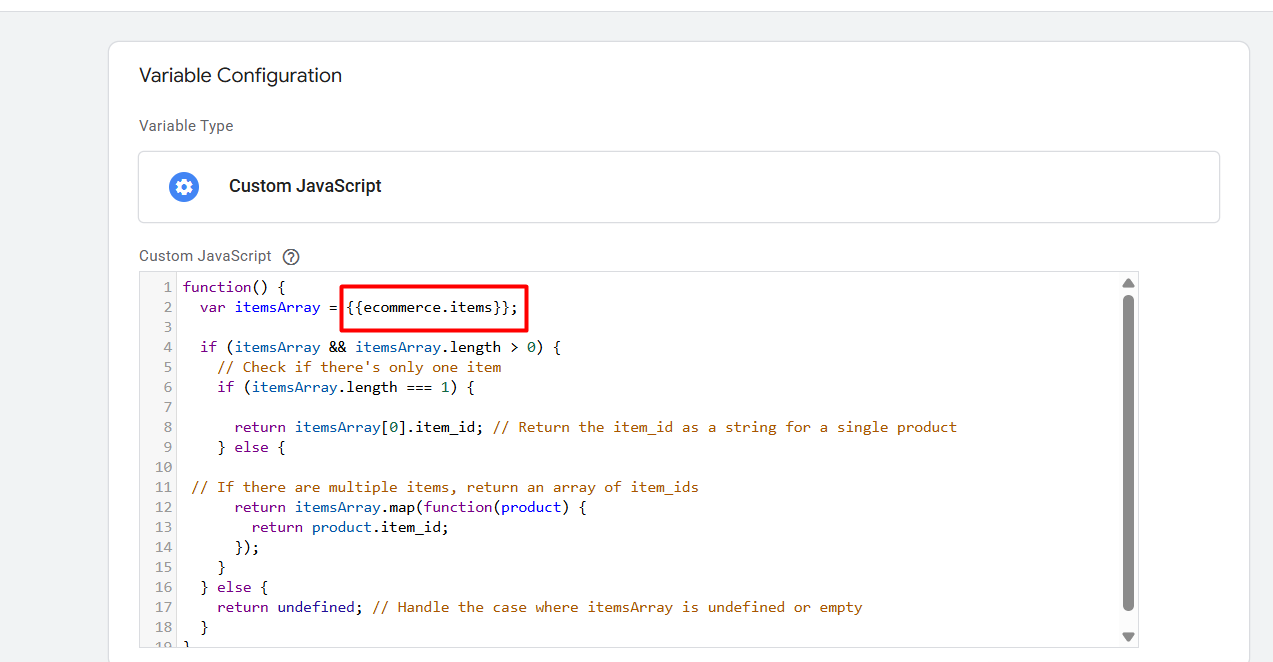
Here also, in the same way, you have to change the red mark as per your variable name. Now this one will help you to collect every item’s ID.
Great, your two new variables are now done to use. Right now we have to set up the “InitiateCheckout” event for Facebook.
For this tag, everything is also the same as “AddToCart” or “ViewContent,” but here we just have to make some changes in the parameters section.
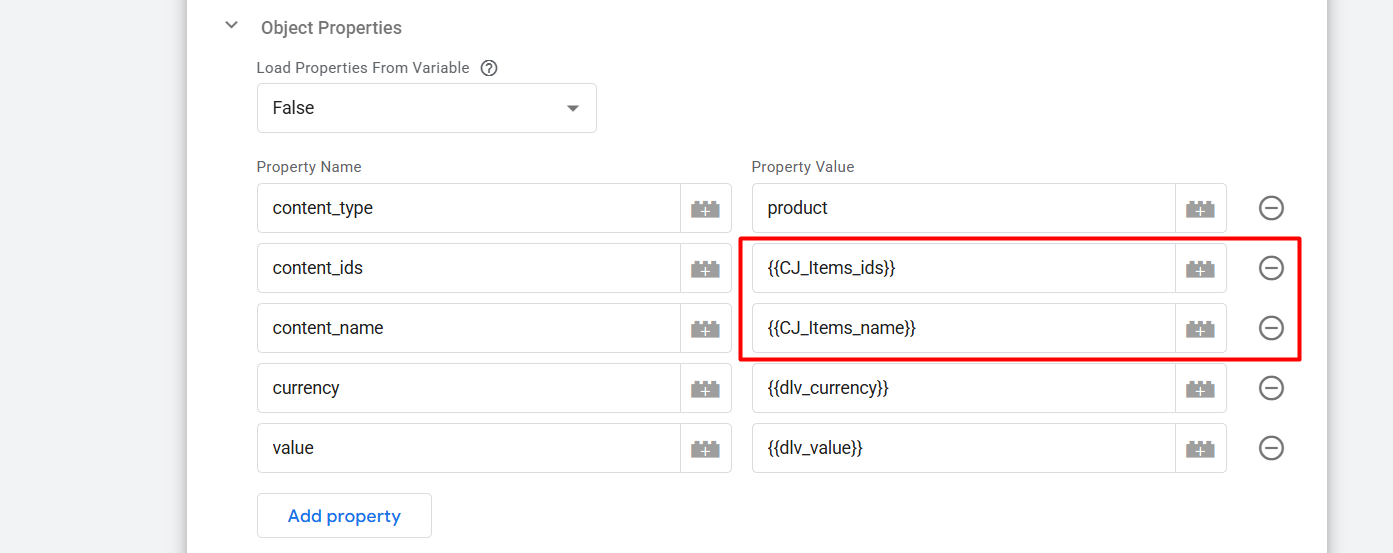
Here you can see we change the two properties with our newly created custom variables. With this step the variable or property section is now ready to send perfect parameters to Facebook for this “InitiateCheckout” event.
So now just easily change the trigger section with custom events for “InitiateCheckout.” And also don’t forget to change the event name also.
Purchase: The “Purchase” event is triggered when a user successfully completes a transaction on your website, typically after the payment process.
This is our final event to complete the Facebook pixel conversion tracking. So to complete this event we can follow the same structure we follow for “Checkout” events. But here we just have to send one more new parameter in the name of “order_id,” and the other thing is the same.
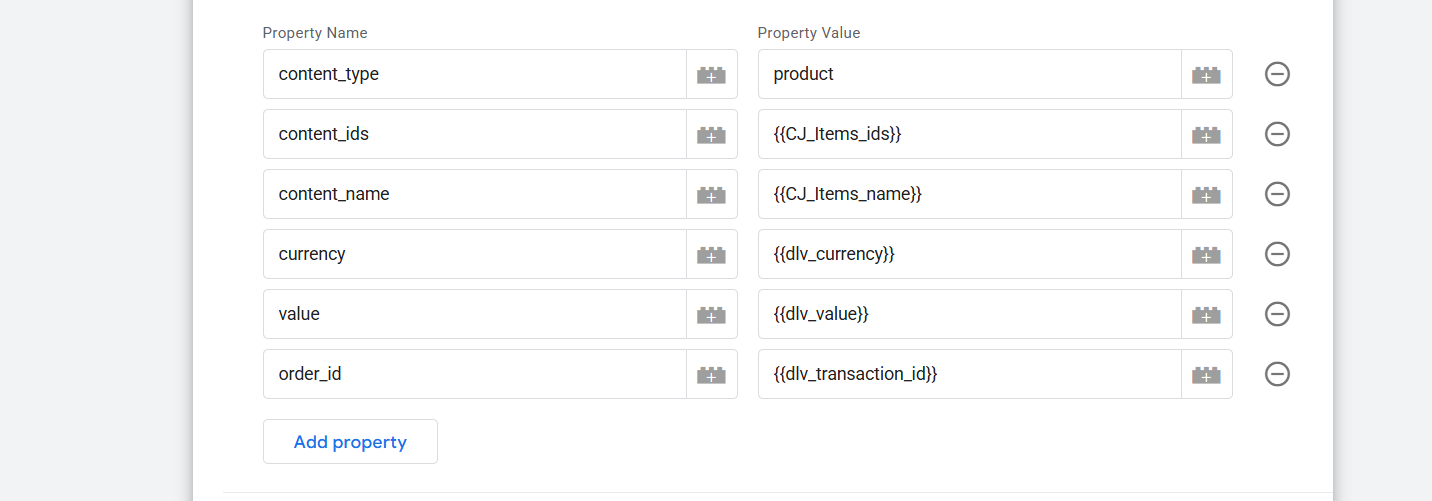
With the order ID we will send the “Transaction ID” to Facebook. Here in the property section you should follow the way we did for the property name. But for the value, you can set the name as you want at the time of this variable creation.

Here you can see how we created the transaction_id variable. You can do it as per your data layer.
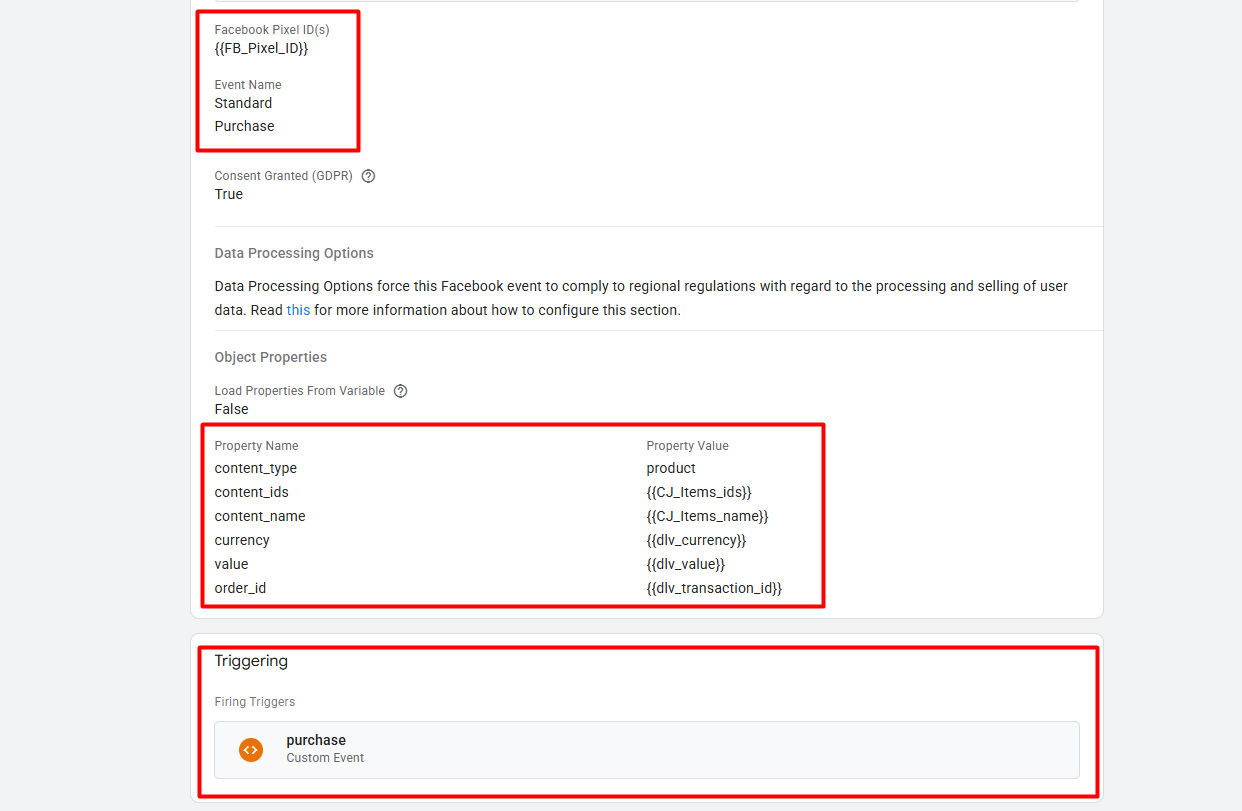
Here you can see how we complete the tag for the “Purchase” event. So with the “Purchase” event, we successfully complete all of the standard event setups for our Facebook pixel.


