
In the rapidly evolving landscape of digital advertising, setting up the “User Provided Data Event” or Enhanced Conversions is no longer a luxury for maximizing your Google Ads campaign effectiveness—it’s an essential step. The primary reason for completing this setup is to significantly boost the accuracy of your conversion tracking.
We all know that stricter browser privacy policies and the eventual deprecation of third-party cookies cause traditional tracking methods to miss substantial amounts of data. In this environment, the “User Provided Data Event” offers a ‘privacy-safe’ solution. When a user completes a purchase or submits a form on your site, this system securely hashes the first-party data they provide—such as their email address, phone number, or physical address—using SHA256 encryption before sending it to Google Ads.
This process allows Google to correctly identify the user associated with your ad click, even if that user completes the conversion later on a different device or browser. The benefits of this accurate data matching are significant:
- Accurate Reporting: You gain a clear view of exactly how many conversions came from your ads, making it easier to measure your true Return On Ad Spend (ROAS).
- Superior Bidding Optimization: Google Ads’ smart bidding algorithms now rely on more robust and reliable data to adjust bids. Consequently, your ads are more likely to reach prospective customers who have the highest probability of converting.
- Reduced Data Loss: You recover a large portion of conversion data that would otherwise be lost due to cookie restrictions and privacy limitations.
Ultimately, by setting up this event, you’re not just checking off a technical task; you are future-proofing your Google Ads campaigns and empowering them with the best possible data for powerful, data-driven success.
So let’s start the setup. But if you are going to complete this setup, first you have to complete Mastering Google Ads E-commerce Tracking
Start the User-Provided Data Event Setup With GTM
Through this we will send our customer-provided data to Google Ads. So at first we have to confirm the place of data. It’s like we can get this type of data every time after someone completes one purchase or fills out one lead form.
If you already know the data layer, then you also know the format of data we get after every time someone completes one purchase.
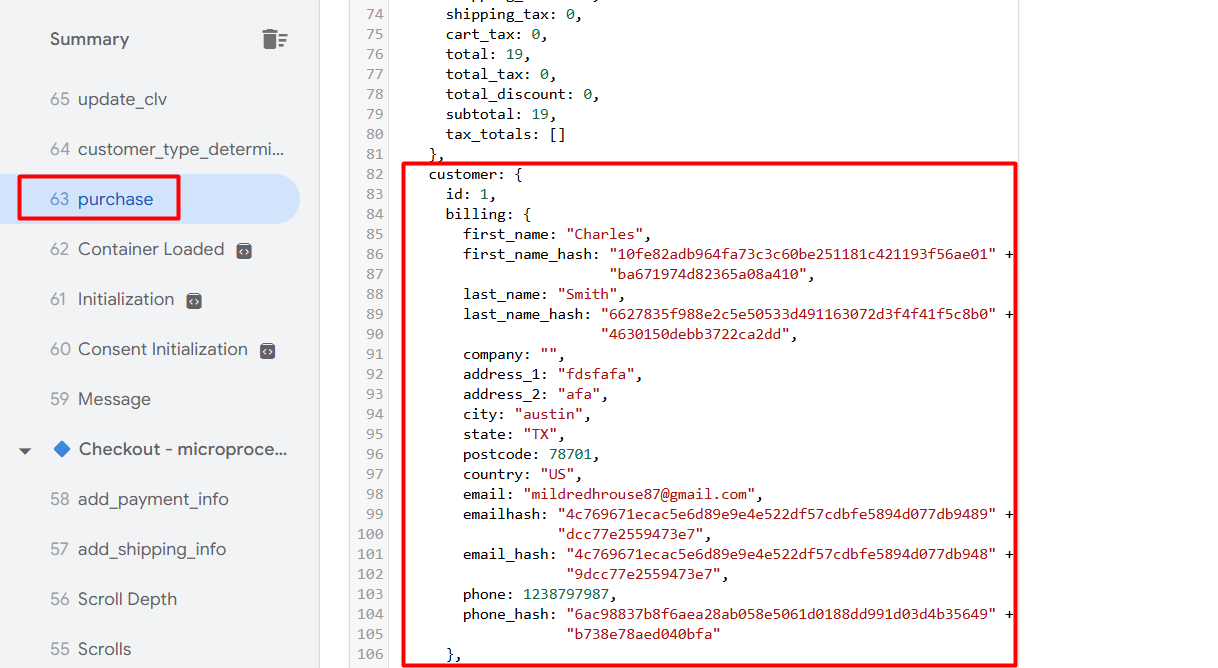
Here you can see. After completing the purchase, we got this data. So now through the “Google Ads User Provided Data Event,” we will send all this data to the Google Ads account. Let’s start it.
First go to your GTM and choose the variable section. Because first we have to create some variable to collect all of this data from our data layer to send to Google Ads accounts.
Variables Creation For event
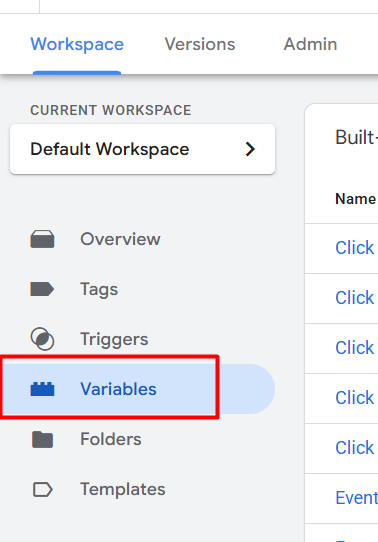

In the variables section we will create every single needed variable under the “User-Defined Variables.”
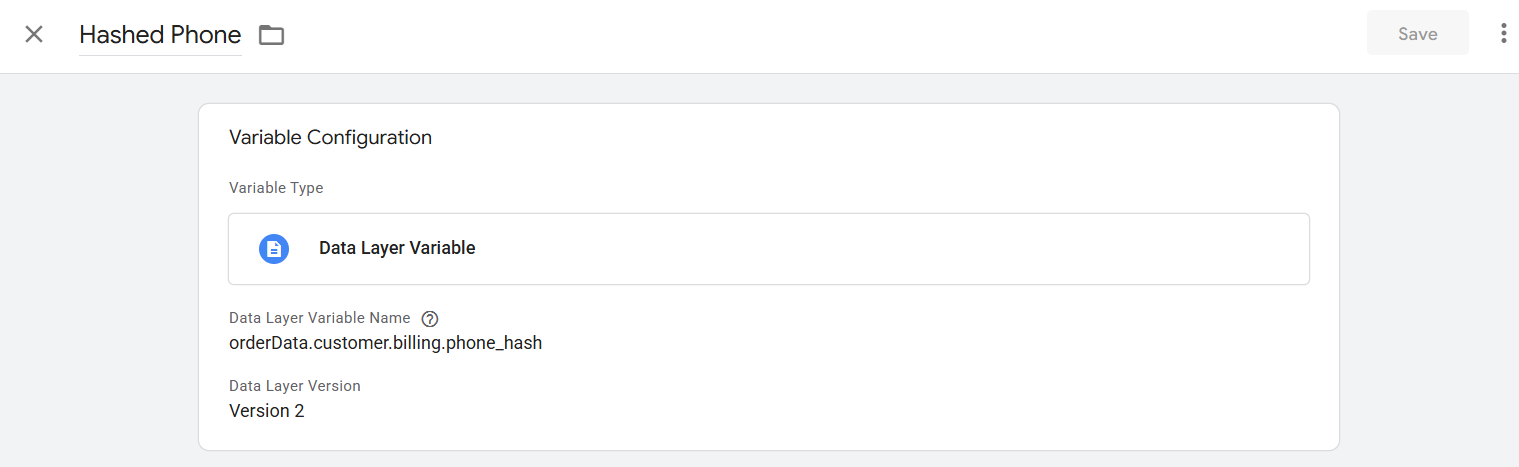
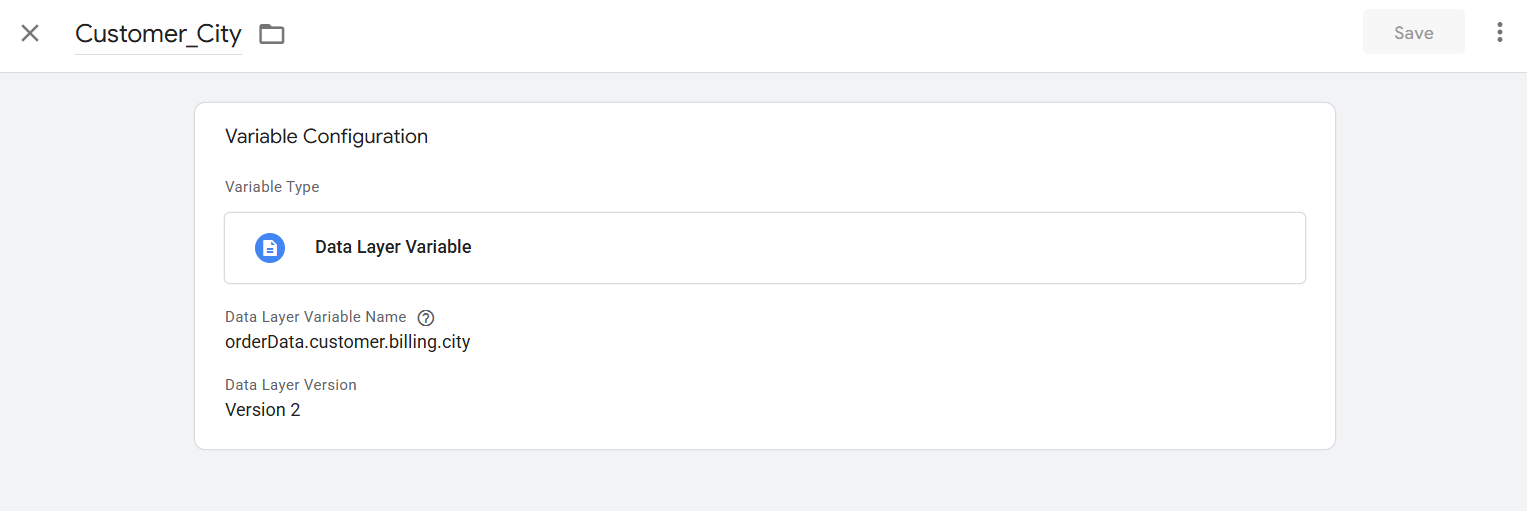
At first we will create one variable to collect the user email address, so click on the new button and select “Data Layer Variable” as your variable type.
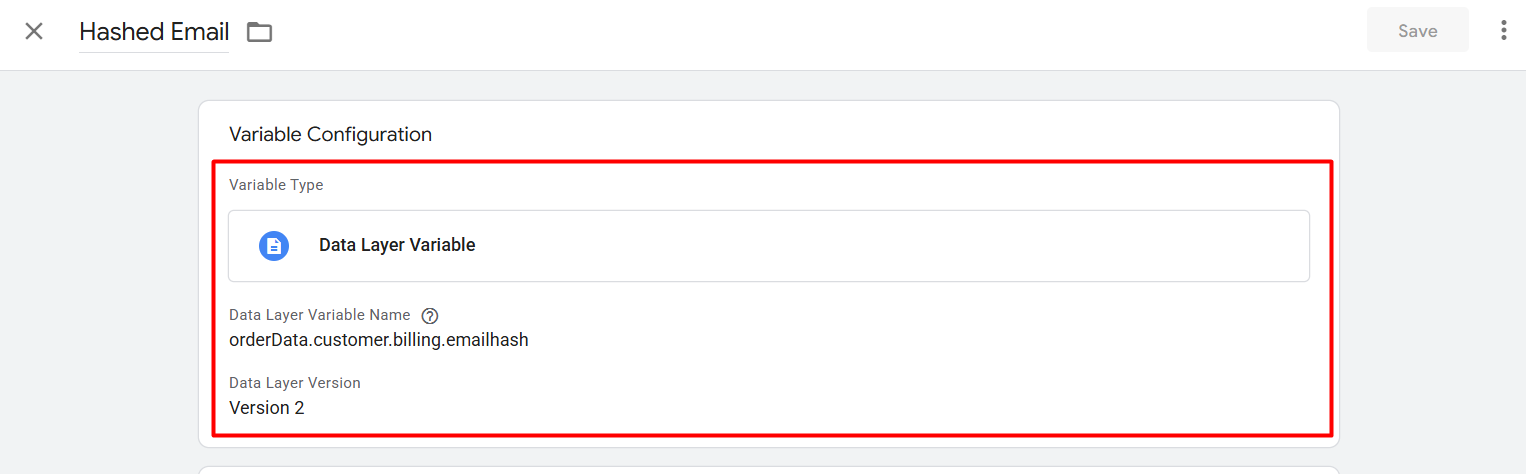
Now here you can see in which way we complete the setup of this variable. If you already know about the data layer, then I hope you got why we follow the structure. The value “emailhash” is under the “billing” object, and the billing is under the “customer” object, and lastly the customer is under the “orderData” object. That’s why we follow this way: object.object.object.value.
Here in the picture you can see. For the reason we did it. For more details you can read this article: The Clear Concept Of GTM DataLayer
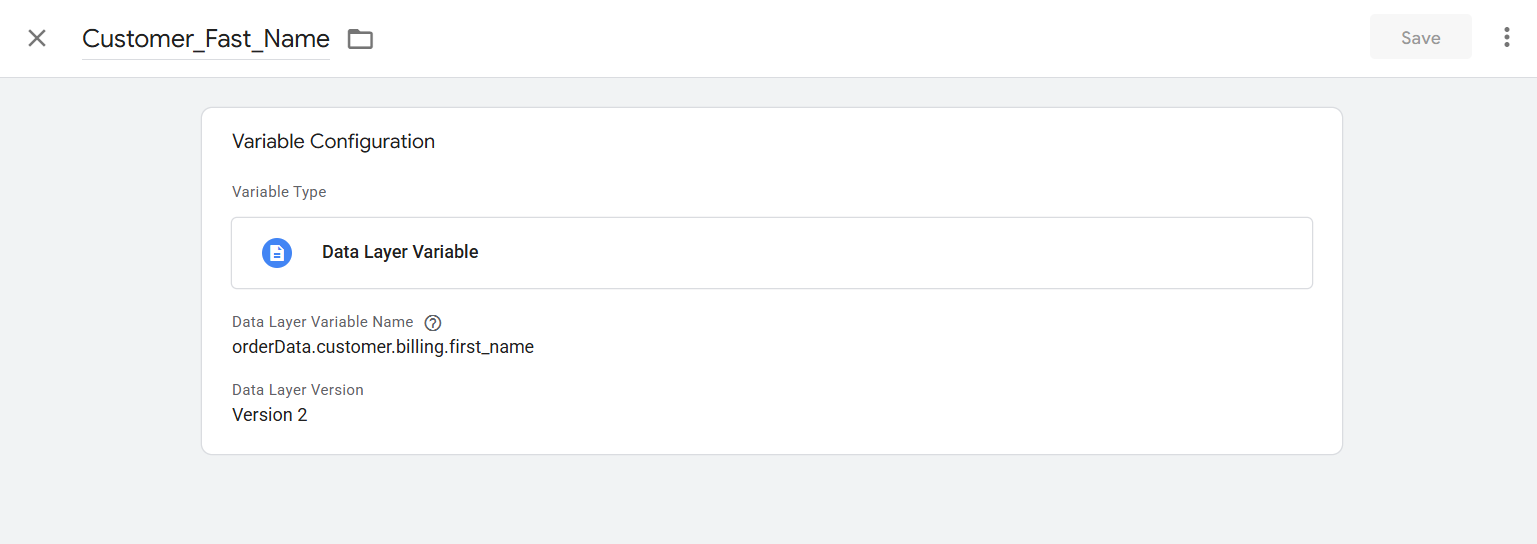
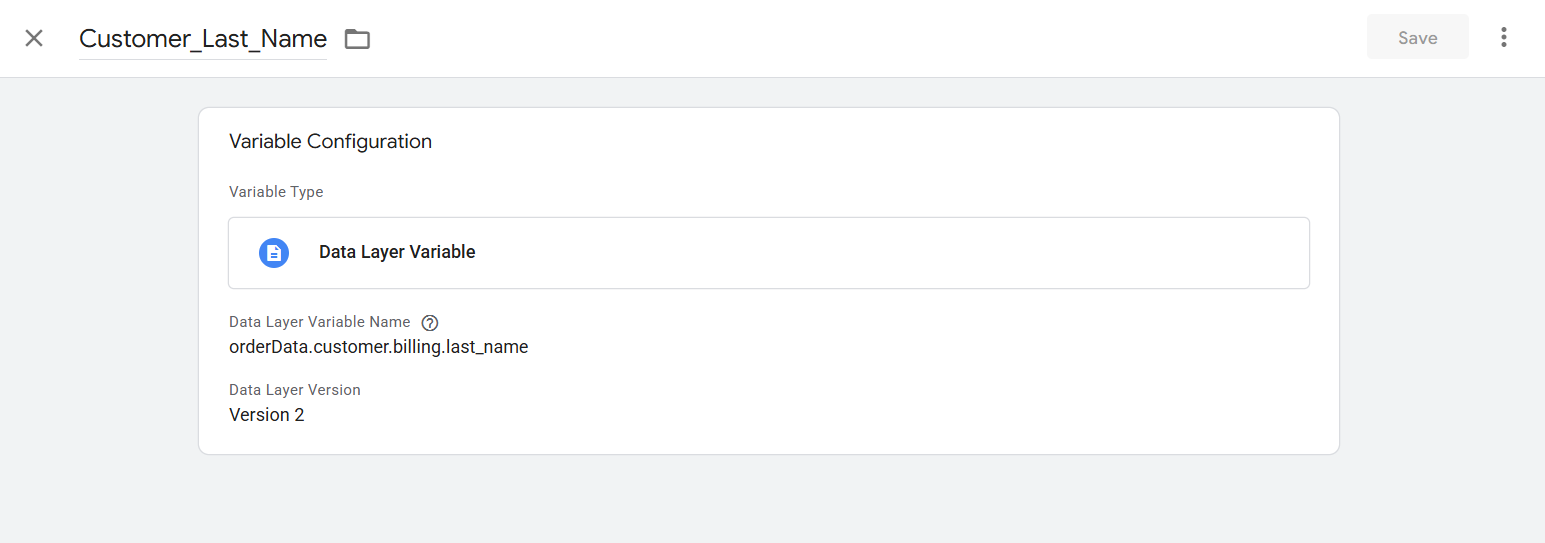
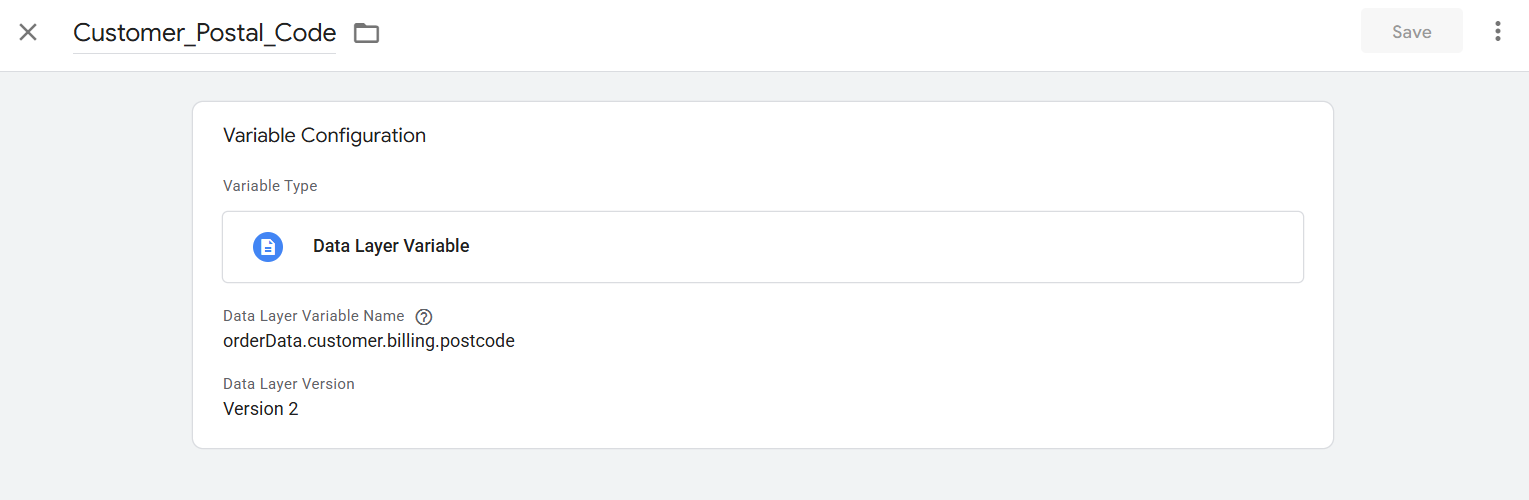
Now in the same way, let’s complete the phone number, first name, last name, street, city, region, country, and postal code.
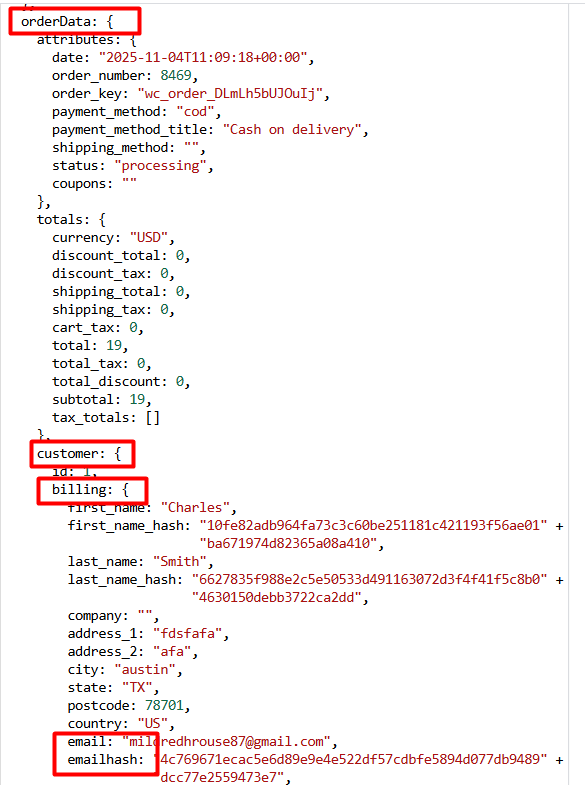
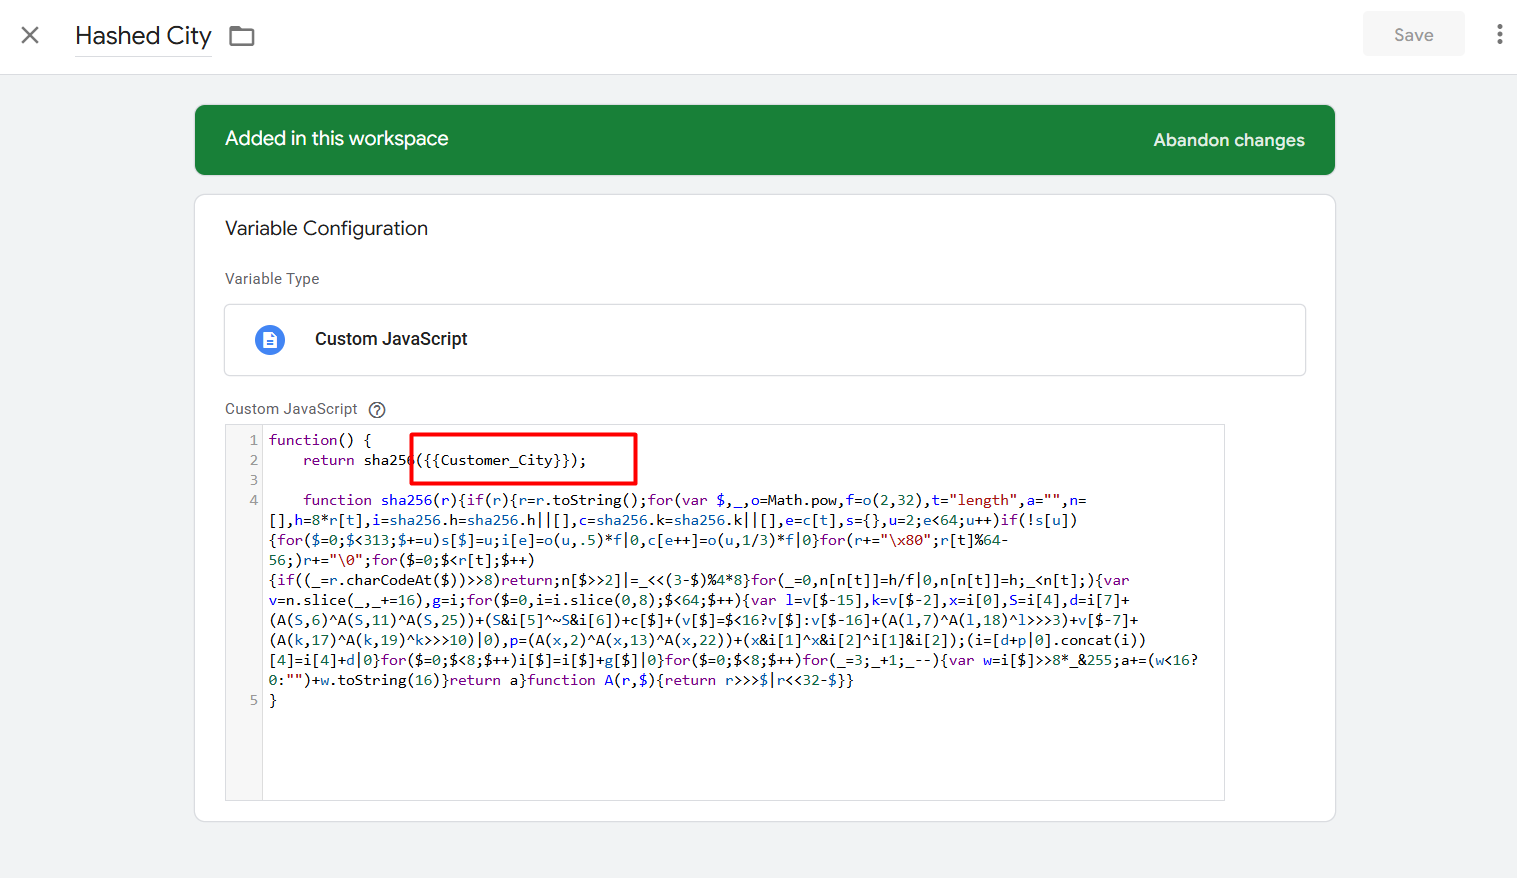
Great in the way we have to complete every single variable to collect every single piece of data perfectly. But now we have to do one more thing here. You can see in the picture of our data layer we already got some value in hash format, but the other data are not in hashed format. So now we have to make variables to make them hashed. Because it’s the standard rule by Google.
Making the hashed format
To do it again, go to your variable section and at the time select “Custom Javascript” as your variable type. At that time we will create a variable with custom JavaScript code for every single variable that we want to transform into a hashed format.
So first copy the code
function() {
return sha256({{value}});

function sha256(r){if(r){r=r.toString();for(var $,_,o=Math.pow,f=o(2,32),t="length",a="",n=[],h=8*r[t],i=sha256.h=sha256.h||[],c=sha256.k=sha256.k||[],e=c[t],s={},u=2;e<64;u++)if(!s[u]){for($=0;$<313;$+=u)s[$]=u;i[e]=o(u,.5)*f|0,c[e++]=o(u,1/3)*f|0}for(r+="\x80";r[t]%64-56;)r+="\0";for($=0;$<r[t];$++){if((_=r.charCodeAt($))>>8)return;n[$>>2]|=_<<(3-$)%4*8}for(_=0,n[n[t]]=h/f|0,n[n[t]]=h;_<n[t];){var v=n.slice(_,_+=16),g=i;for($=0,i=i.slice(0,8);$<64;$++){var l=v[$-15],k=v[$-2],x=i[0],S=i[4],d=i[7]+(A(S,6)^A(S,11)^A(S,25))+(S&i[5]^~S&i[6])+c[$]+(v[$]=$<16?v[$]:v[$-16]+(A(l,7)^A(l,18)^l>>>3)+v[$-7]+(A(k,17)^A(k,19)^k>>>10)|0),p=(A(x,2)^A(x,13)^A(x,22))+(x&i[1]^x&i[2]^i[1]&i[2]);(i=[d+p|0].concat(i))[4]=i[4]+d|0}for($=0;$<8;$++)i[$]=i[$]+g[$]|0}for($=0;$<8;$++)for(_=3;_+1;_--){var w=i[$]>>8*_&255;a+=(w<16?0:"")+w.toString(16)}return a}function A(r,$){return r>>>$|r<<32-$}}
}
From here, in the place of “value,” change it with your variable name in the way.
If you did it in the way, then you will get the value in the way.

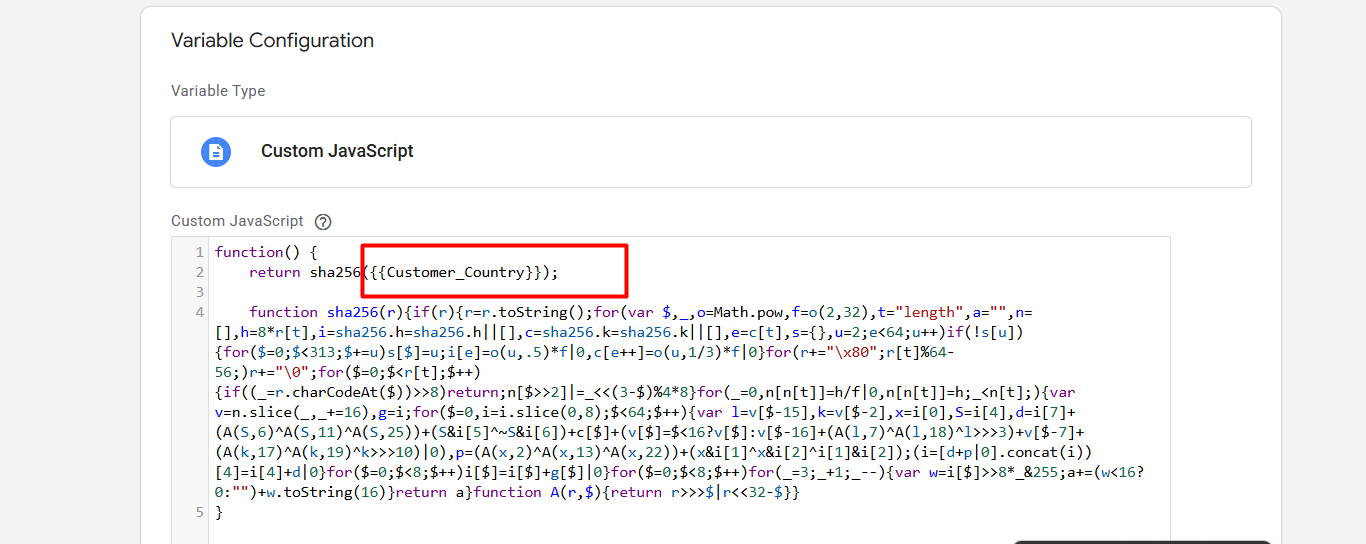
In the same way, you have to create more variables for the rest of the variables to transform into hashed.
In a way, create variables for every single variable that will collect for you the user-provided data. So at this time your variable is now ready to use in the tag.
Now we have to create one more variable that will collect all of the variables that we create at the time.

So to do it, create one more new variable, and at that time the variable type will be “User-Provided Data.” Select it.
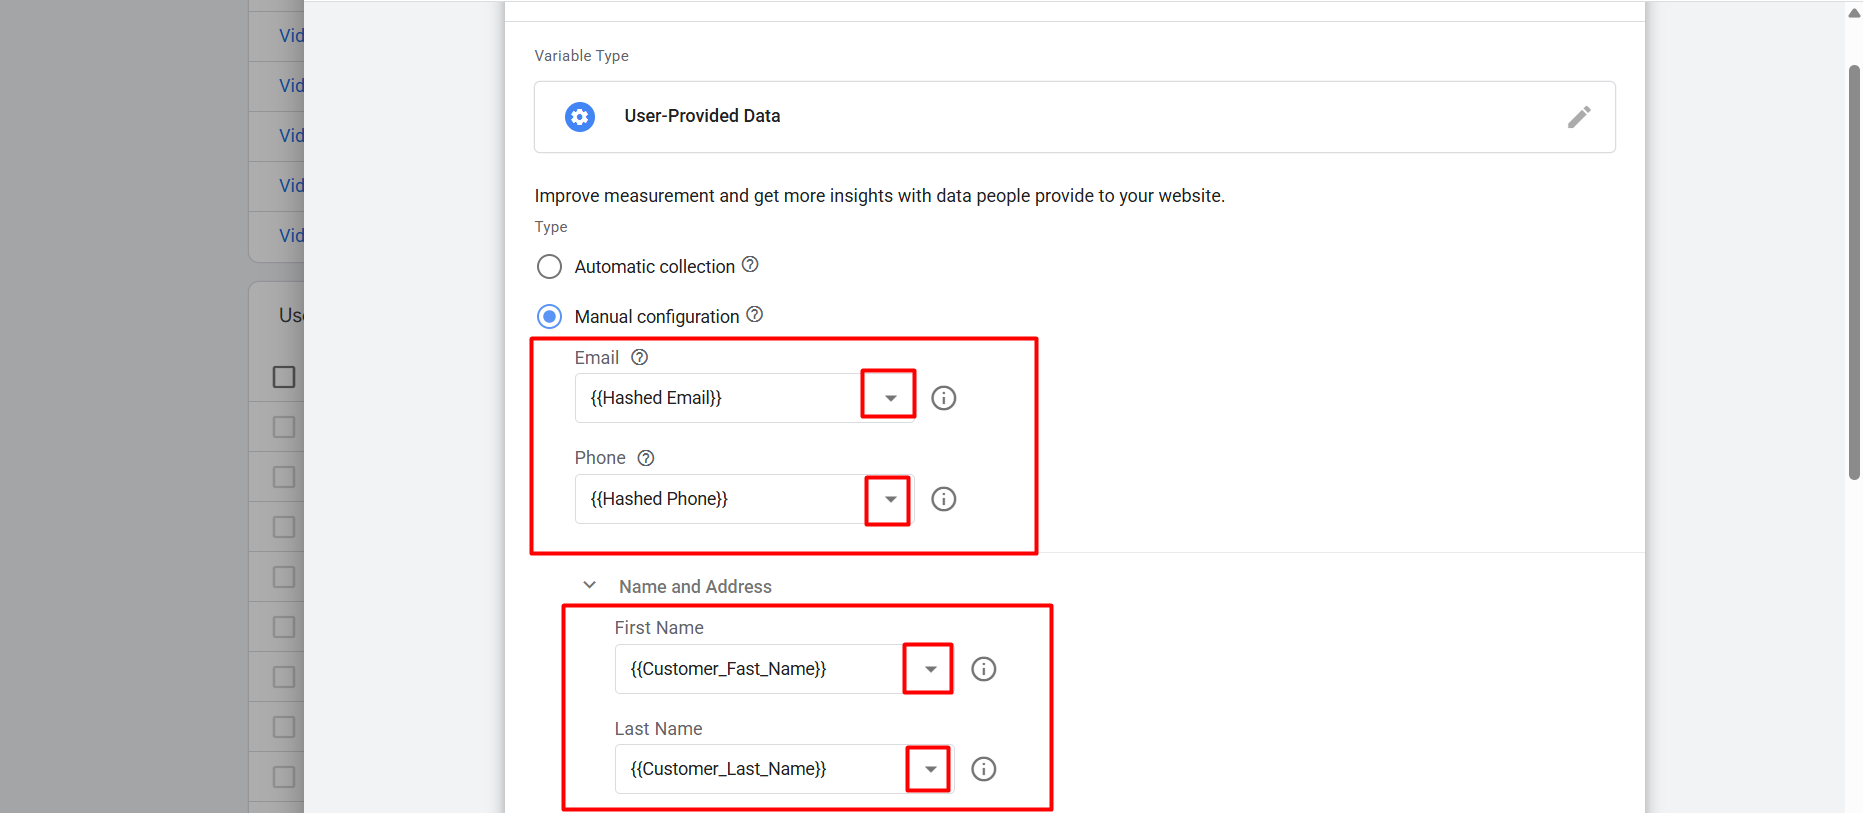
After selecting the variable type, now go to every box, and as per box, pick the right variable we created. In the way, fill up every box of theirs. But if some of your business is service-based, then there’s a chance that you can just get the customer’s email and phone number. Don’t worry; go with them and leave another box empty. Save.
Set up Google Ads user-provided data events
To set up the tag, go to your tag section in your tag manager and create a new tag.
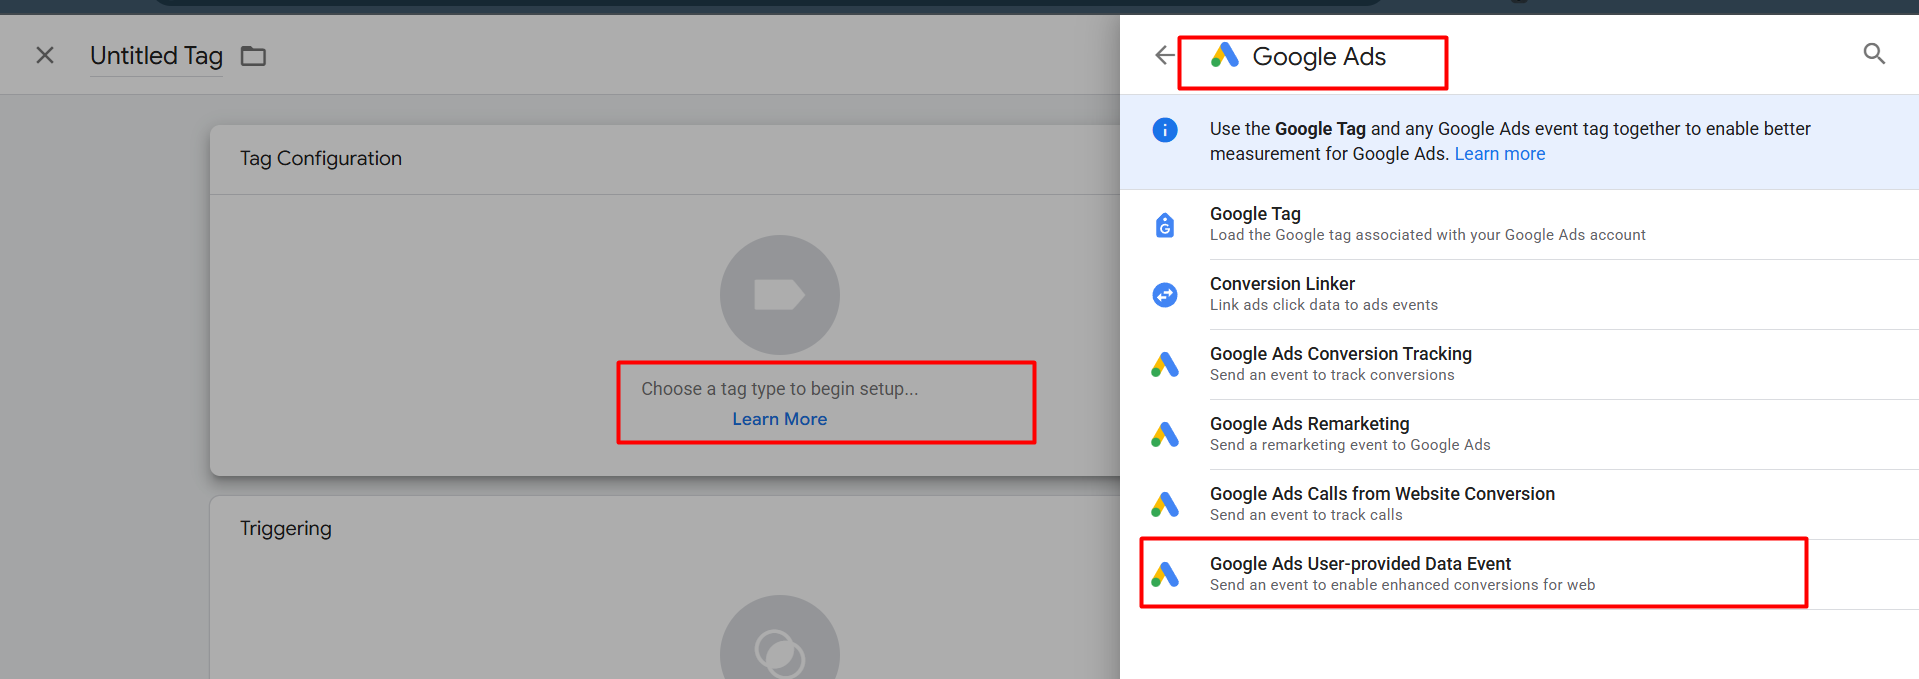
Now from here, as your tag type, select “Google Ads user-provided data event.” Let’s go.
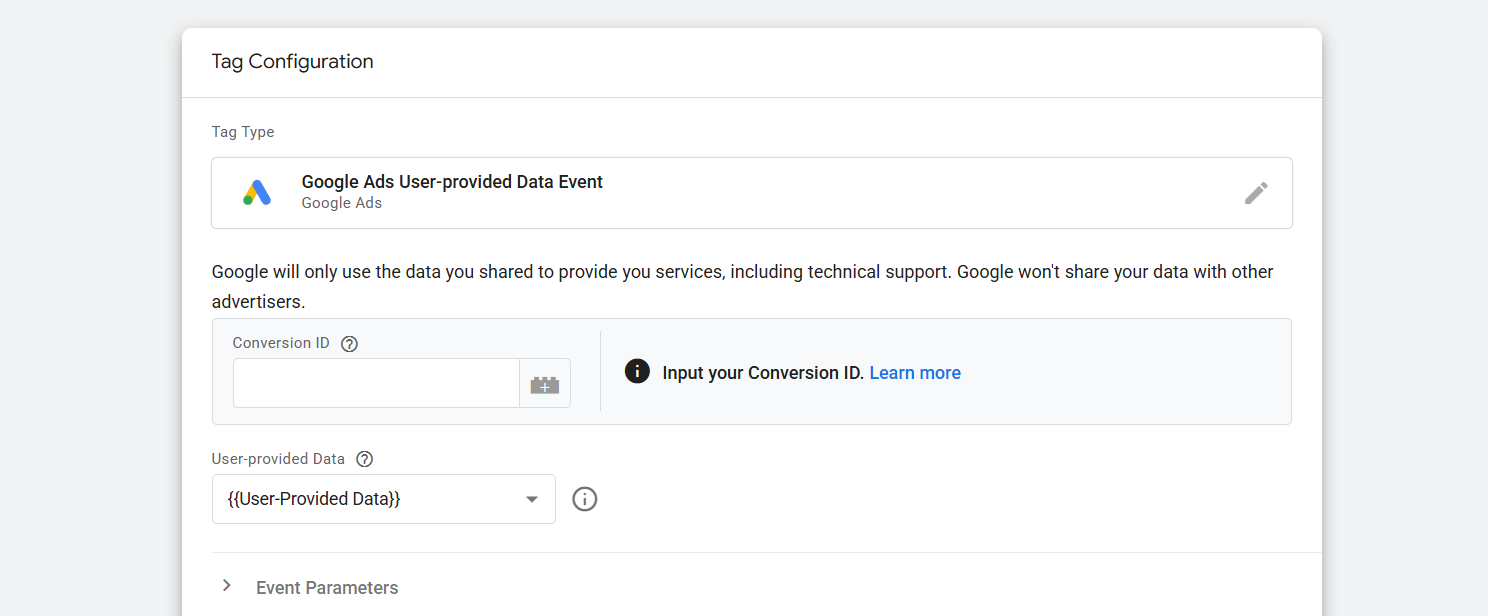
This is the view you will get after selecting the tag. Here in the place of “Conversion ID,” place your conversion ID, which you already get at the time of creating the other conversion for your Google Ads. For an account, the conversion ID is the same every time.
After that, in the place of “User provided Data,” you can see we just select the last created variable, which is the one collecting all of the customer data in one place.
Now it’s time to set up the trigger. I want to set up the trigger at the time of purchase. Because every time when someone completes one purchase, we will get this type of data. But you can do it as per your need.

Save. Well done, your setup is now online. Every time when this tag fires, it will share all of the info with your Google Ads account.


