Pinterest is a great platform. The world called Pinterest the visual search engine of Google. That’s why it can be a great place for us to grow our business.
And then here comes the analytics work. If you want to grow your business, then definitely you have to understand the traffic behavior. Especially when you are running a paid campaign, then definitely you have to complete your Pinterest pixel tracking. So let’s start it.
Pinterest Tag ID
Before starting the setup in Google Tag Manager for our Pinterest conversion tracking, first we have to collect the Tag ID from the Pinterest “Manage Business” section.
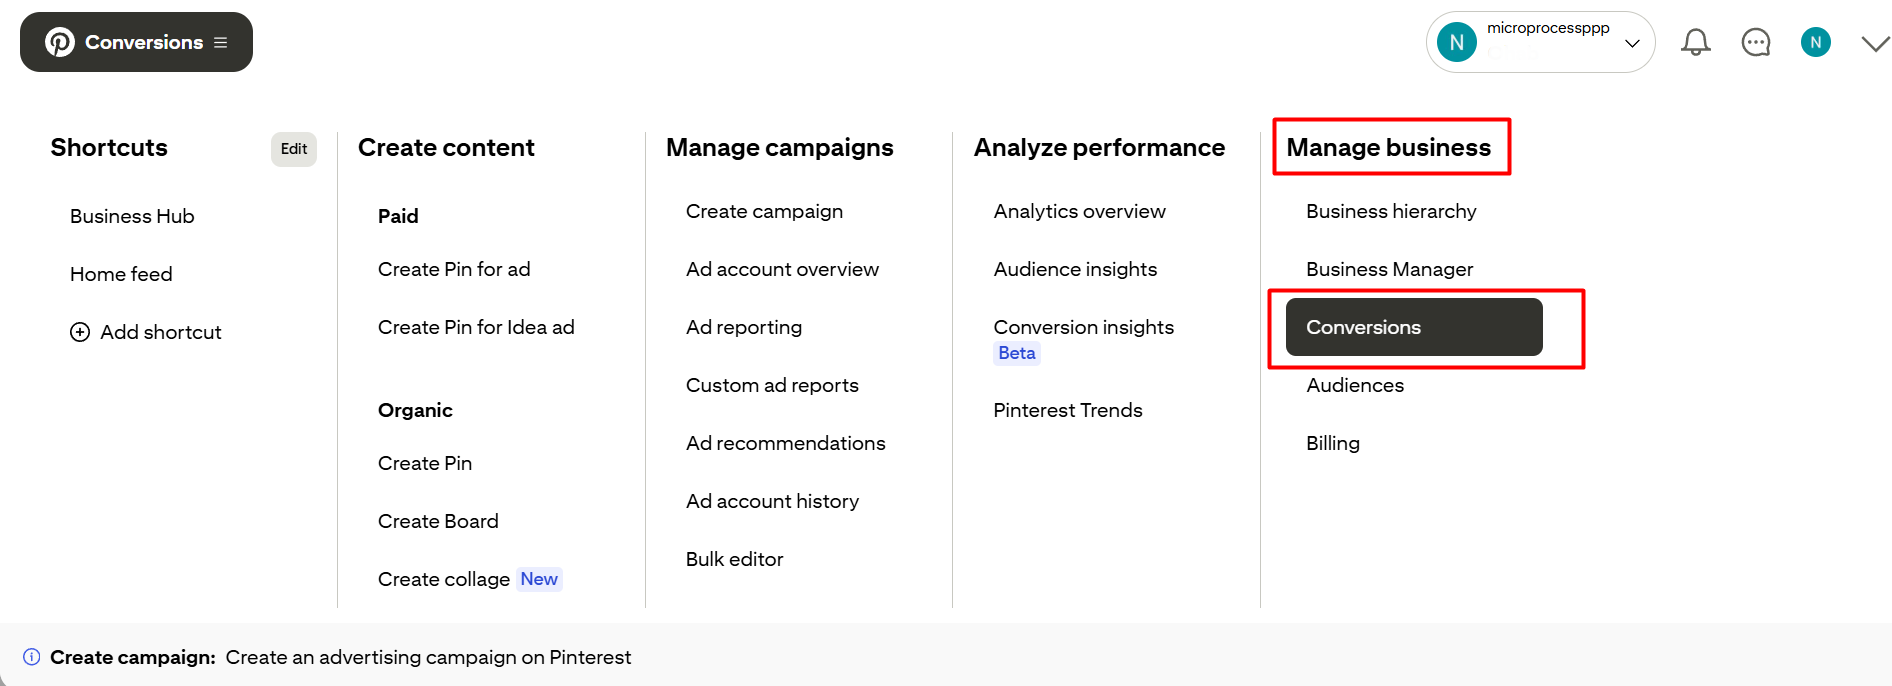
From here, select the Conversion Section.
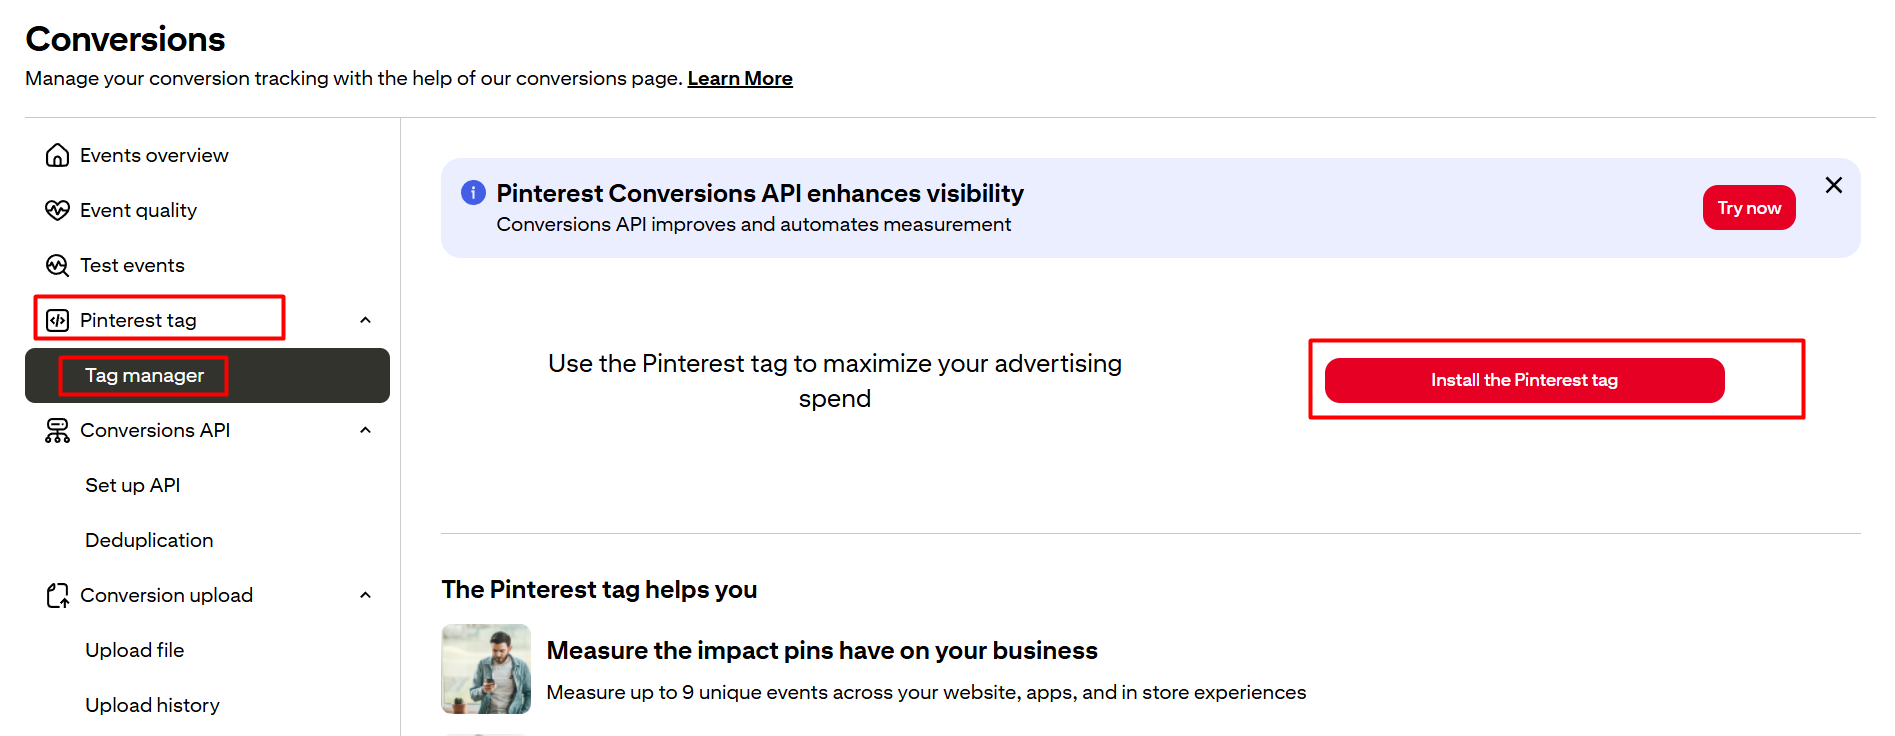
Click on “Install the Pinterest Tag.”
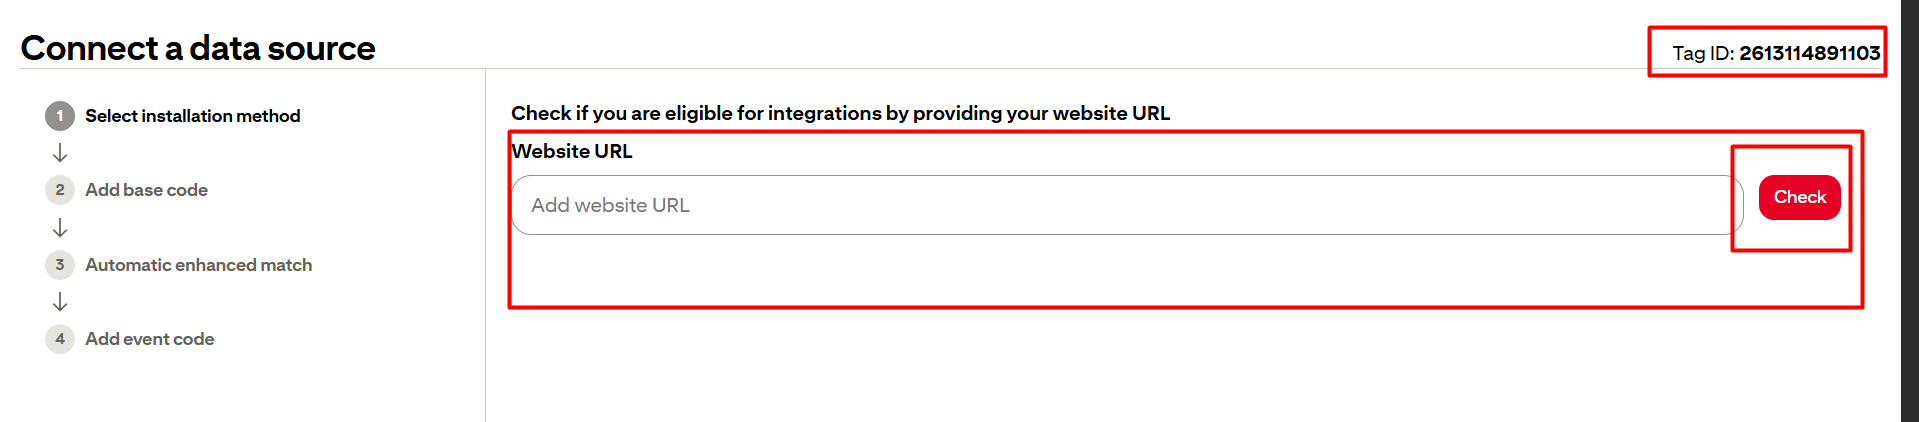
Now place your URL and check.
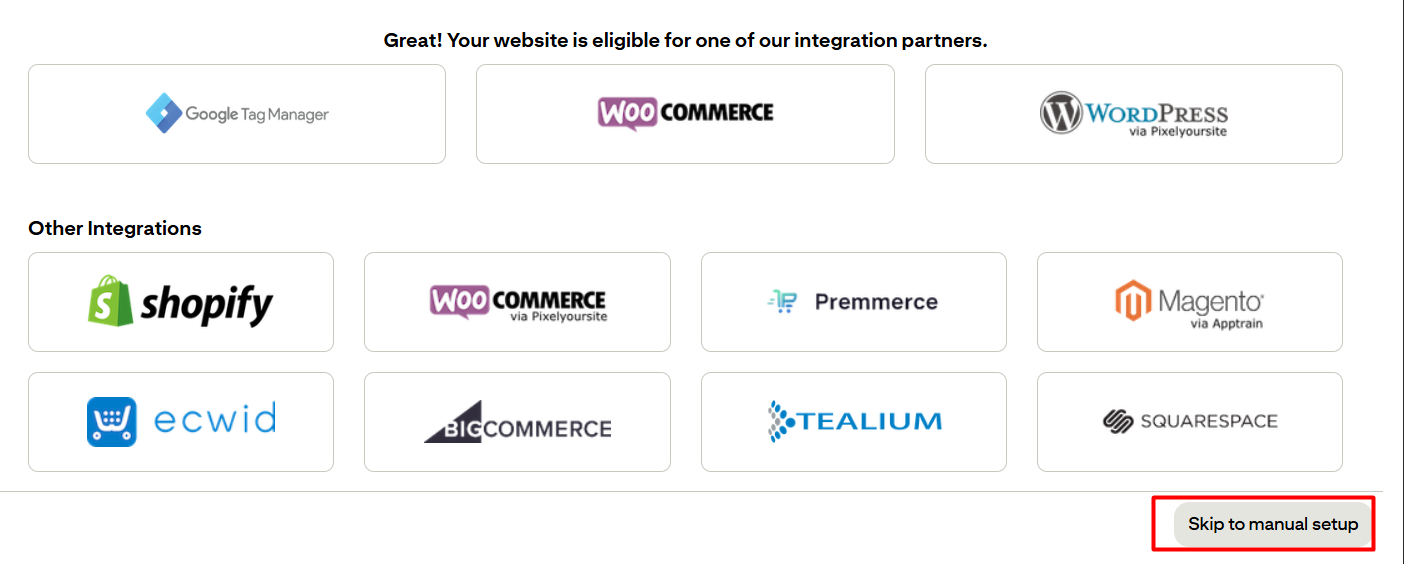
From here, select the “Skip to manual setup” option.
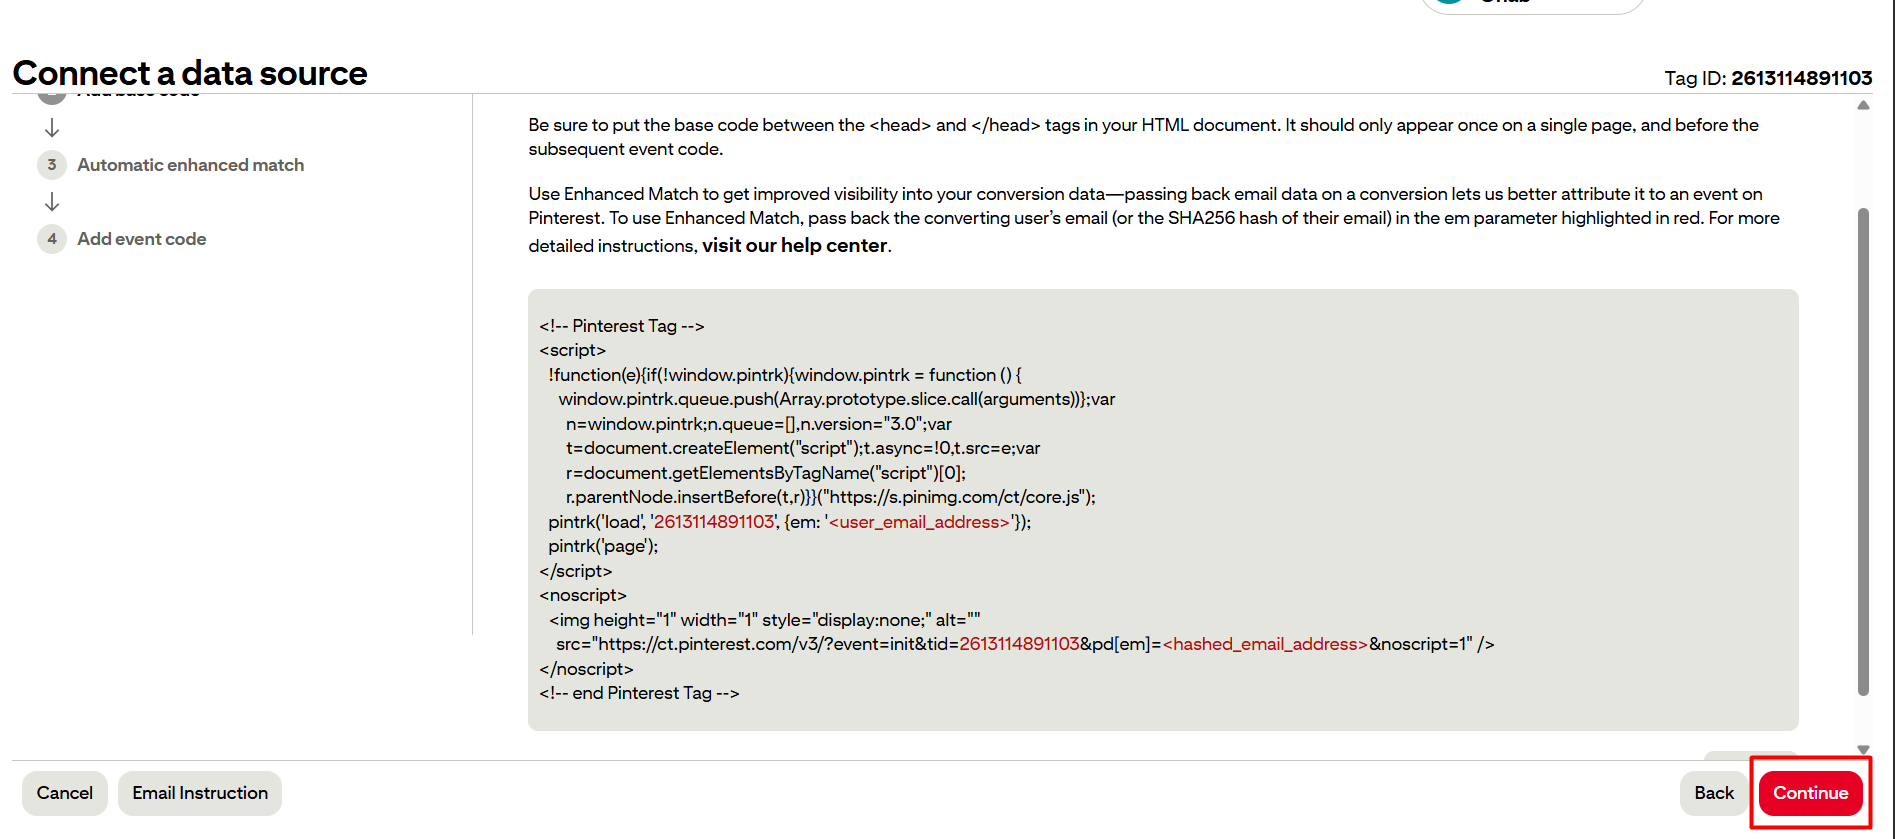
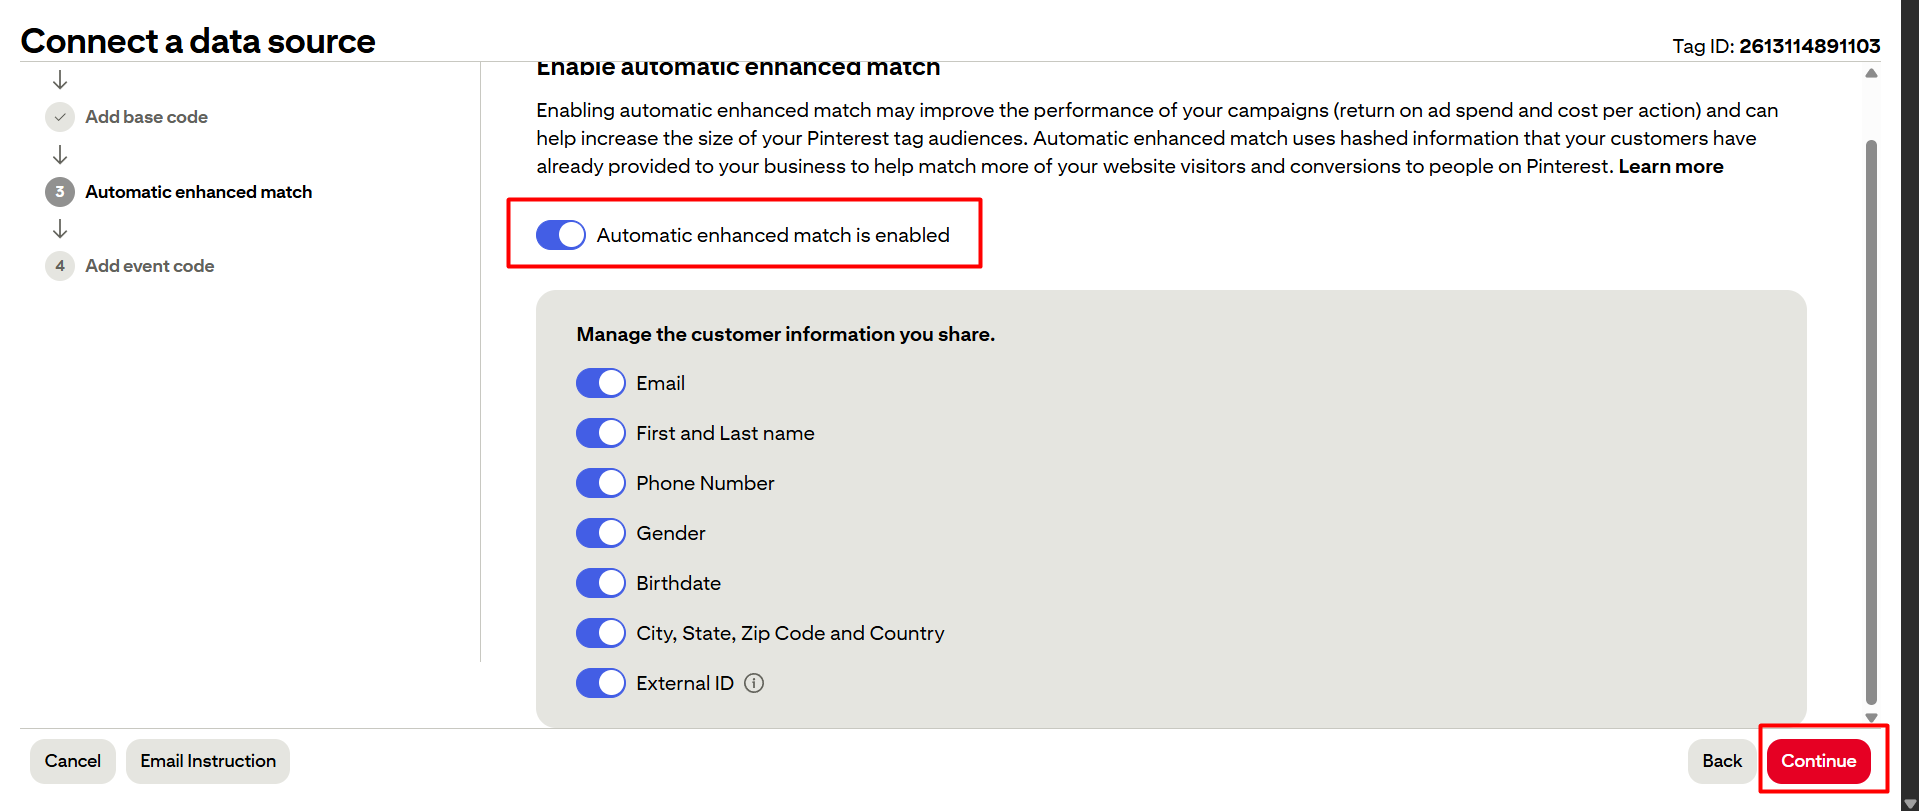
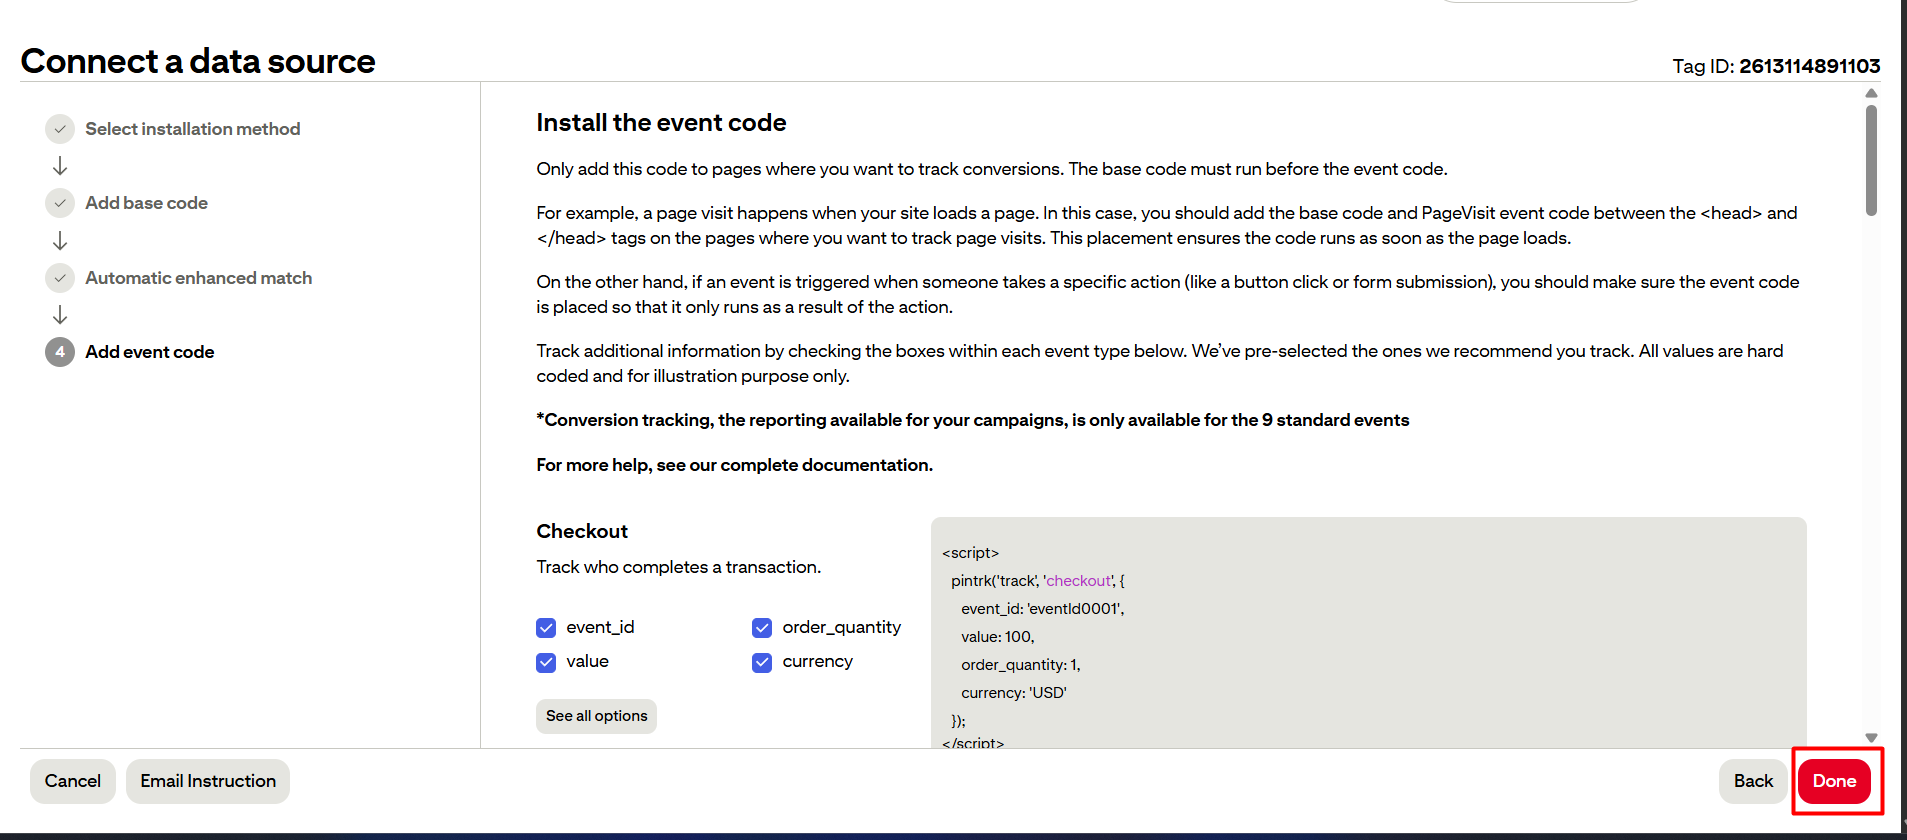
Done here on every page. I hope you are able to see the Tag ID. Please copy the tag ID, and let’s go with us for the setup process through GTM.
Pinterest Conversion Tracking setup with GTM
Pinterest has a lot of standard events, and we can send custom events also as per our need. But at the time we will just cover the e-commerce events.
First go to your tag section from GTM and now create a new tag.
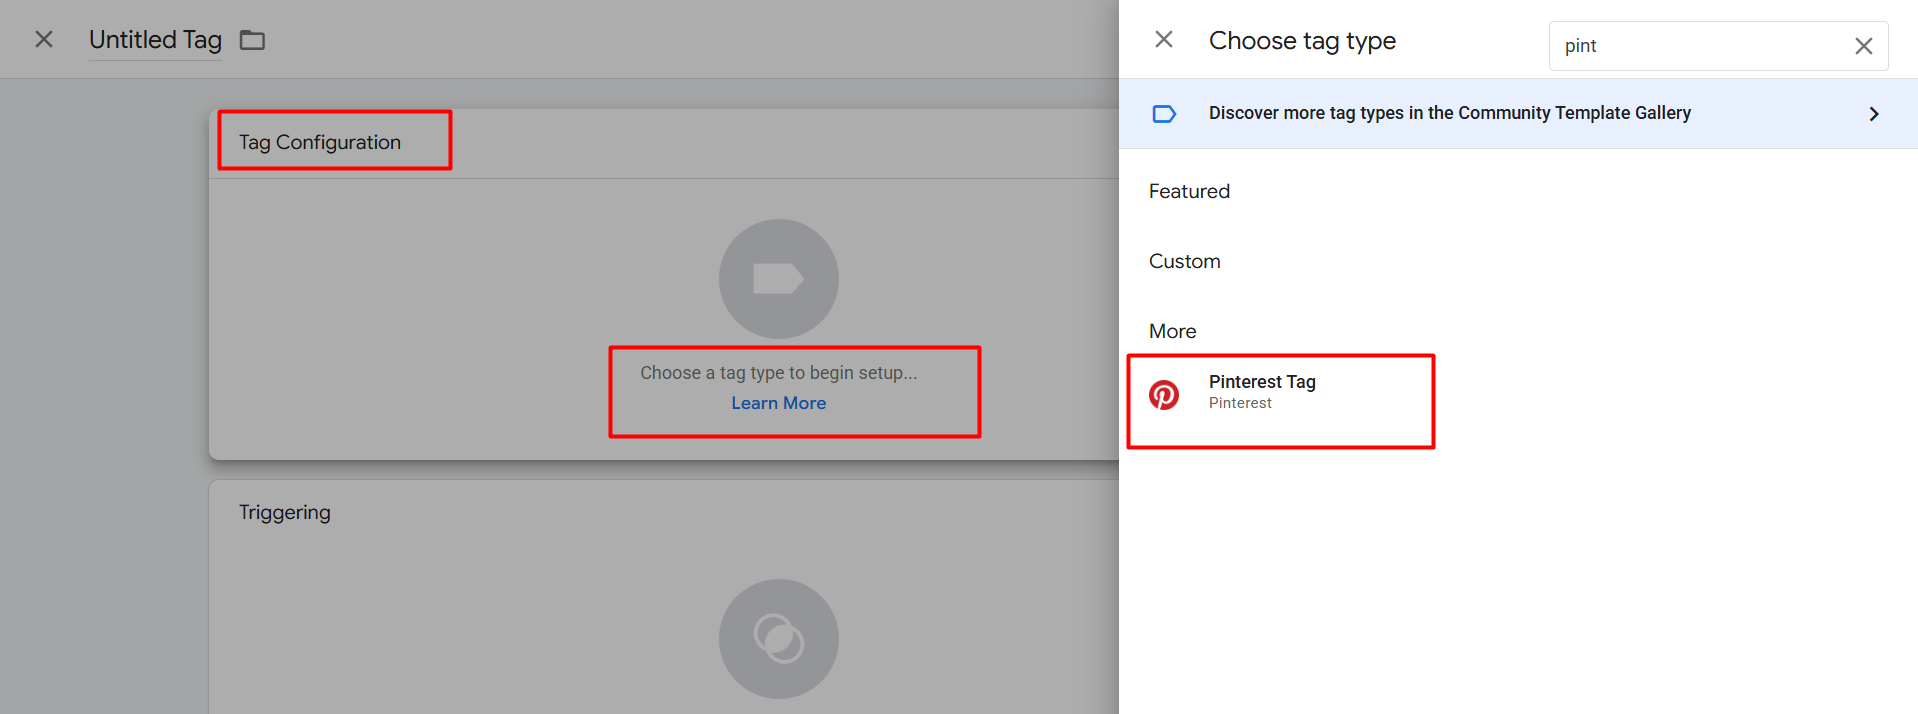
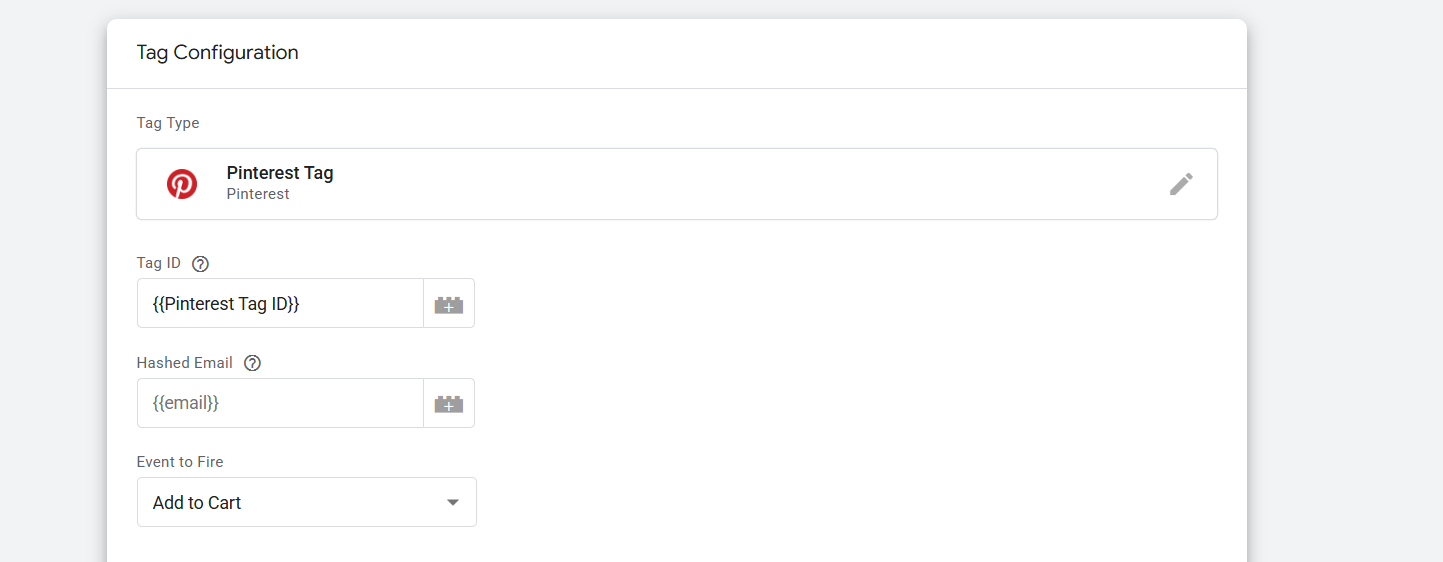
Now select the Tag as your tag type. With these templates we will send our data to Pinterest “Business Manager.”
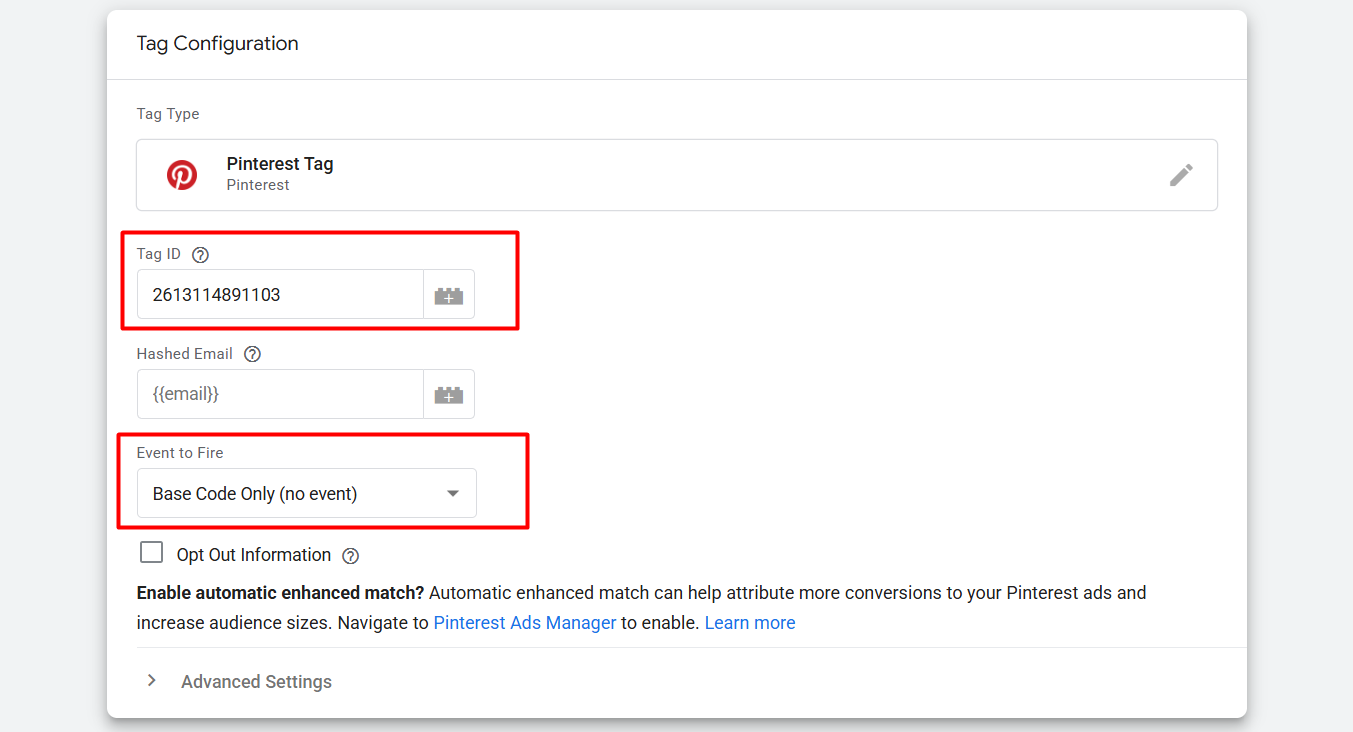
Here you can see in the first place “Tag ID”; we paste our tag ID. Then in the “Event to Fire” section you can see what we selected. The rest of the events we will send from the next tag. Now let’s start the setup of the trigger.
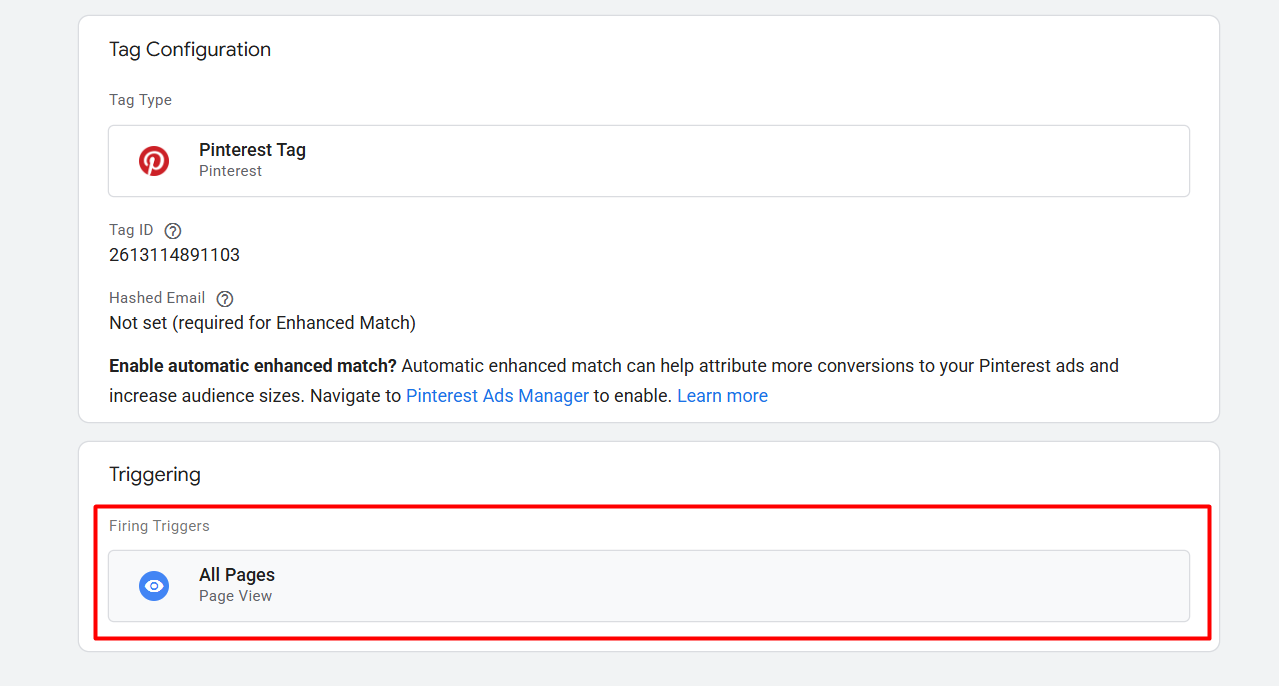
Here in the trigger section, set up “All Pages” as your trigger. Because this trigger should be fired on every single page.
Page Visit
In Pinterest conversion tracking, Page Visit Mining refers to the process of tracking when users visit specific pages on your website, typically the ones tied to conversion actions (like product pages). So every time when someone visits the product page, Pinterest calls it a page visit.
So now let’s set up the “Page Visit.” Every time when someone visits a product page, then we will send data to Pinterest in the name of “Page Visit” and the other data about the product.
So again, from your tag section, create a new tag in the same way, and again select the same tag type.
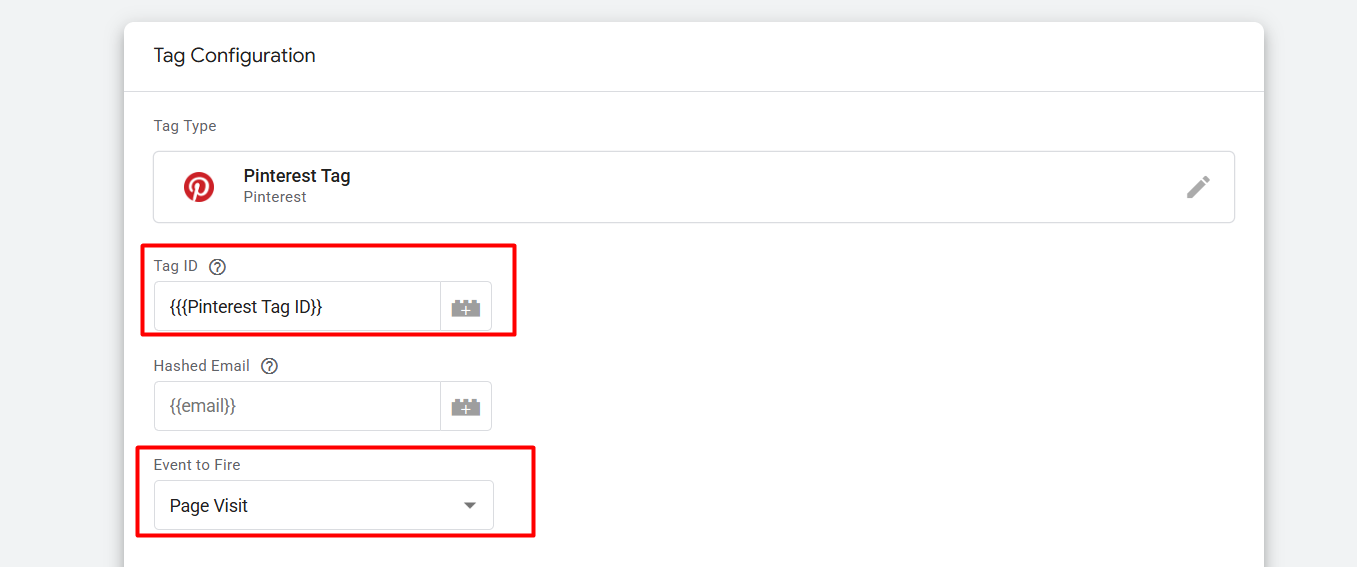
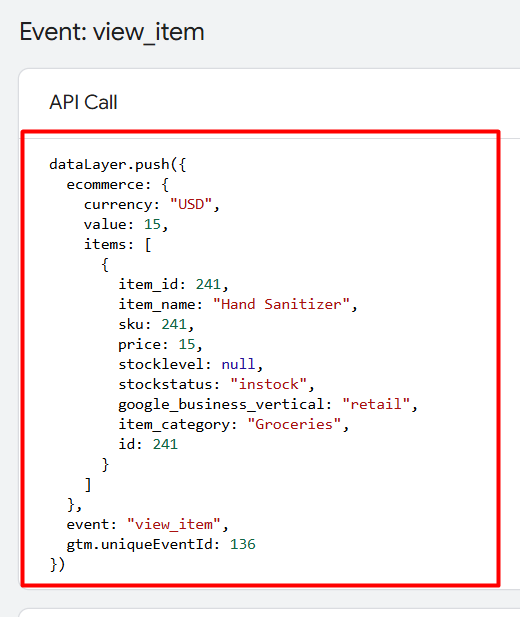
Here you can see what we did in the first position. Now we have to send data about our product. The Clear Concept Of GTM DataLayer
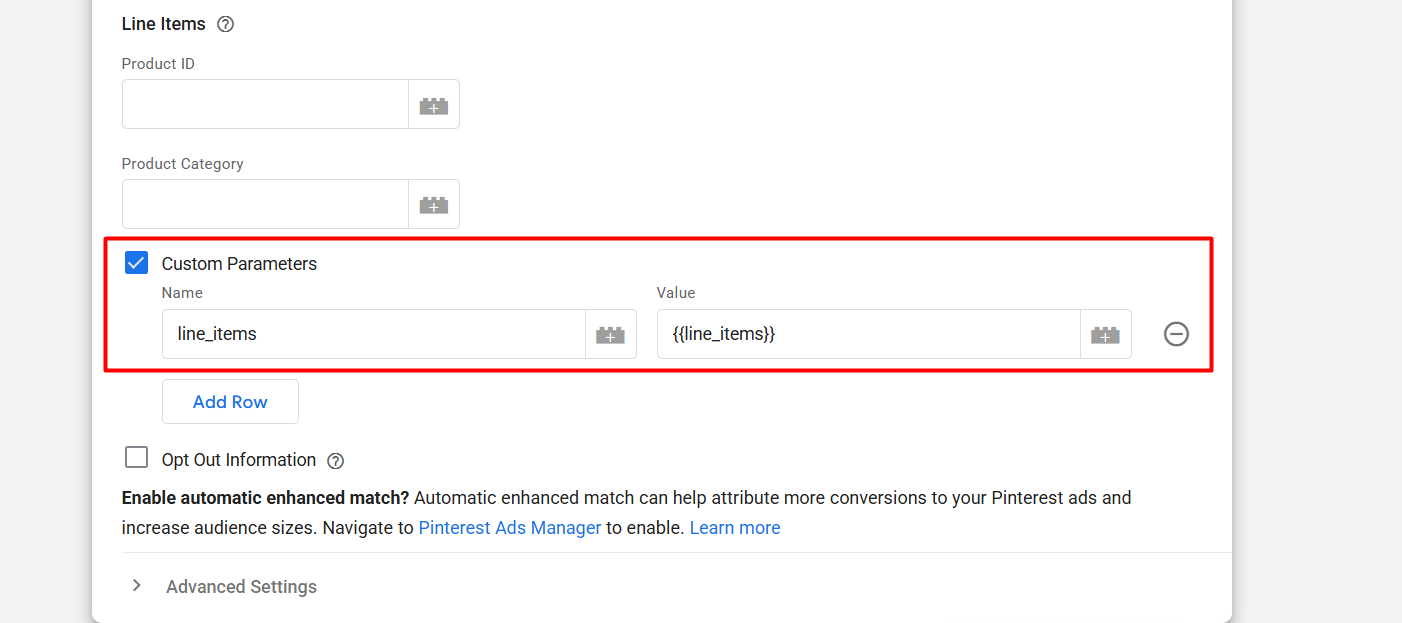
Here you can see with the “Custom Parameters” we are sending all of the values about our viewed items. To create the value, first you have to create one variable that will be able to collect the total array from your data layer.
But in the data layer we can get the items array in the way
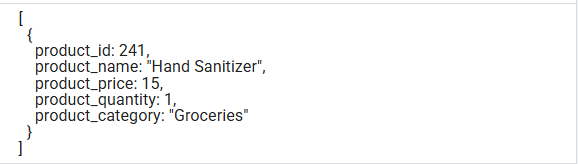
So we have to change the format according to Pinterest. Because the Pinterest format is like that.
So, to do it, go to your variable section. Create a new variable from the user-defined variables. In the time select “Data Layer Variable” as your variable type.
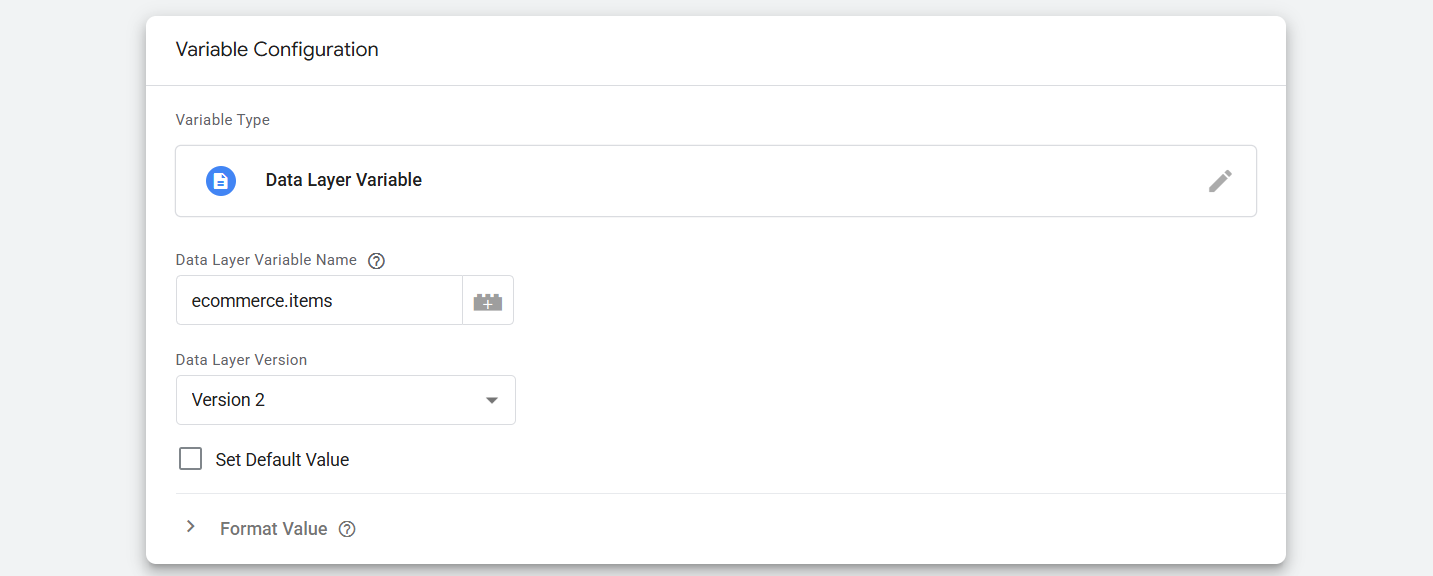
Here you can see how we write the variable name. Also remember the variable name you selected.
Now again go create one more new variable, but this time choose “Custom JavaScript” as your variable type and paste the code.
function() {

  var products = {{ecommerce.items}};

  return products.map(function(product) {

    return {

      product_id: product.item_id,

      product_name: product.item_name,

      product_price: product.price,

      product_brand: product.item_brand,

      product_quantity: product.quantity || 1,

      product_category: product.item_category,

    };

  });

}

Now this custom JavaScript code will help you to make one transformation in the data structure.
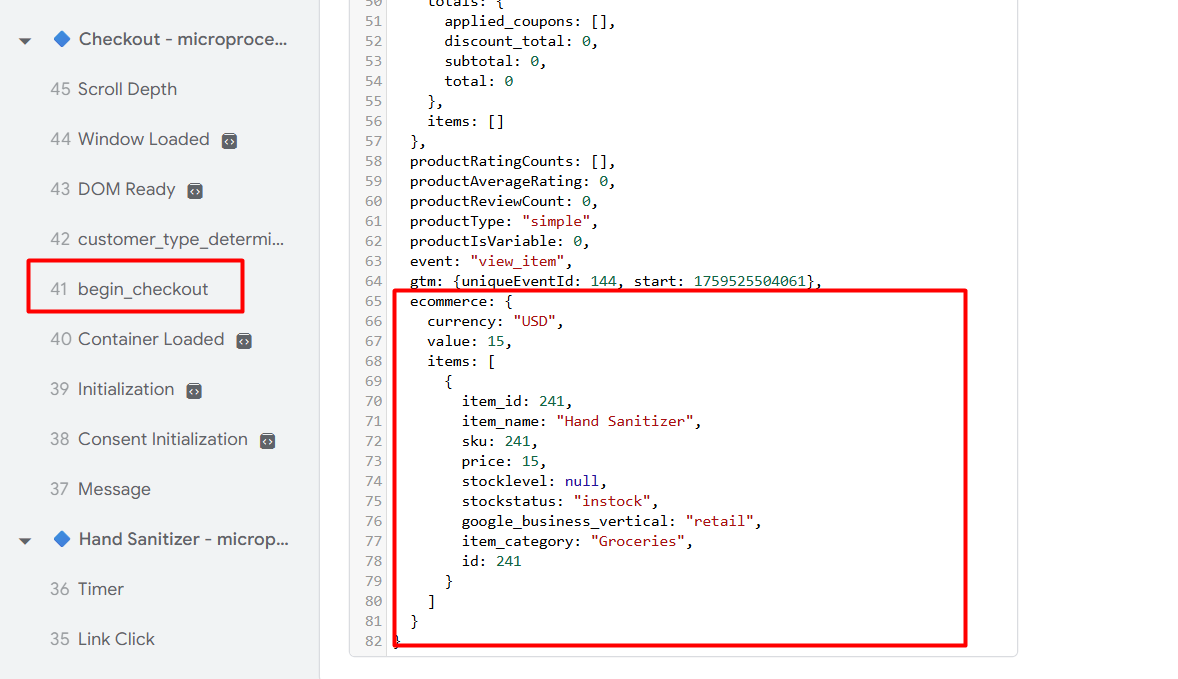
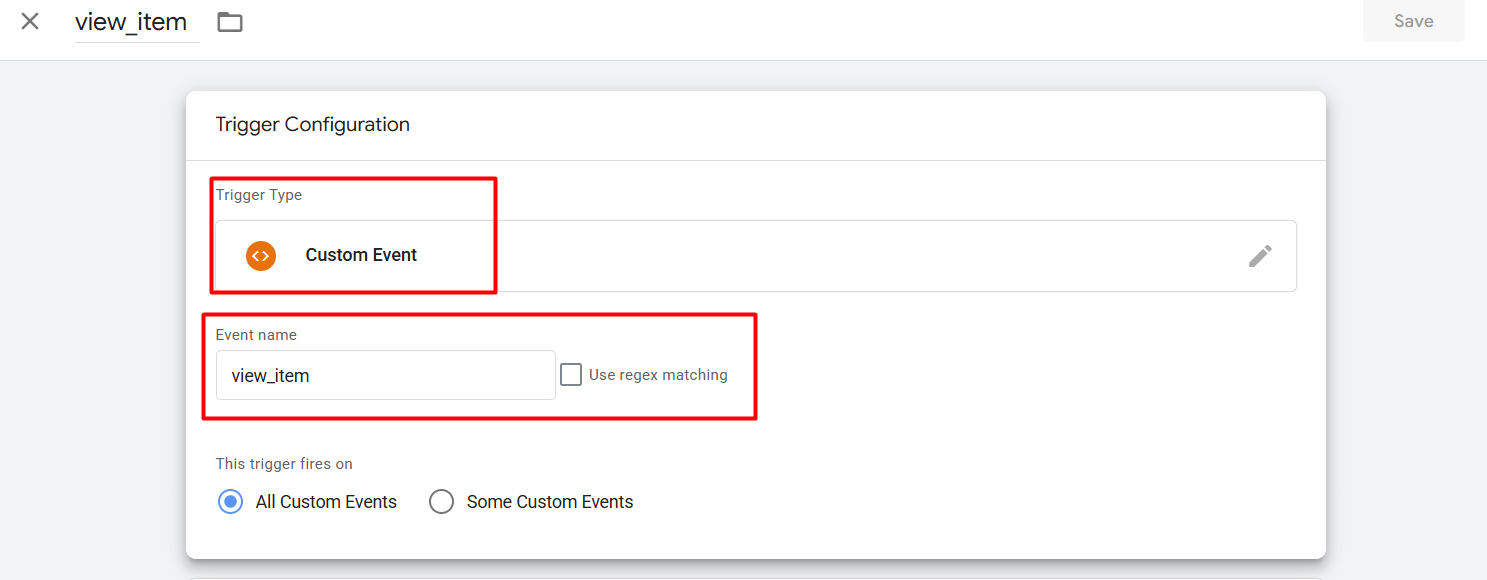
Great, now it’s time to set up the trigger. With the trigger, we will make a rule for this tag about when it should be fired and when it should send data. Here we will do it according to our data layer. But in the data layer we will be able to see “view_item,” not “Page Visit,” because the data layer is always made in the structure of GA4.
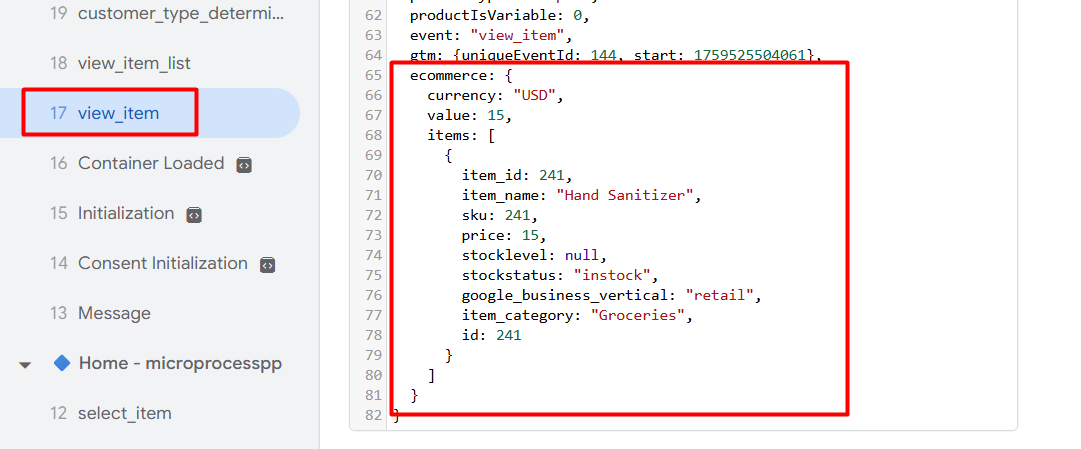
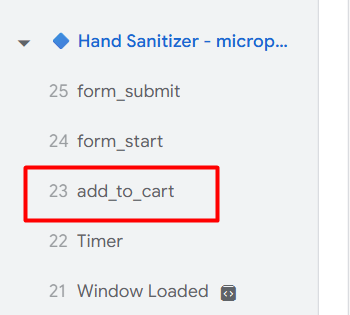
Here in the picture you can see what the custom events look like in the tag assistant of GTM and how the GA4 schema-based data layer looks. Every time after viewing one product, we will get this event. So through the Custom Event trigger, if we pick this event name, then every time after visiting one product, our tag will work perfectly. In the same way, after add_to_cart, you can get one event like that.
Checkout looks like that.
So to set up the trigger, go to your trigger section and select “Custom Events” as your trigger type. Then fill up the box with the targeted event name like this.
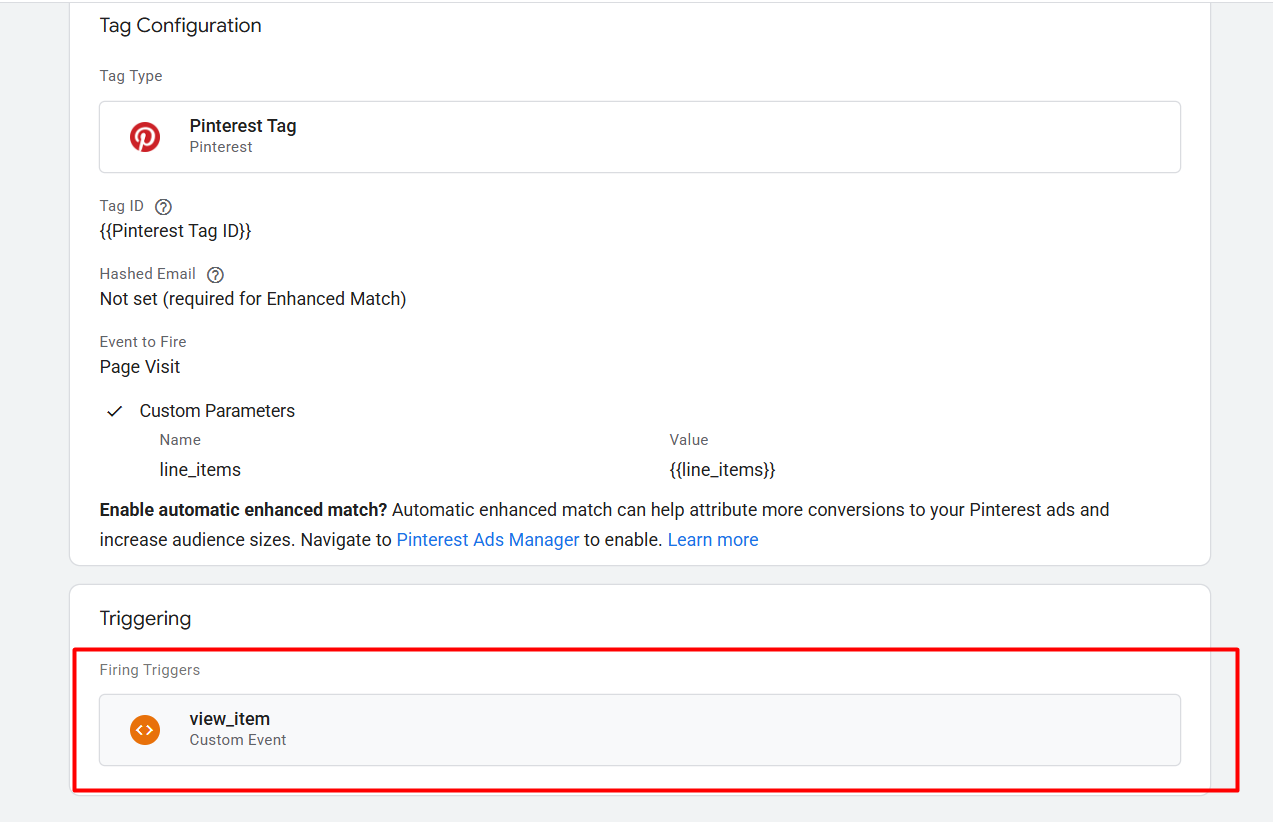
Here you can see the complete view of “Page Visit” after completing it.
Add to Cart
With the event, Pinterest gets data about the add-to-cart product by our traffic. In the same way we can do it just like a page visit, but here we have added some more new Because with the items array, every single piece of information isn’t possible to provide.
To do it again, create one more new tag for this event, and, in the meantime, also select the same tag type like we did the previous time.
Here you can see the same things again: the Tag ID and the “Event name” that we selected.
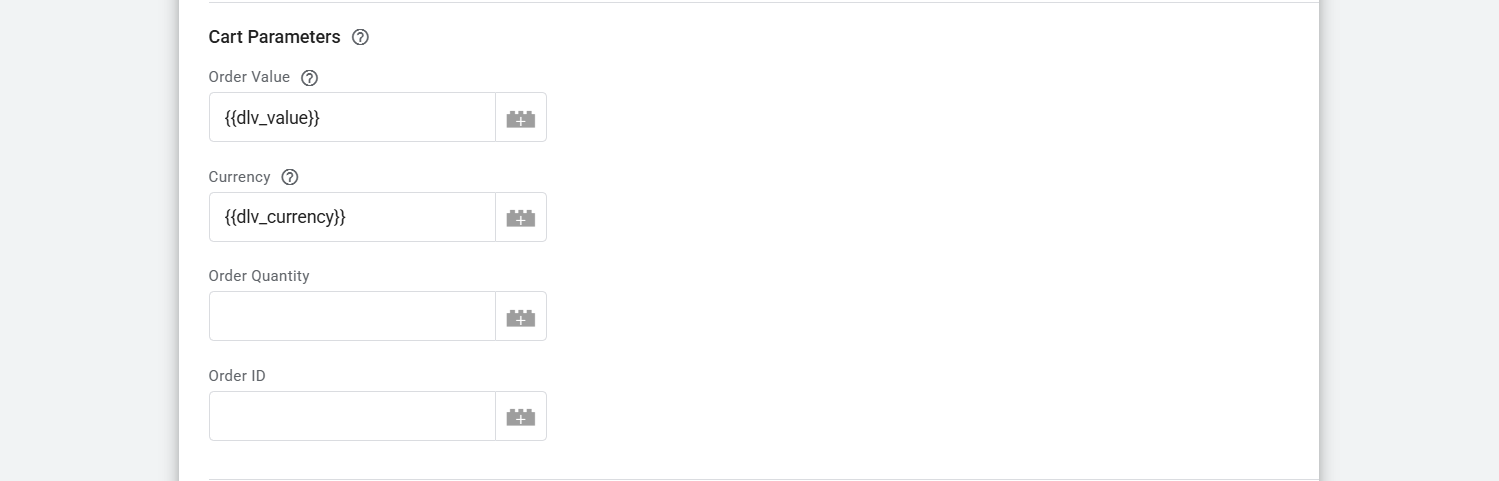
Now here in the “Cart Parameters” we have to create these two variables as per the data layer. The first variable will provide the total value, and the second one will provide the information about the currency.
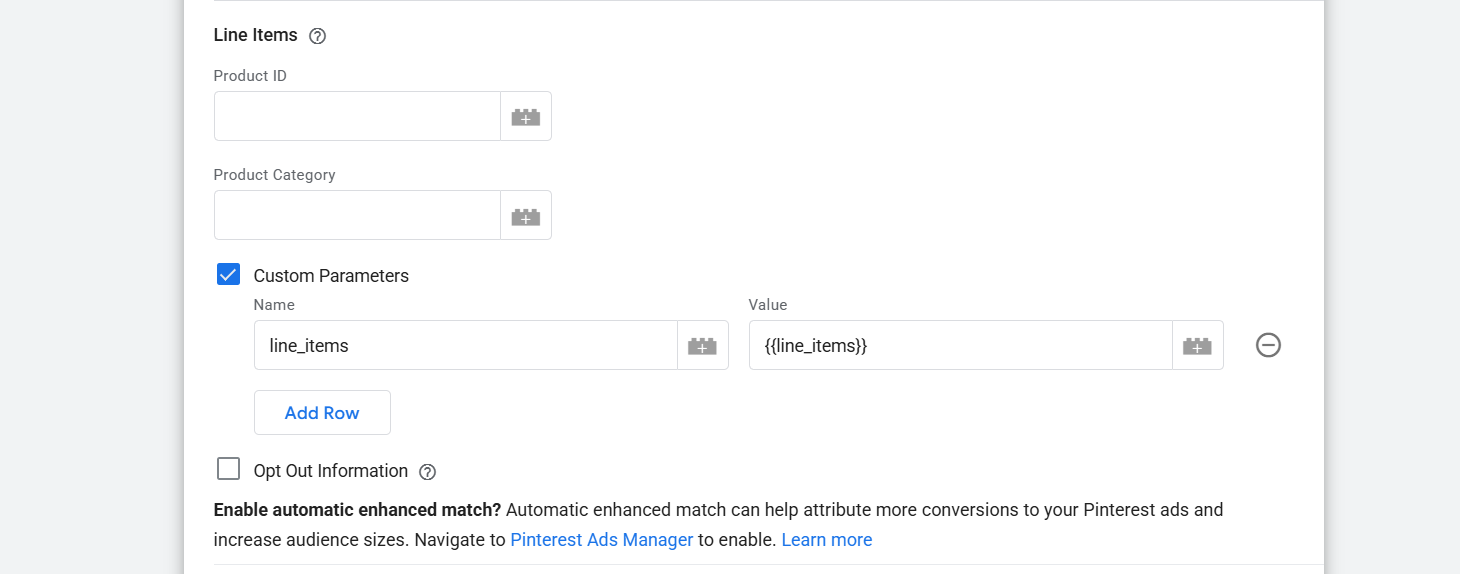
But in the “Line Items” we send the same value as, like, Page Visit. Now set up the trigger as per the data layer.

Checkout
This event is really different from the other platform. In the other platform when someone completes the purchase, we call it “purchase” or “place an order,” but here in Pinterest it’s called “Checkout.” So let’s start the setup.
Again, create one more tag, and as the type of tag, select the Pinterest templates.
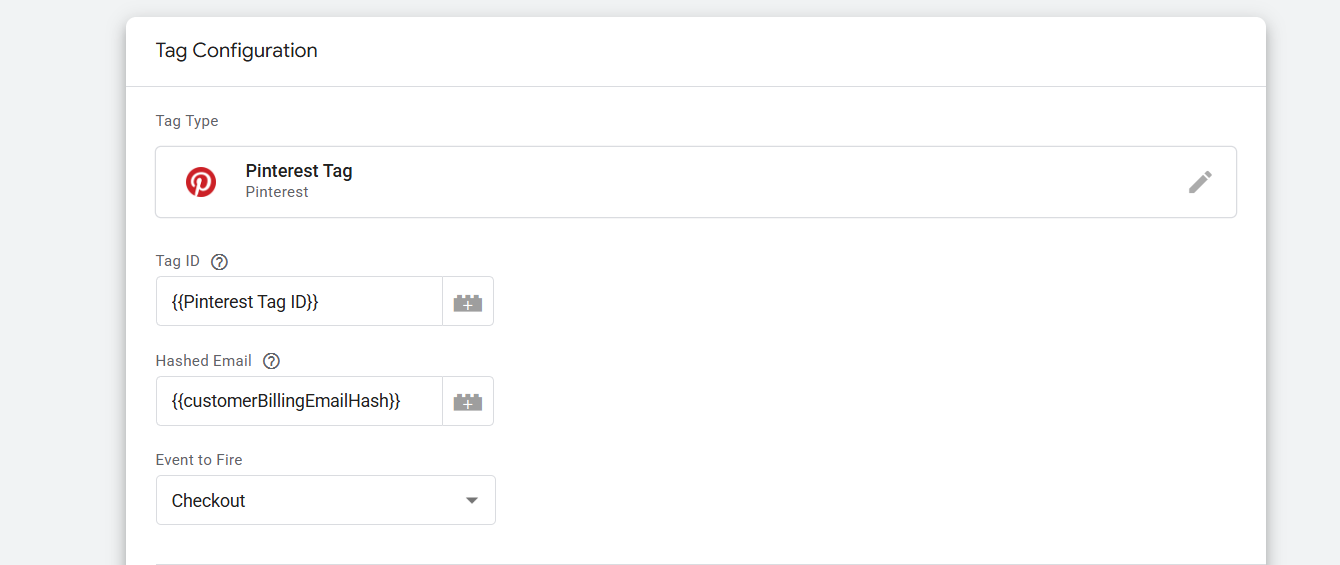
Here you can see we make two big differences from the other. First, in the place of “Hashed Email,” we place one variable. Every time when someone completes one purchase of a product, they submit one mail so we can send this mail to Pinterest in the hashed format.
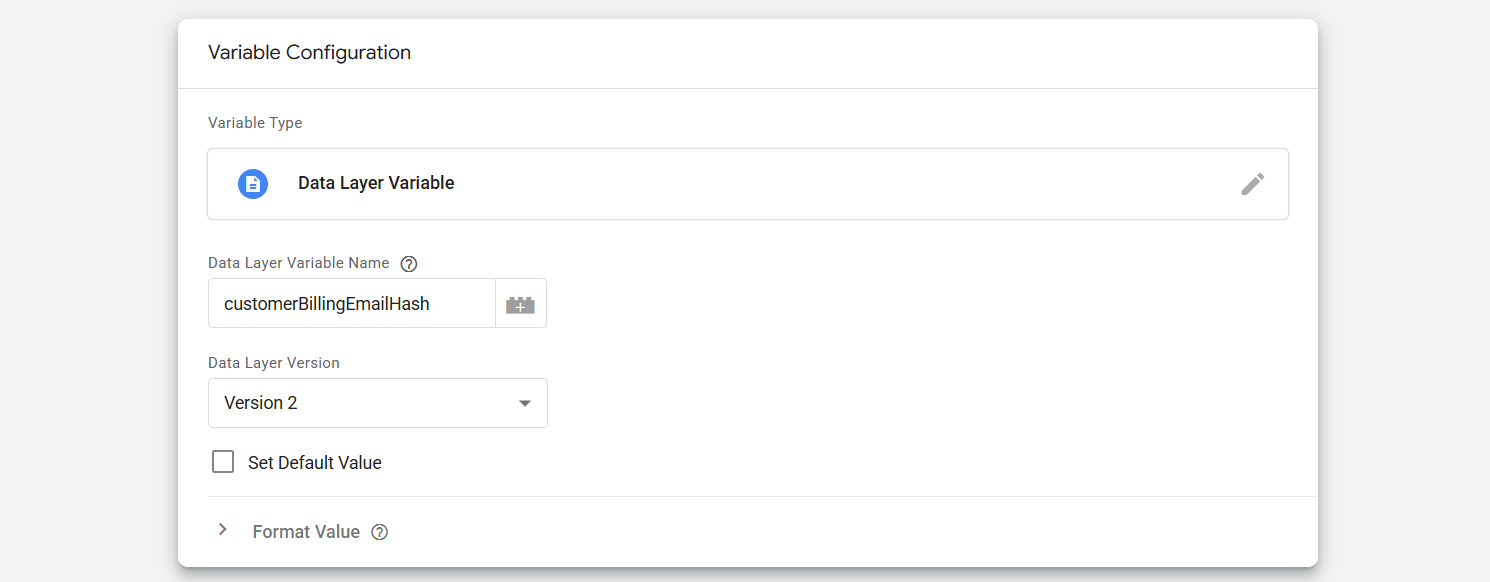
Here you can see how we complete the variable setup. In the same way, you can do it if your data layer is also the same; otherwise, do it as per your data layer format.

Then in the “Cart Parameters” you can see we fill up this whole place because at the time we have every single piece of data. Already you know about the first two, but for the third one, you have to use one custom code to calculate the total product quantity. Because a single person can purchase a lot of different products in different quantities.
So to do it, please go to your variable section again and at this time again select “Custom JavaScript” as your variable type. Then paste the code.
function() {

 var getDataFromArray = {{Ecommerce Items}};

 var initialValue = 0;

 return getDataFromArray.reduce(

  function(accumulator, currentValue) {return accumulator + currentValue.quantity},

  initialValue

);

}
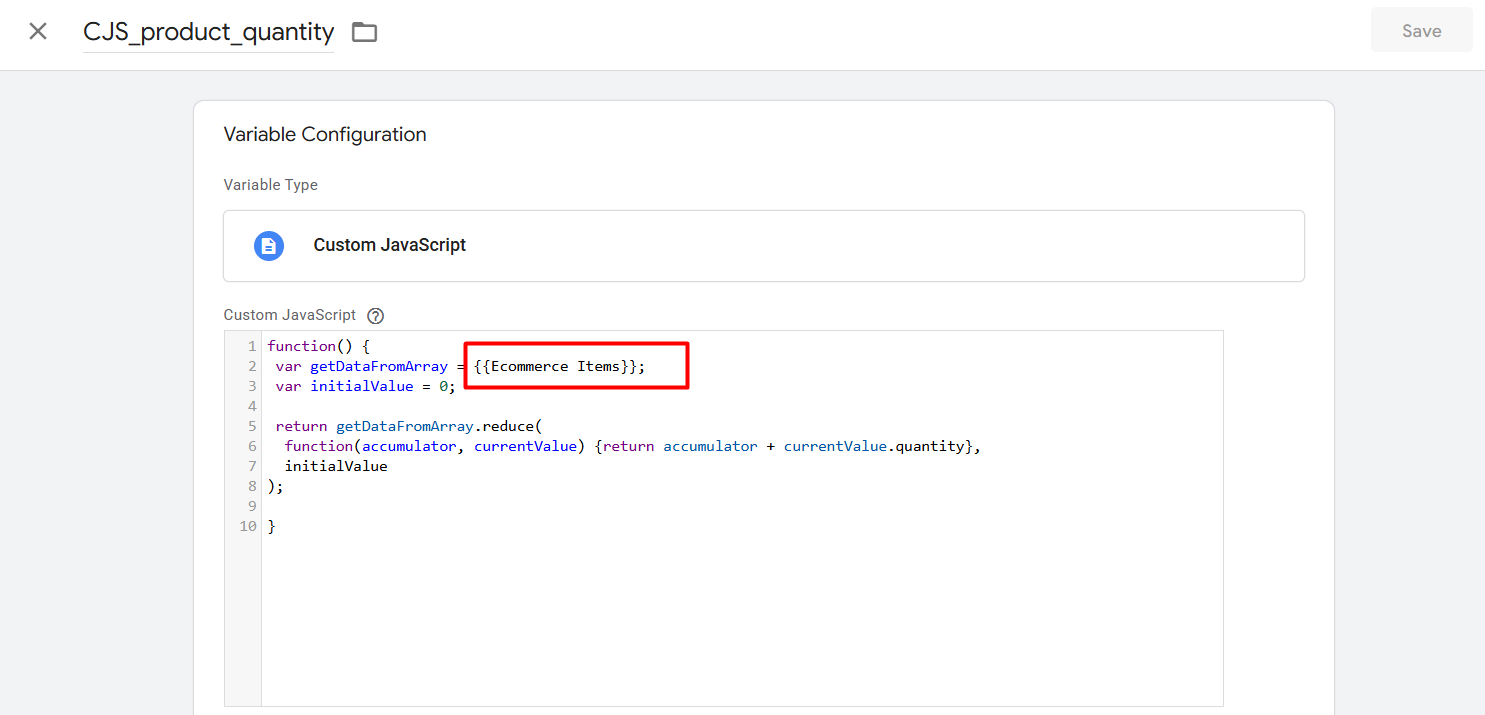
Don’t forget to change the name of the variable here in the red mark as per your variable. This variable will just work whenever your first variable is collecting the items array perfectly. Great, now add the custom variable in cart parameters.
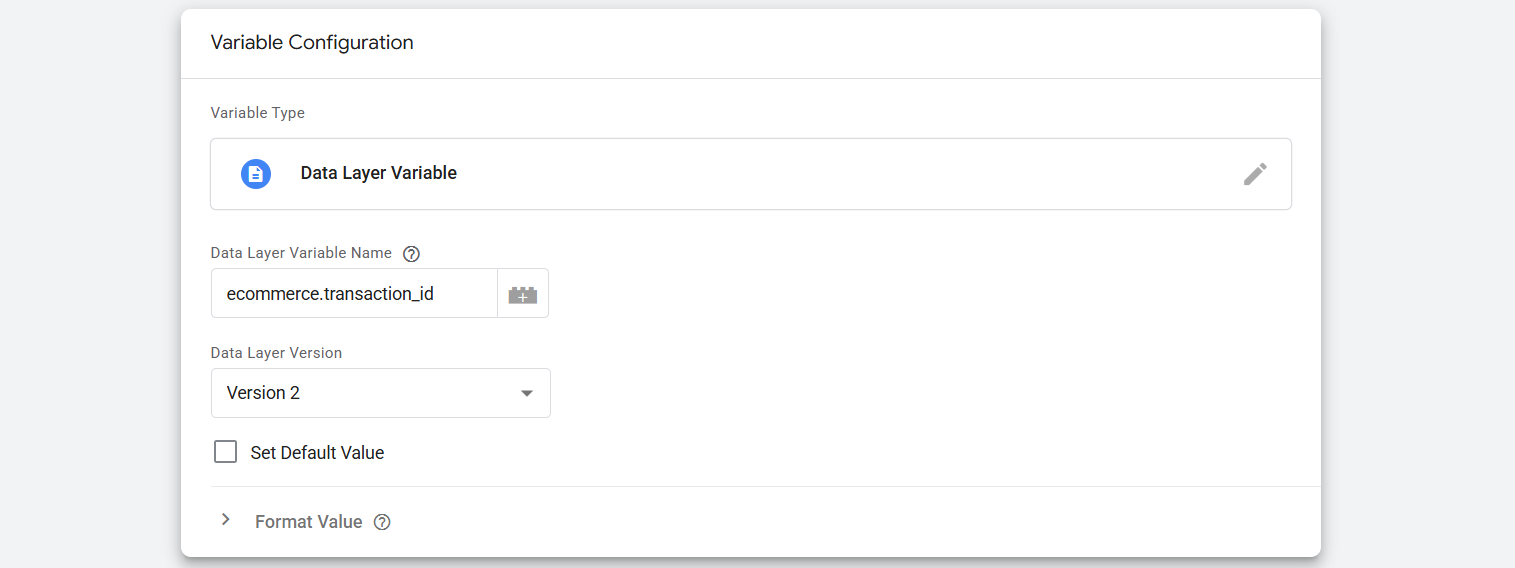
Now the other variable is “Order ID.” In your data layer you can see in preview mode that after completing every single purchase, we got one new order ID. From the data layer we have to collect them, and we have to send it to Pinterest.
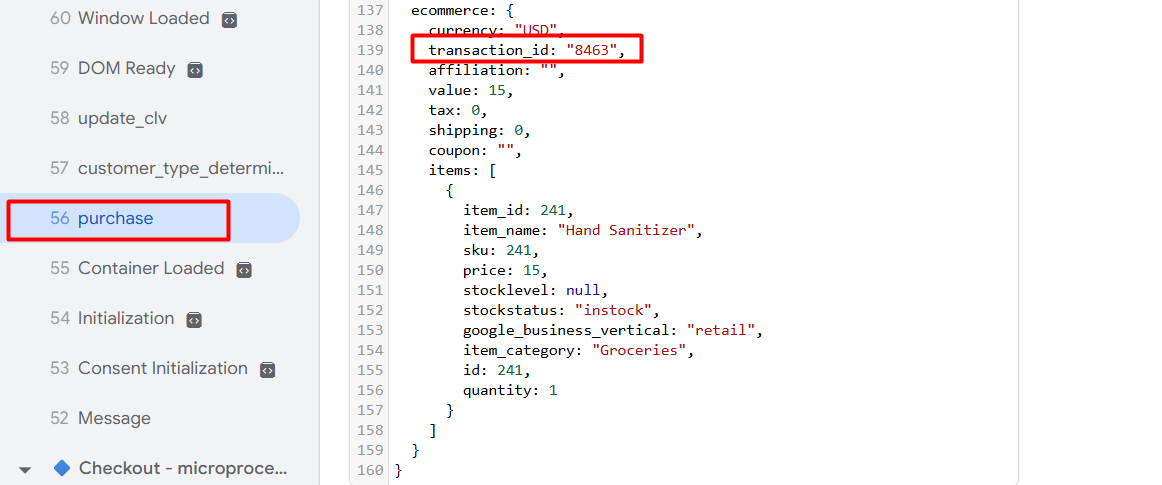
Here you can check it out.
And with this value the “Cart Parameters” sector is now ready.
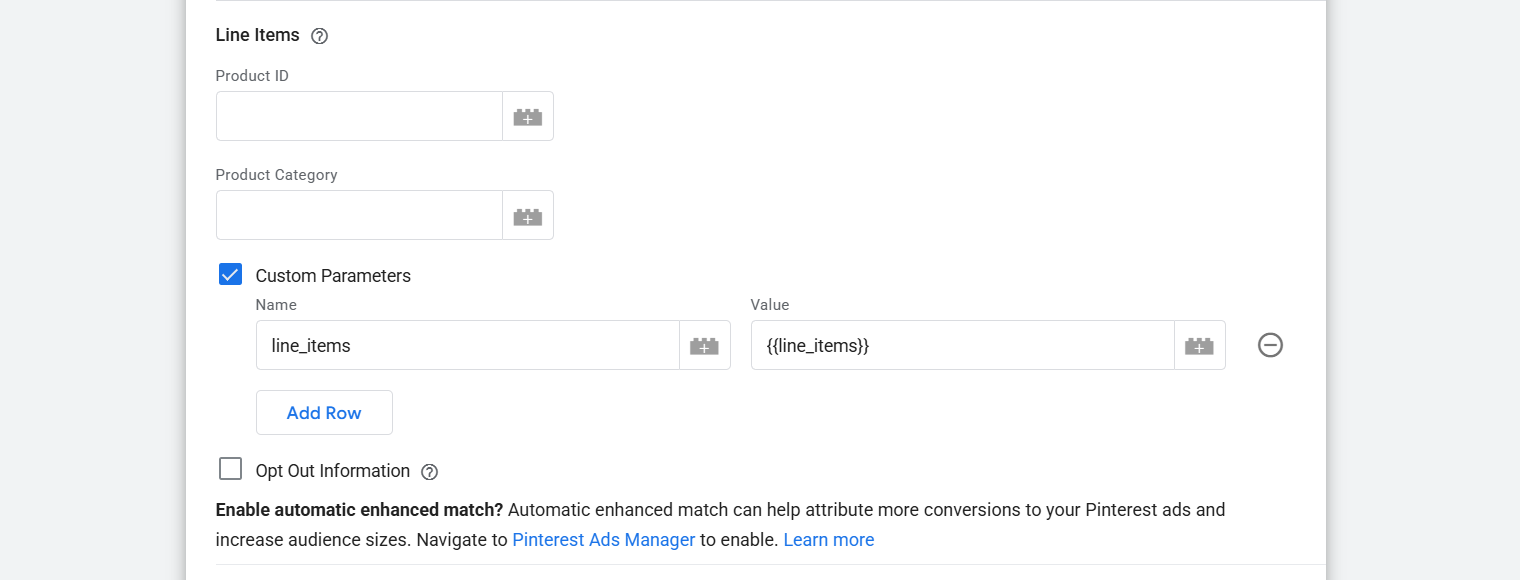
Here you can see we did the same thing for “Line Items” as before. Now set up the trigger as per your data layer.

Great, now your Pinterest conversion tracking is done. Don’t forget to share with us your thoughts.


