TikTok is one of the greatest video-sharing platforms. TikTok is the place where a lot of people globally spend their free time. That’s why it’s a really great platform for a marketer to grow their targeted traffic source.
In order to scale our business, it is imperative we know what the customer is doing. Without tracking user engagement in our content, advertising on TikTok is an inefficient exercise. Advertisements will not have the data for improvement, so they will be disastrous.
What’s more, when we don’t have visibility into user behavior, we lose the power to make data-driven decisions that lead to higher engagement and conversions. Let’s be realistic, tracking is critical to recognize traffic trends and act upon them more specifically.
And here in the time of conversion tracking, the first-party server-side tracking is one of the greatest ways to do it more perfectly.
Server-side first-party tracking.
To complete the total tracking, we have to follow this way as per TikTok standard rules.
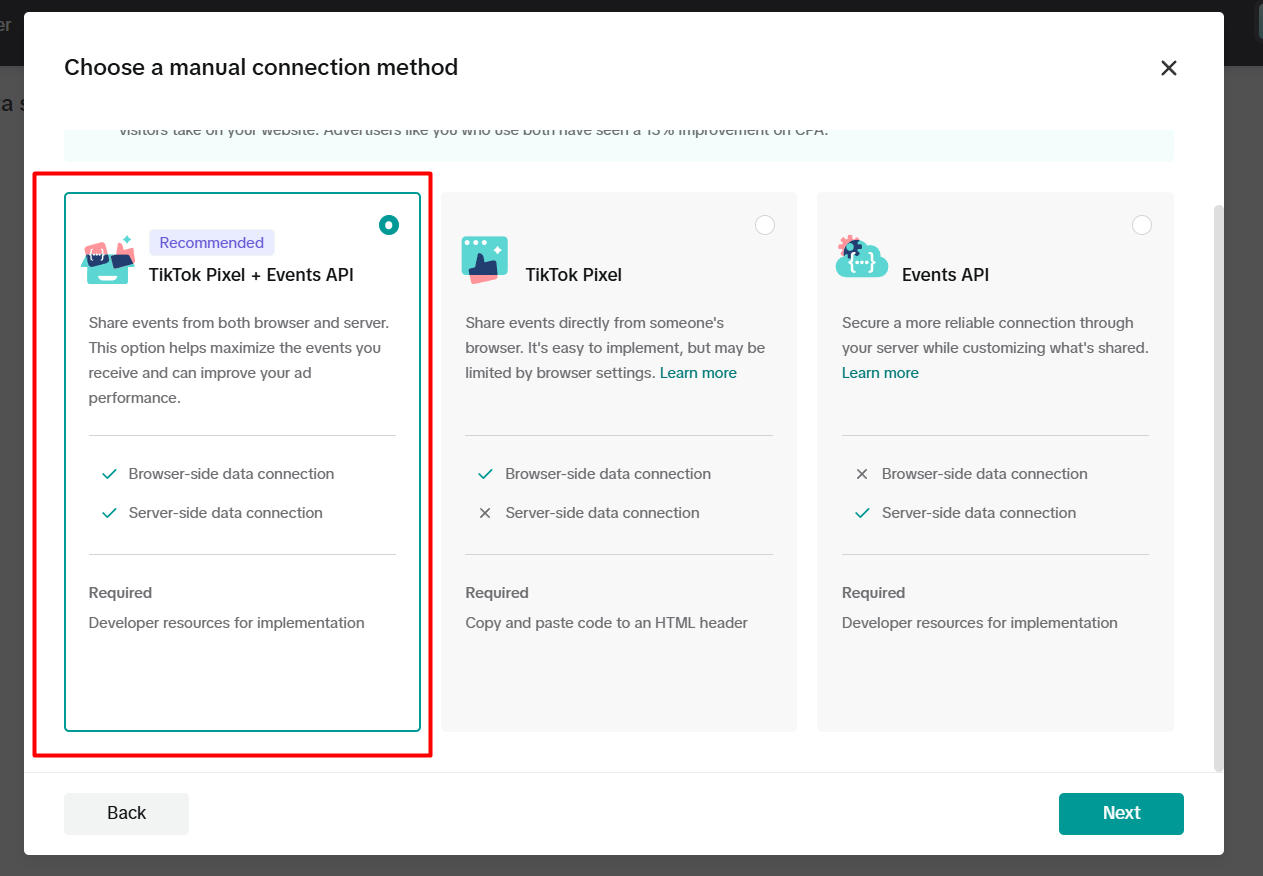
TikTok Pixel + Events API. Pixel will work as a browser-side data connection, and the API will work as a server-side data connection.
If your browser-side tracking is done, then you can continue with us for the server-side tracking. But if it’s not, then follow this article.
“TikTok Browser Side Tracking.”
After completing the browser-side tracking, now you have to create one server container and server provider. Follow this article to do it.
Server-side first-party tracking.
As soon as you’ve finished configuring the new server container in GTM, it’s time to get back to our browser container. From this point on, we’ll send all the data to the server. The server will then deliver the data to a GTM server container. The client will collect and group together this information within the container so that we can use it to track, analyze, and optimize.
GTM web Container setup
First, to do it, we have to take help of the GA4 tag. Through the GA4 tag we will send our data to the server. So if you have it, then copy the measurement ID. Then came back to the GTM browser container again and click on the
First we have to set up our GA4 tag. Through this GA4 tag we will connect the GA4 measurement ID with our website.
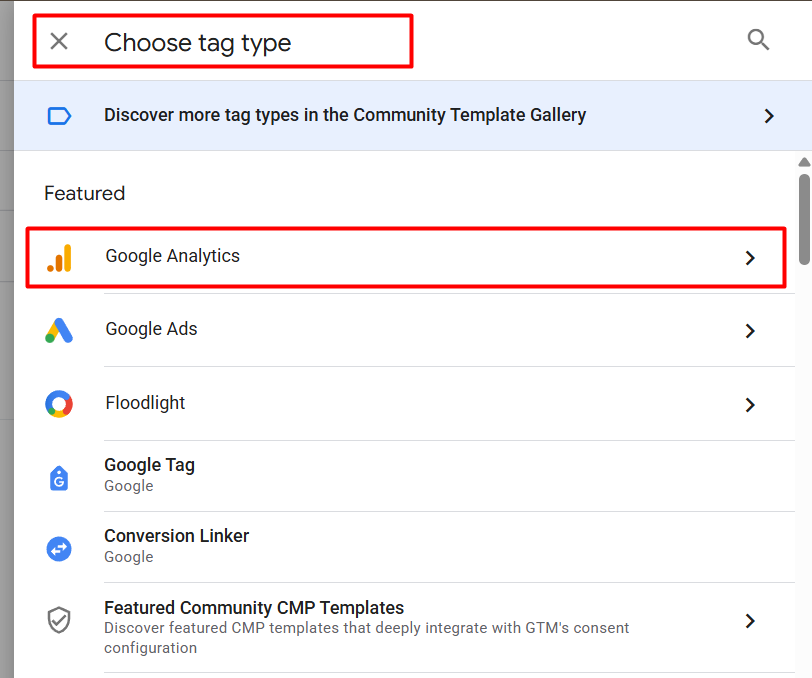
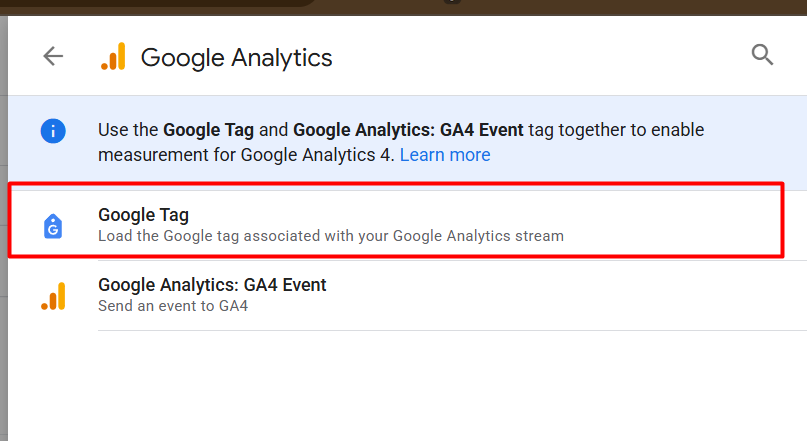
So go to your tag section and create a new tag. Then from the tag type, select Google Tag.

After selecting the tag type, now in the place of the tag ID, place your GA4 measurement ID. Then in the trigger, select “All Pages” as the trigger.
This is the main tag through which we are going to send our data to our server container. So that’s why here we have to do some more things.
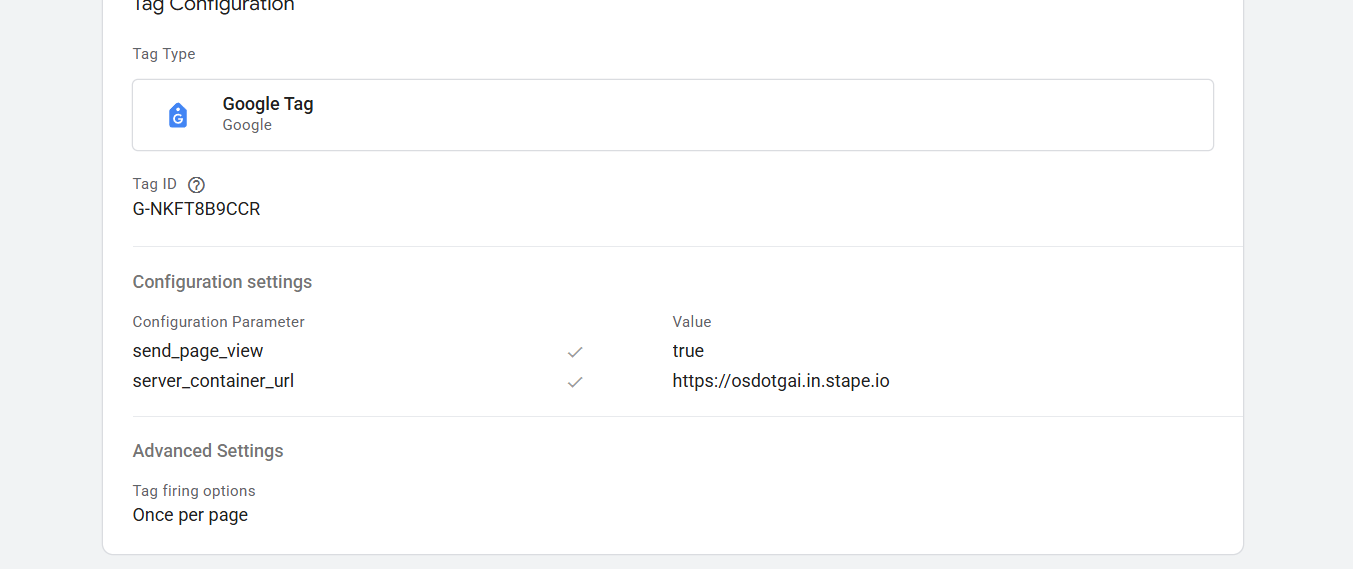
Here in the “Configuration settings” we have to configure 2 different parameters. send_page_view, and the one is server_container_url.
send_page_view: This boolean value (set to true) ensures that the page view event is sent to the server container for processing.
server_container_url: This is the URL of the server container, directing the data to the correct server where it will be processed and stored.
So here in the “server_container_url” parameter value, you have to paste your server URL, where this tag will send all of your tracking data. Now this first tag setup is done.
ViewContent
This “ViewContent” event setup is like the browser-side setup. But here in the parameters we just have to make some changes.
So to do it, create one more new tag, and from the tag type, select the “Google Analytics” tag.
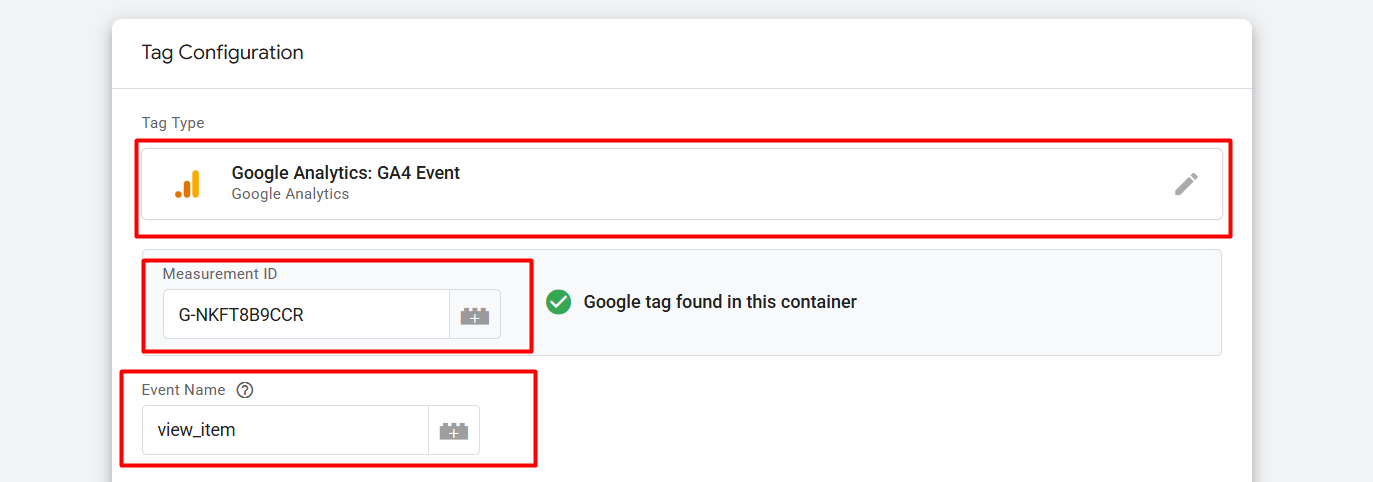
After selecting the tag in the “Measurement ID,” we place the same measurement ID, and in the “Event Name” place, we place the event name. Here in the time we are working to set up the “ViewContent,” but we have to remember that we are sending this data through GA4, so at the time we have to follow the GA4 schema. Because GA4 called “view_item” every time after viewing one product, not “ViewContent.” But don’t worry, from the server, when we send the data to TikTok, these things will be fixed as per TikTok rules.
Now it’s time to set up the important parameters. To do it, scroll down and click on the “Event Parameters.”
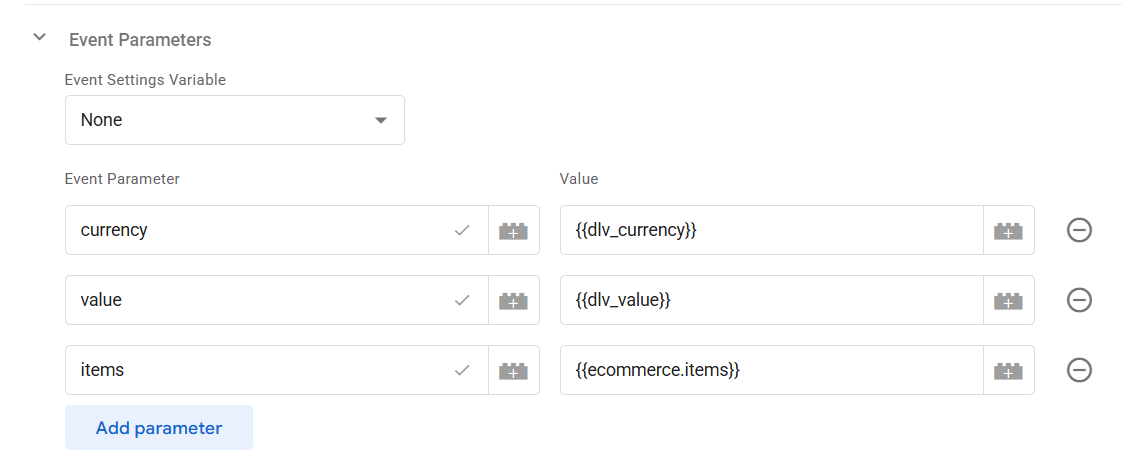
Here for the “ViewContent” event, we have to send these three parameters. Especially here in the “items” parameters, we have to send the full item array data. Don’t worry, from the server container we will do it perfectly through the TikTok API tag.
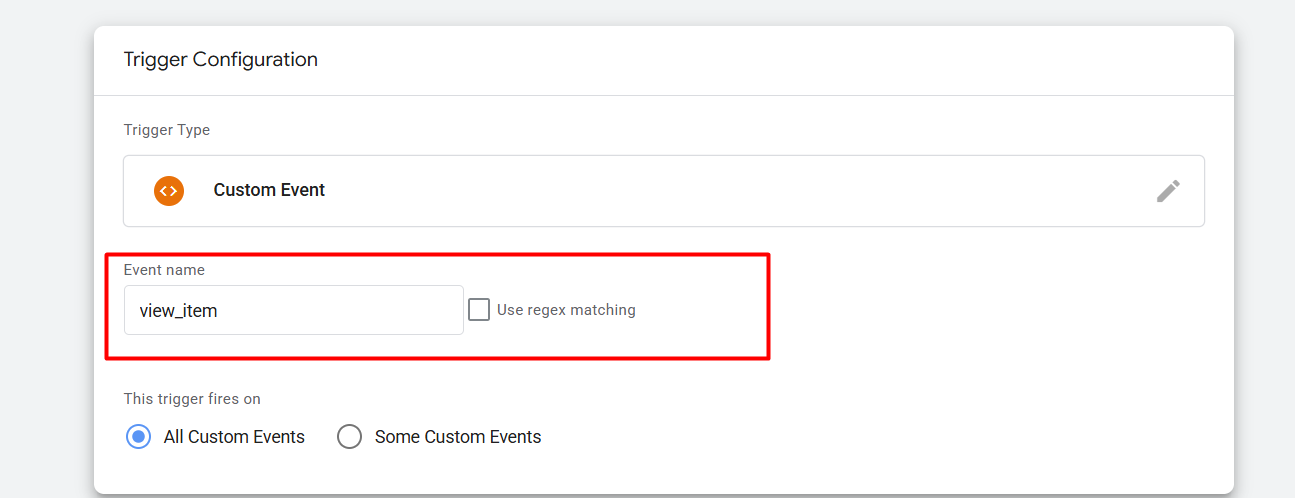
Now is the time to set up the trigger. Here the trigger will also be the same as the browser-side “ViewContent” trigger.

As we know, every time after we complete one event on our side, like viewing one product or adding one product to the cart, our data layer pushes one event in the name of “view_item” or “add_to_cart.”
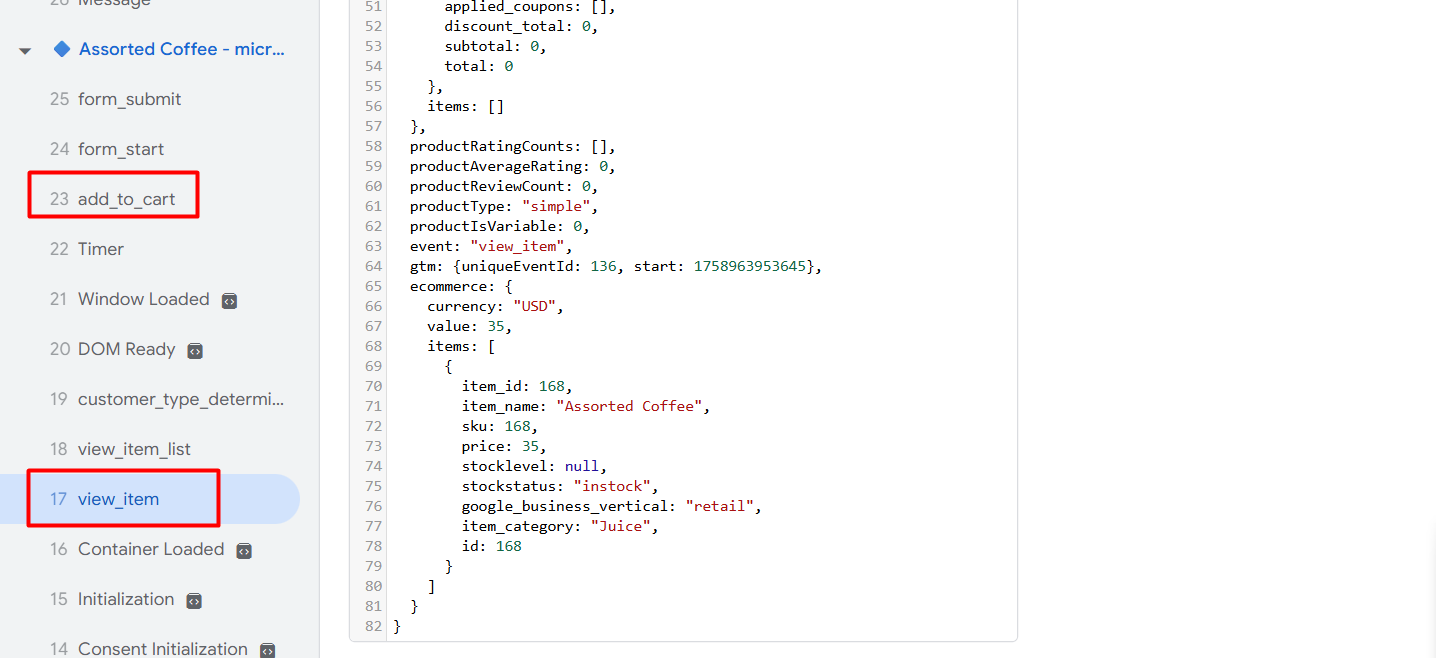
So to create the perfect trigger every time, we have to select “custom event” as the trigger type, and in there we have to place this event name, and done, it will work perfectly for you.
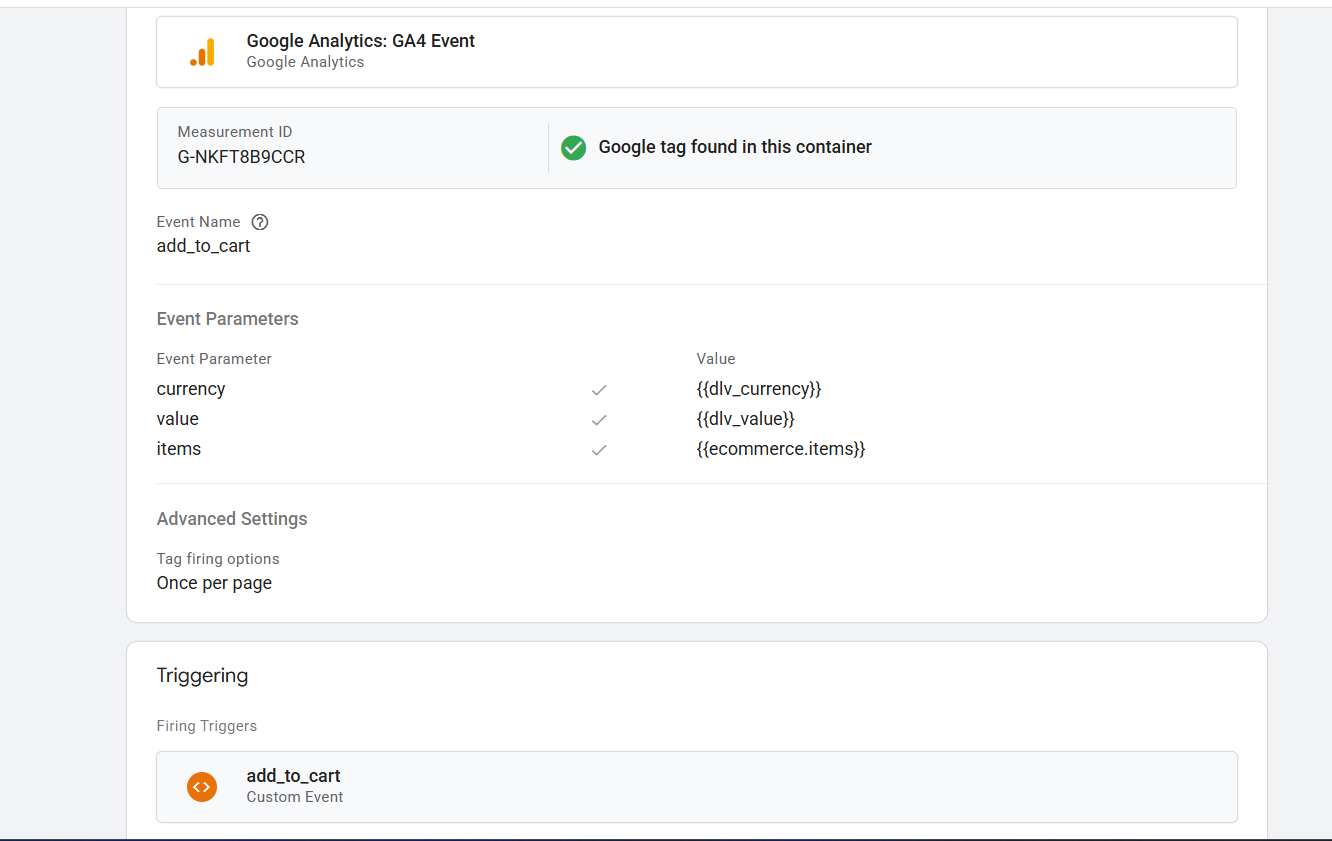
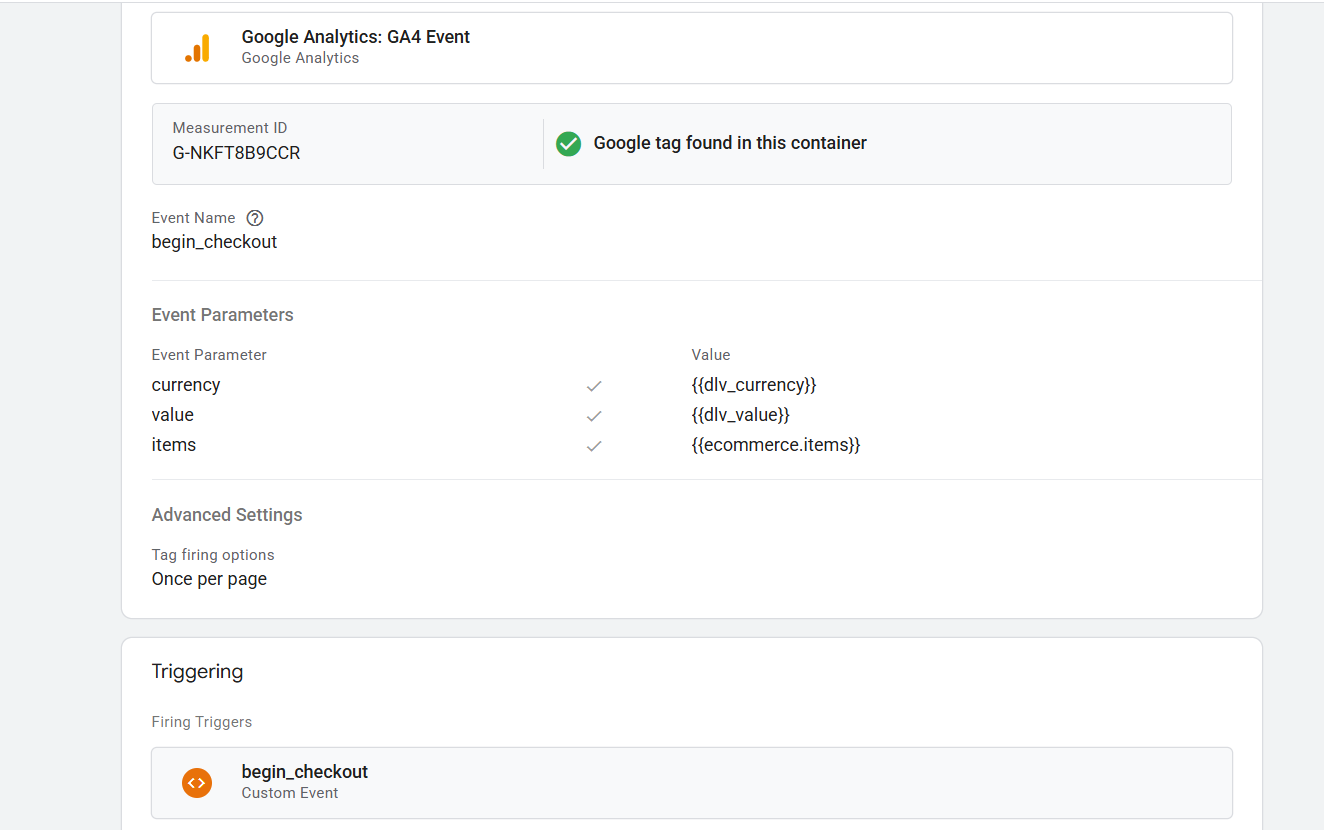
AddToCart and InitiateCheckout
In the same way, you can complete the tag setup for your “AddToCart” and “InitiateCheckout.” For these two new events, you have to change the trigger setup as per your event. Like the way.
PlaceAnOrder
The same setting is also for the “PlaceAnOrder,” but here in the parameters we have to add two more parameters.
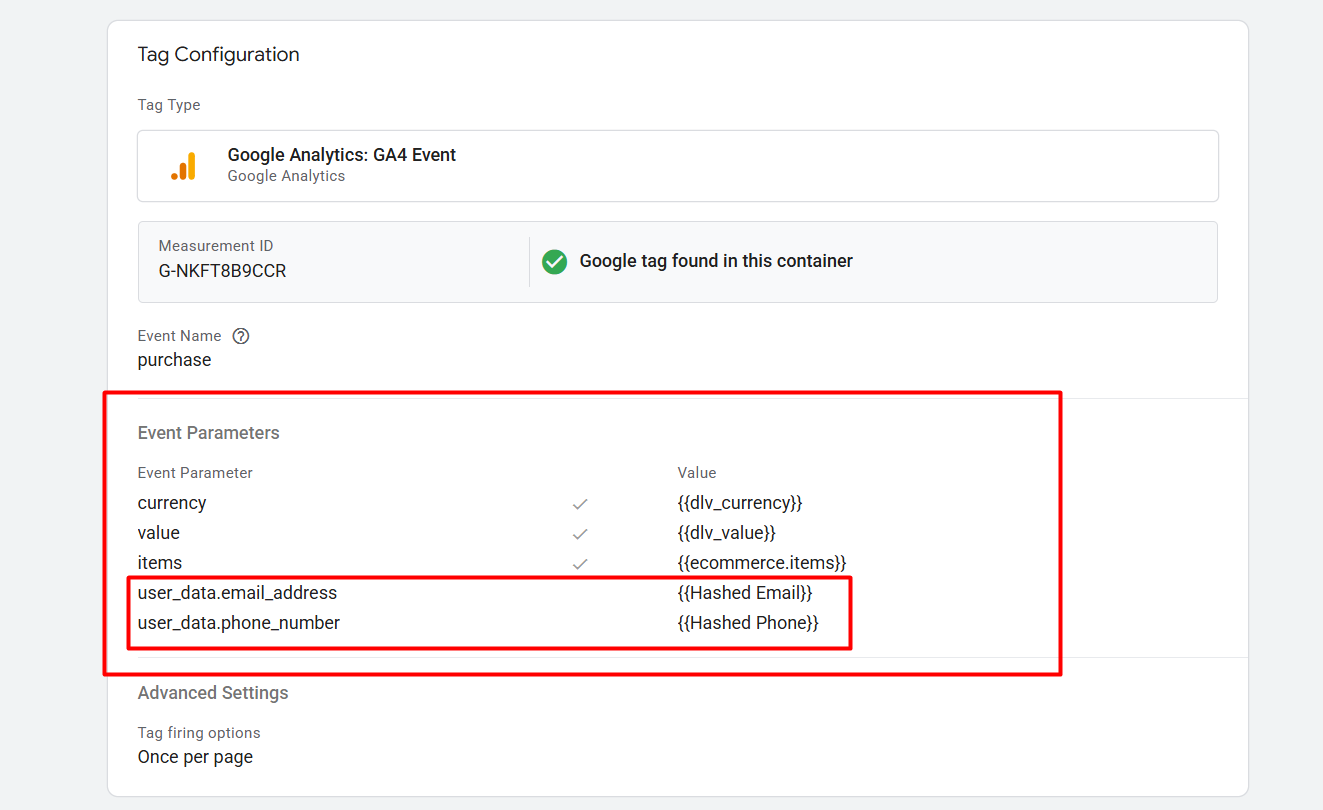
Here you will have to add your customer email and phone number, like the same way of browser-side tracking. Also, don’t forget to cover the way we used to write the names of event parameters.
Event ID
In GTM, an event ID is commonly a unique identifier for some event that happens on your website or app when a person interacts with it. This ID is used to log and identify events on the site so that the correct data can be associated with it in analytics systems (e.g., Google Analytics, TikTok Pixel).
We have used the event ID for deduplication. Because in one place we are sending data in two different ways. One browser is client-side, and the other one is server-side. So if we don’t send the event ID with the event, then our platform will start counting every piece of data as new data. That’s why we have to send the event ID with every event.
To set up the event ID with the event, first we have to add one more new template in our GTM. So to do it, go to your variable section and create a new variable from the user-defined variable.
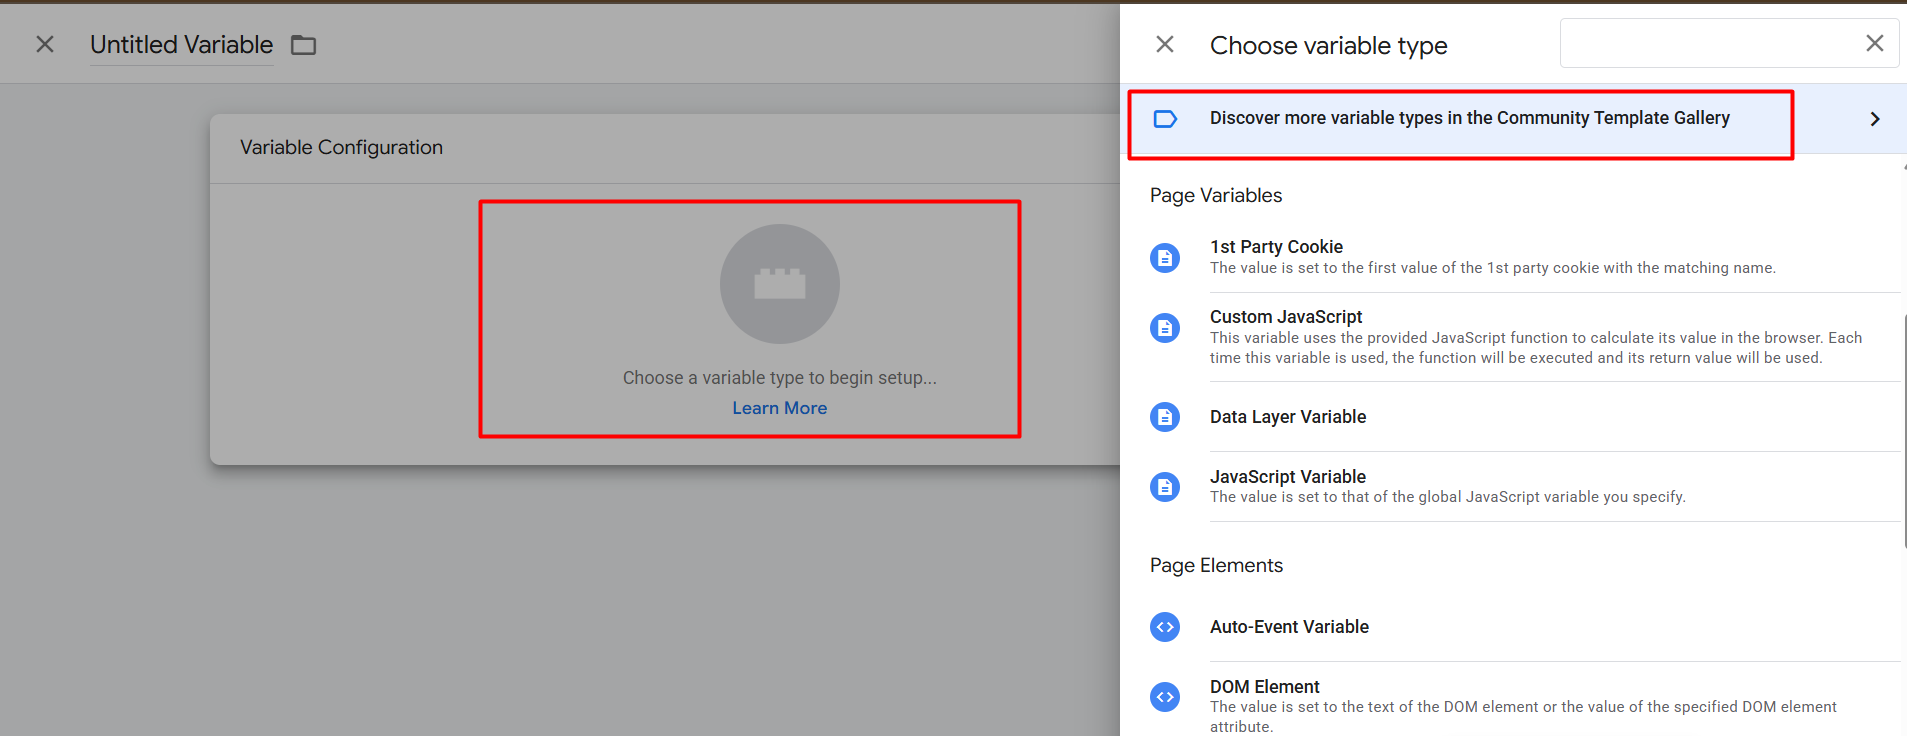
Here to select the variable type, we have to discover new variables.
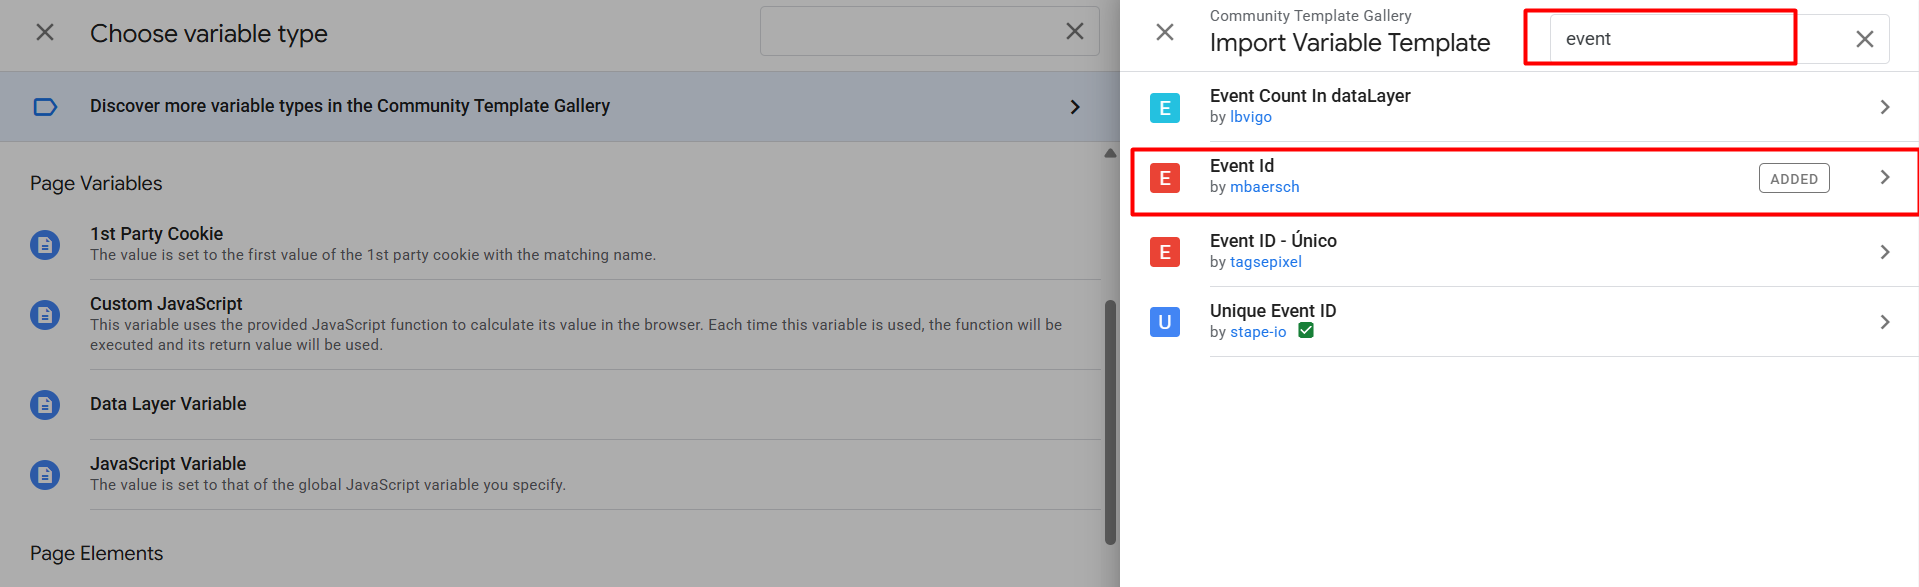
So from here, select search and select the Event ID variable template. Now after adding the new templates in the variable section, you can use it as your variable type.
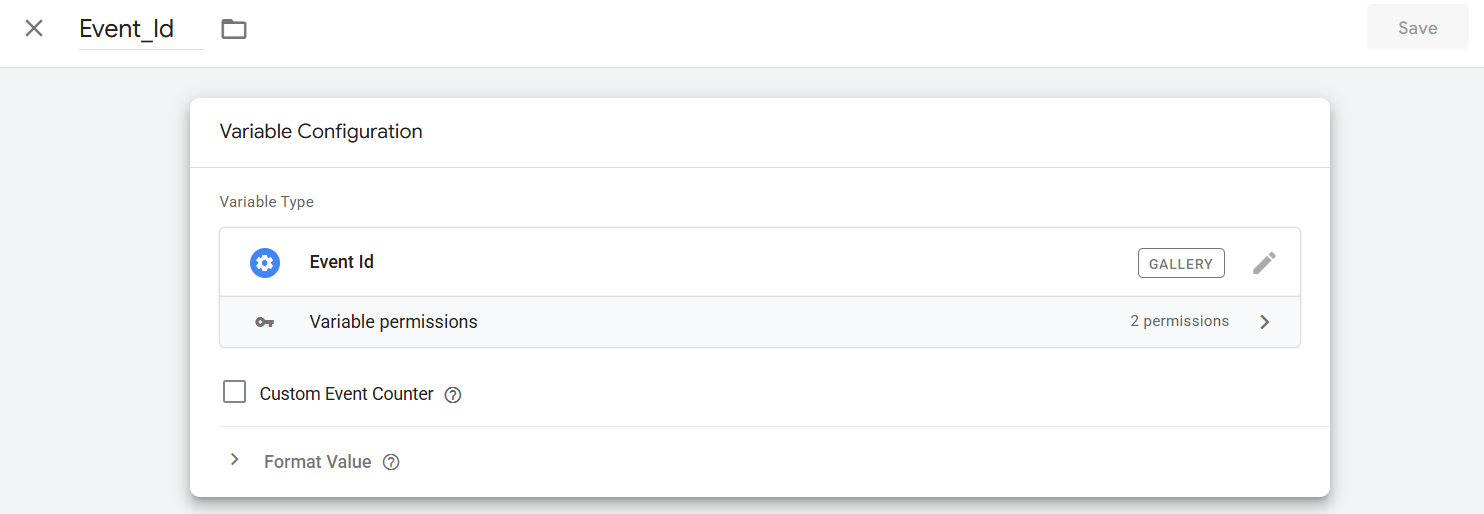
Event ID variable creation is now done. So again, go to your tag section because now we have to set this variable with every single tag. Let’s start it with the TikTok pixel templates.

In every TikTok pixel template, you can add this under the Parameter Override. In the same way, set up the event ID for every single tag.
Now again you have to set up this variable in your GA4 tag. Because with this tag you are sending data to your server. So here also it’s important to have the event ID.

Here in the GA4 tag you can send this event_id simply like this with the other parameters.
Great, your GTM web container is now ready to send data to your server, and in previous time we already completed our server container setup, so the server container is also ready to get data through the GA4 client in the server container.
GTM Server Container Setup
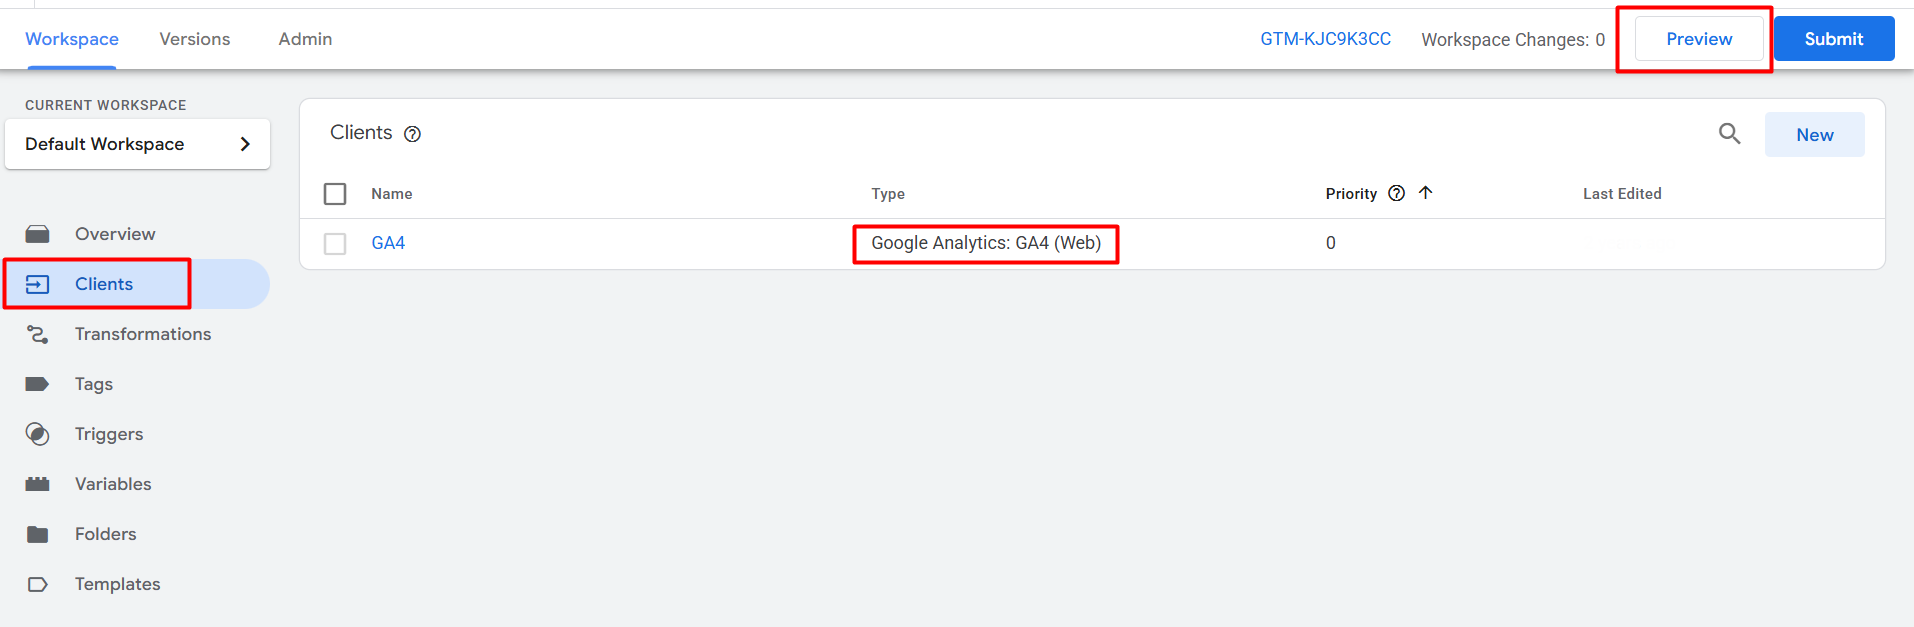
This is the view of your server container. Here you can see the GA4 (Web) client.
The server container client in Google Tag Manager (GTM) is responsible for capturing the data coming from the browser container. When a website user interacts, data such as page views or events is collected by the browser container and then sent to the server container through HTTP requests. The client of the server container processes that data, does any transformation/enrichment as necessary, and logs it to analytics platforms such as Google Analytics or TikTok. This server-side method helps in increasing performance, avoiding overhead on the browser, and also supporting more secure data handling to track it accurately.
To check that your server container is working perfectly, first click on the preview section from the server container.
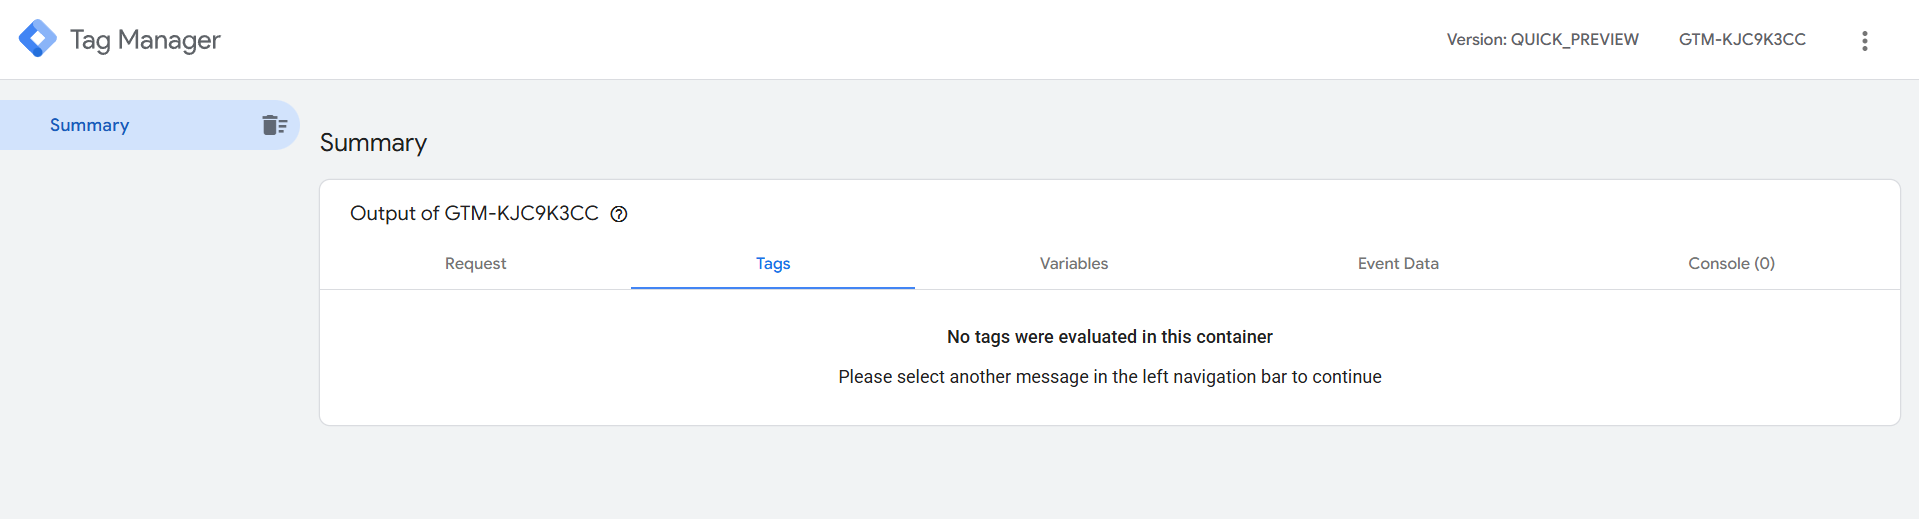
This is your first view after opening the preview from the server container. Now go to your GTM web container and create a new preview and do some events on your site.
Here you can see how we are getting data from the server in our server container. So we can send this through the API to our site.
To do it first, you have to add one tag template in your server container like the previous way.
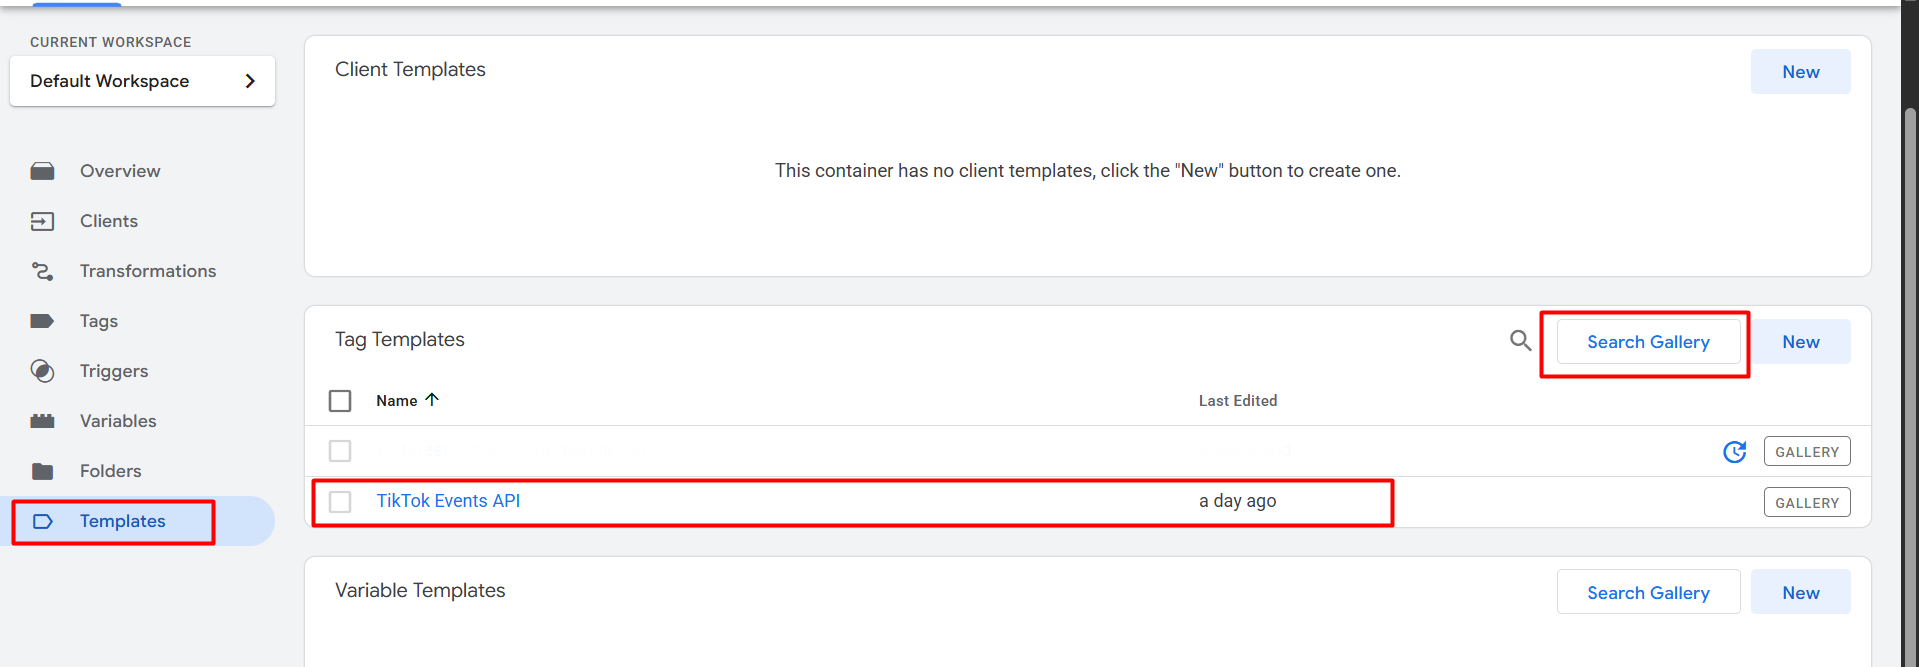
Now go back to the tags section and create a new tag, and as the tag type, select the recently added TikTok API.
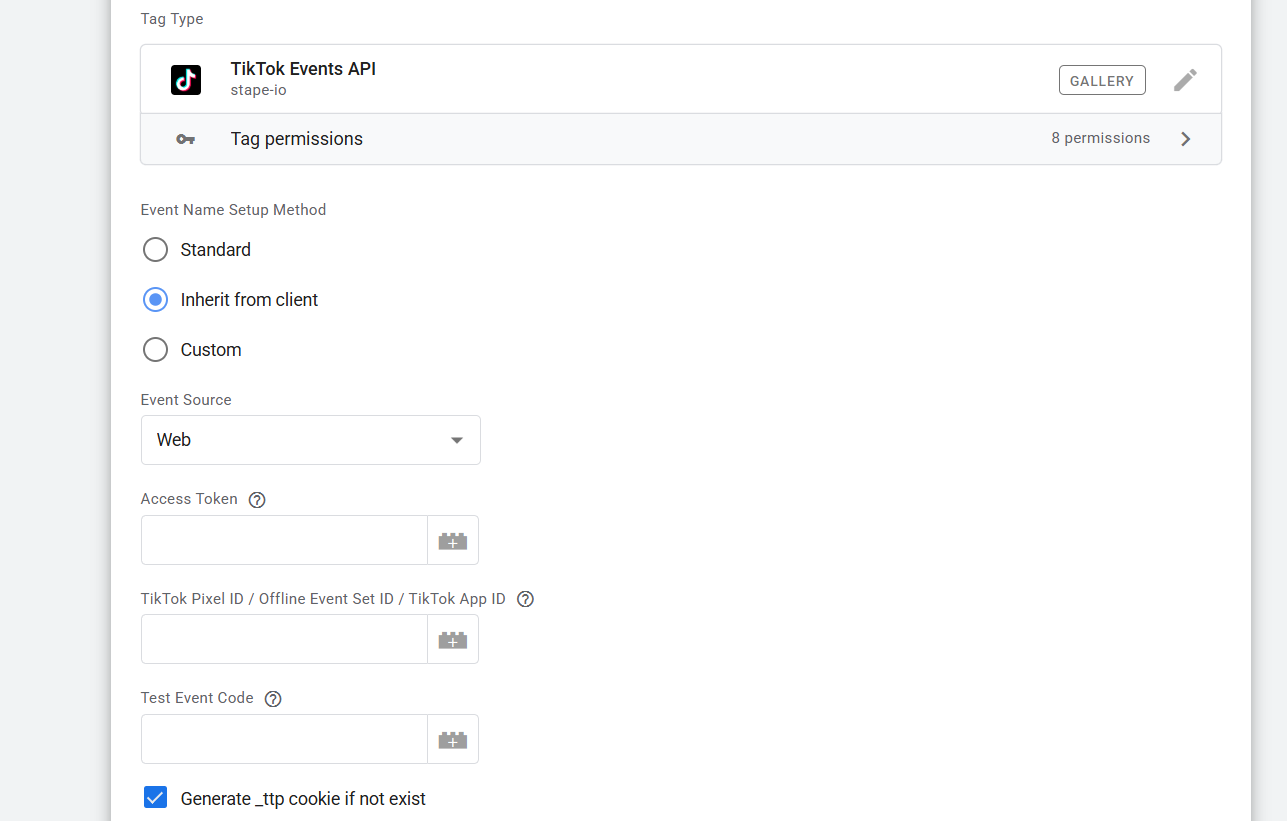
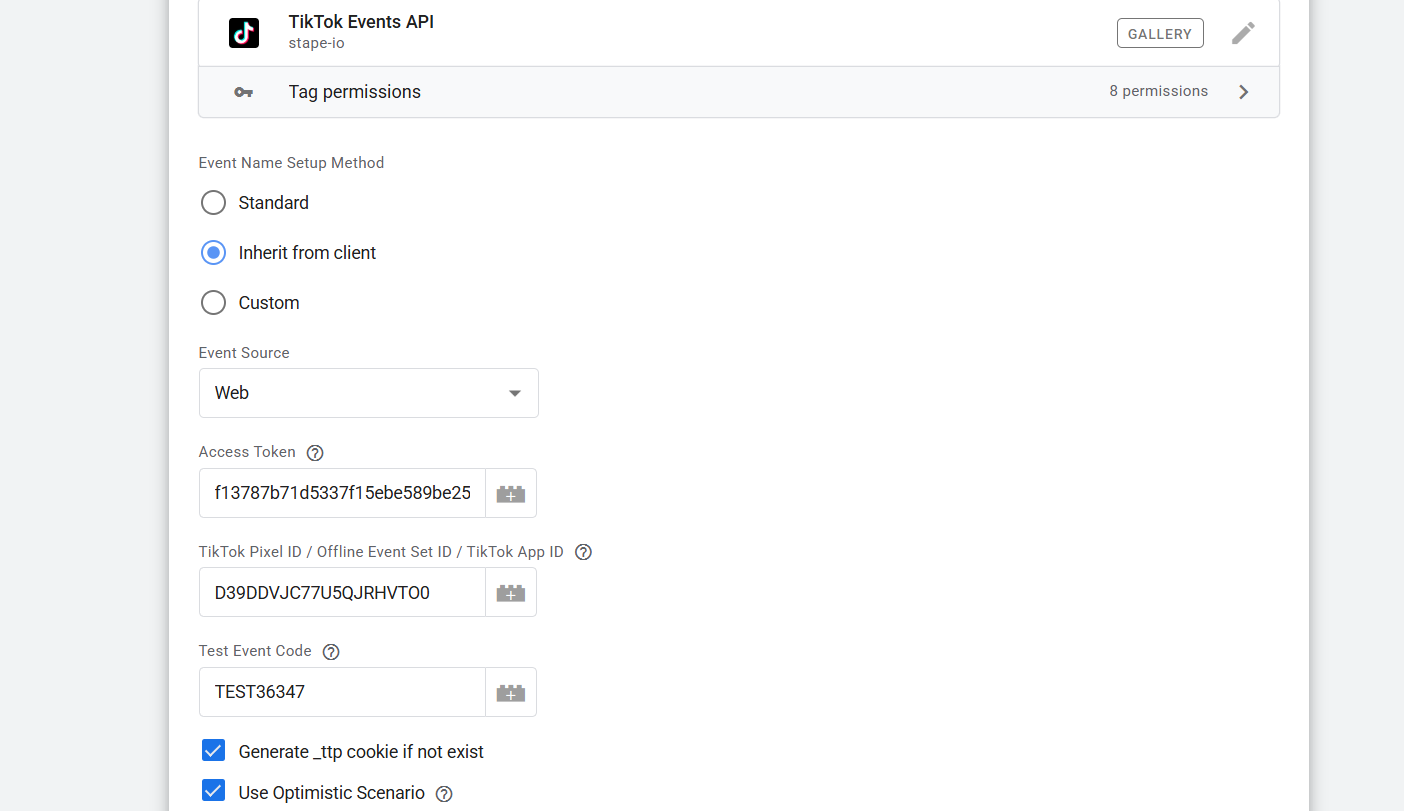
This is the view of your TikTok API. Here to complete the setup, we have to collect three things. one “Access Token,” the 2nd “TikTok Pixel ID,” and the test event code.
To get this, all we have to do is go back again to our TikTok event manager setting.
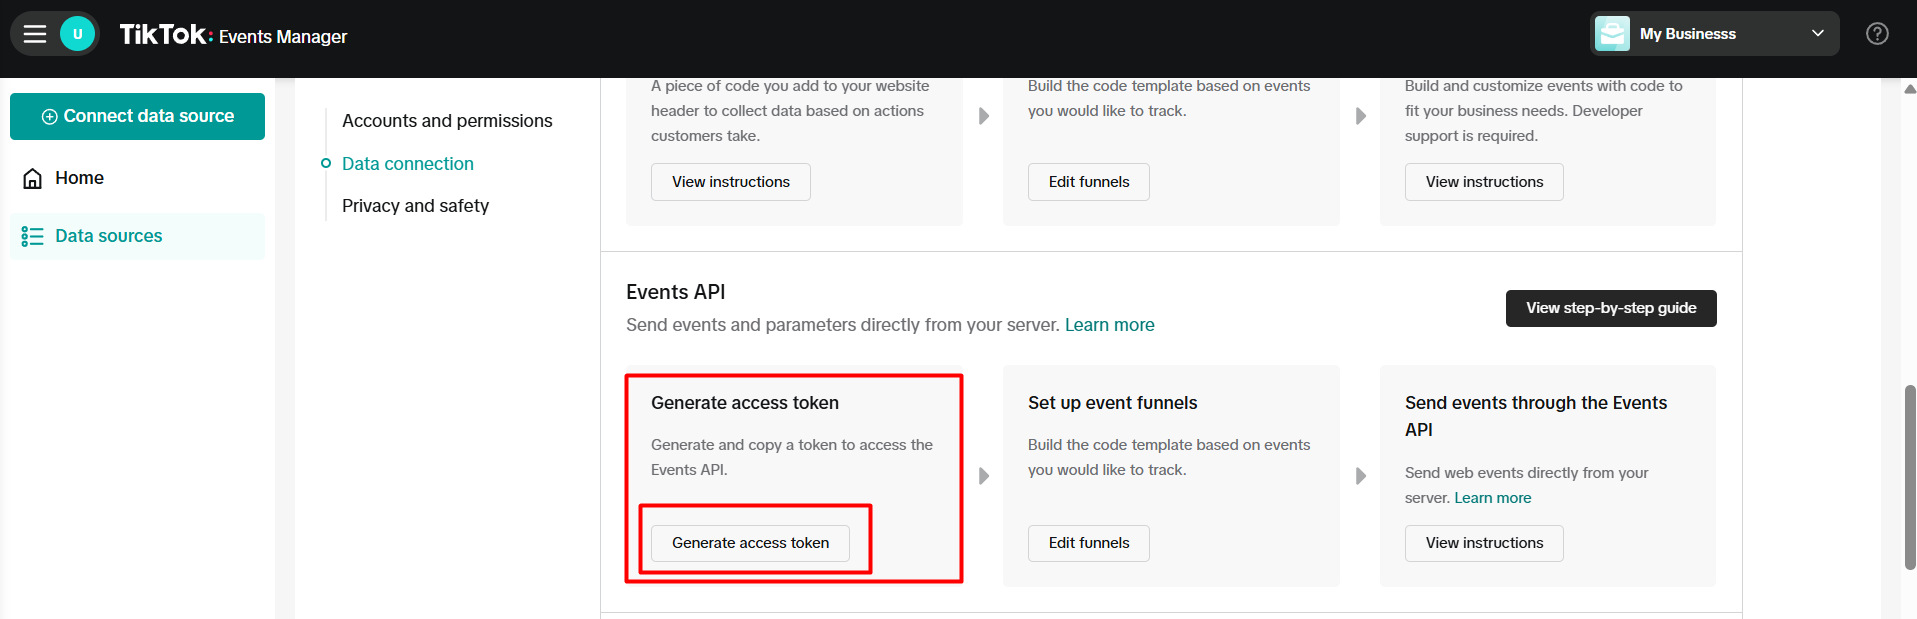
From the event manager setting, you can generate the access token. Now go to the “Test Events” section for the test event code.
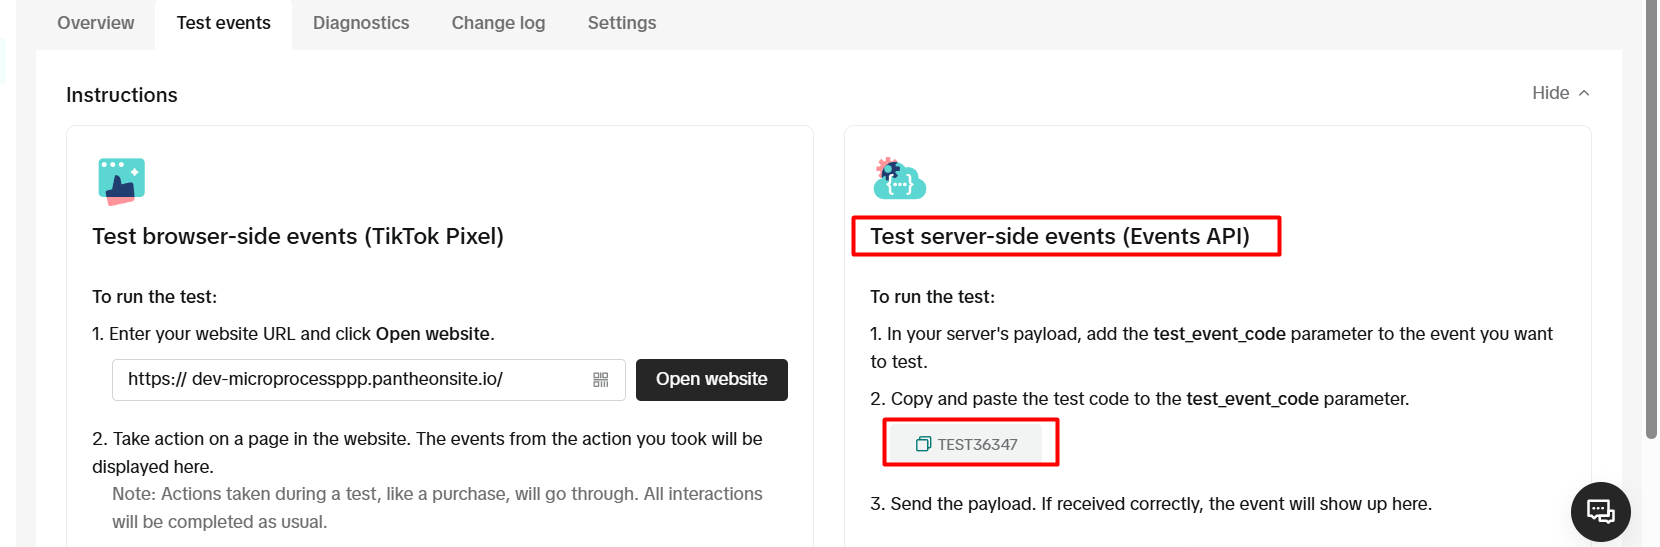
Now you can use this access token and the test events code in your server API because you already have the TikTok pixel code.
Great, now we just have to set up the trigger. So go to your trigger section.
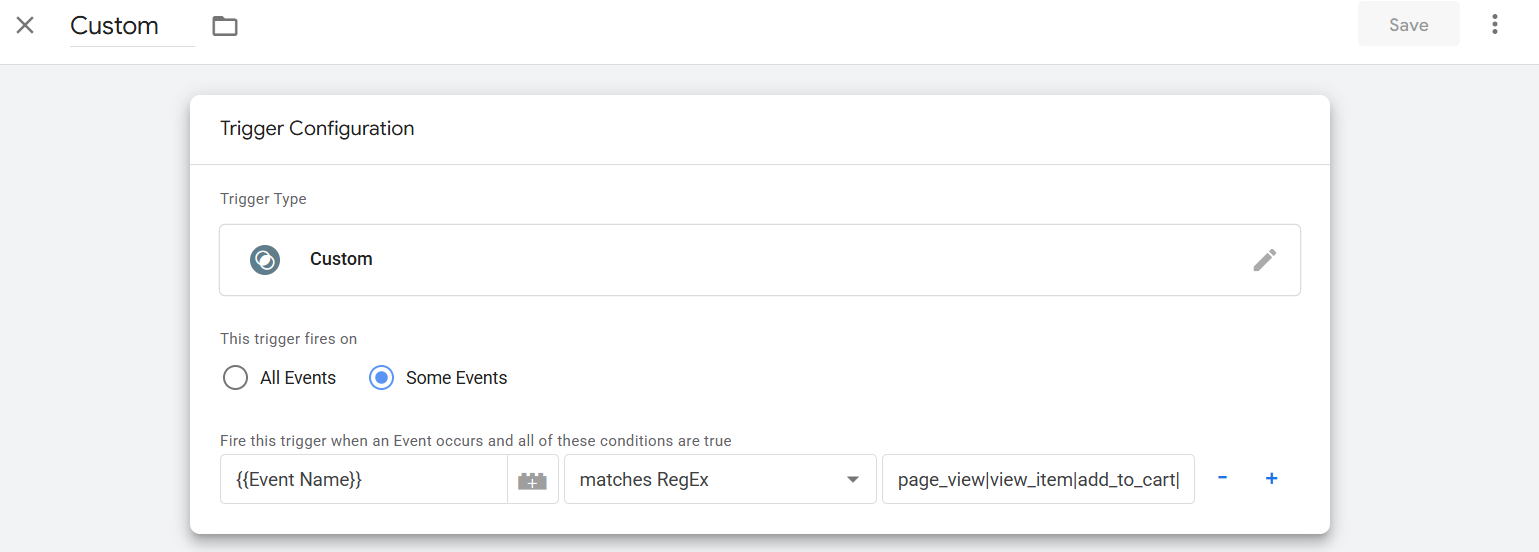
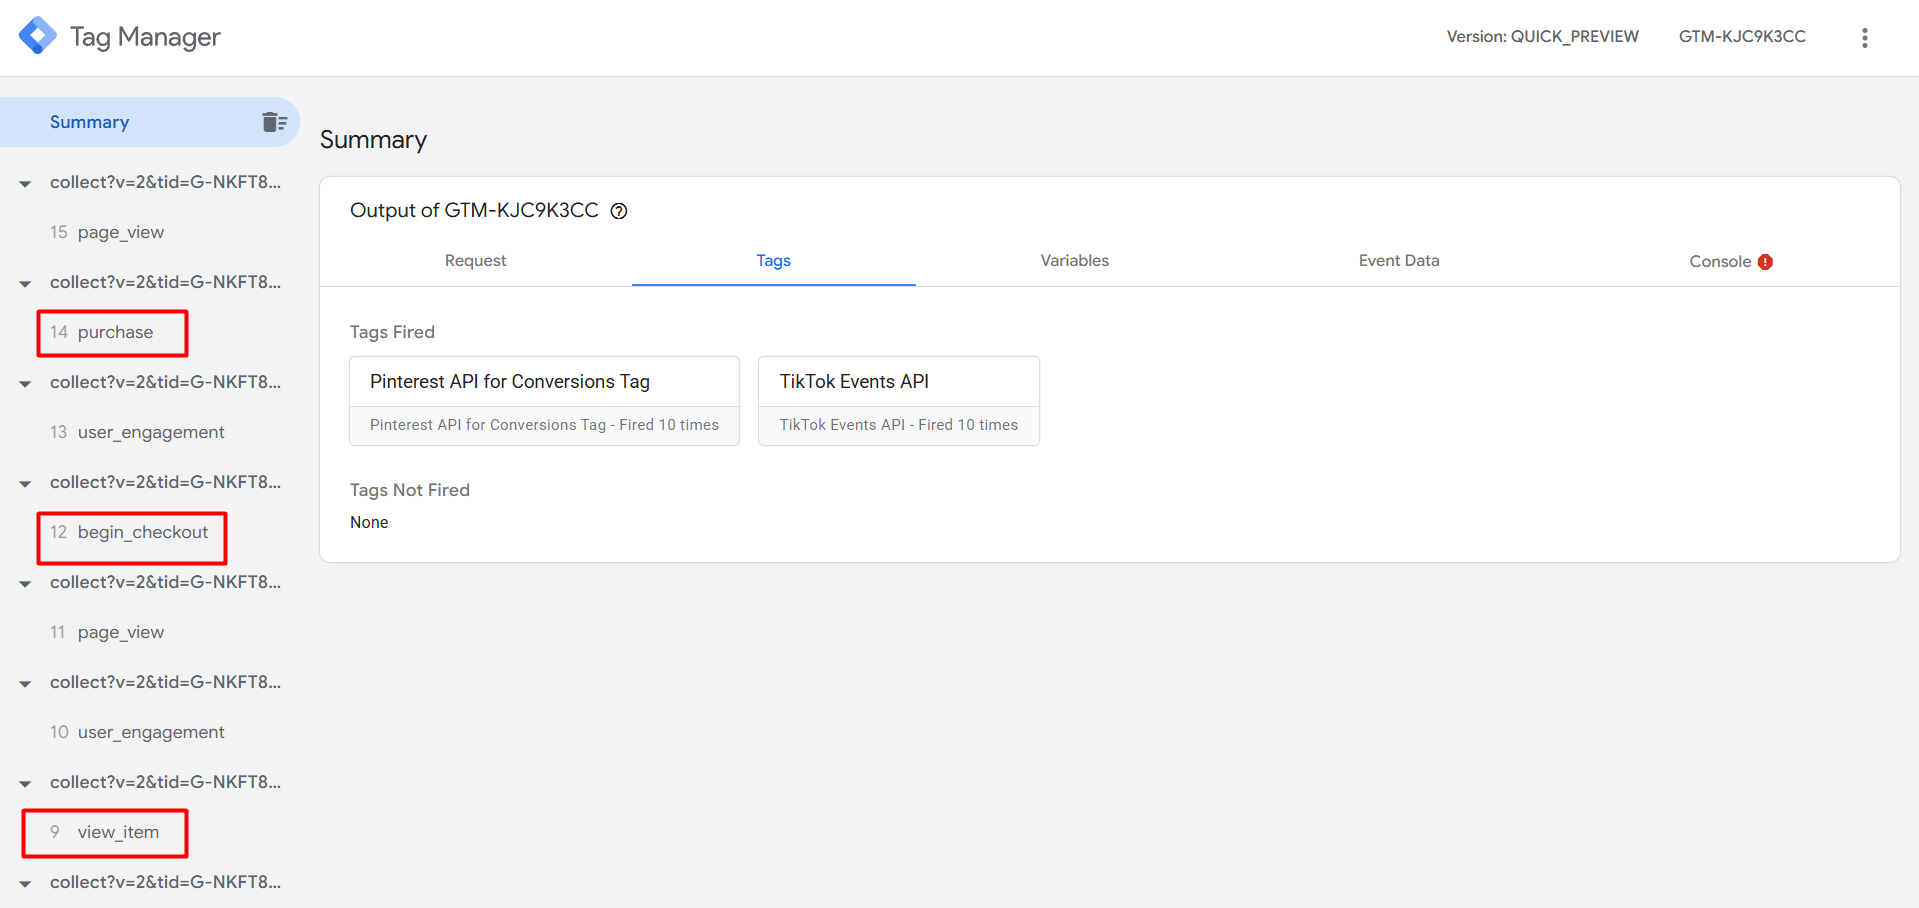
Now in the trigger, select “Custom” as the type, then select “Some Events.” Then you can see in the next first position we select “Event Name” in the next “Matches RegEx” and in the other place “page_view|view_item|add_to_cart|begin_checkout|purchase.” You can also do it for your trigger setup.
By using “Matches RegEx” in the trigger configuration, you can set up a Custom Trigger in GTM to track multiple events. You can allow the trigger to match particular event names using a regular expression (RegEx) by choosing “Matches RegEx” after entering “Event Name” in the first dropdown.
You enter “page_view|view_item|add_to_cart|begin_checkout|purchase” in the second field. This regular expression instructs GTM to start up whenever any of these things take place. Because the | symbol is used to separate the various event names, this trigger will activate for any of these events, enabling you to record actions at every stage of the customer journey, from page viewing to purchase.
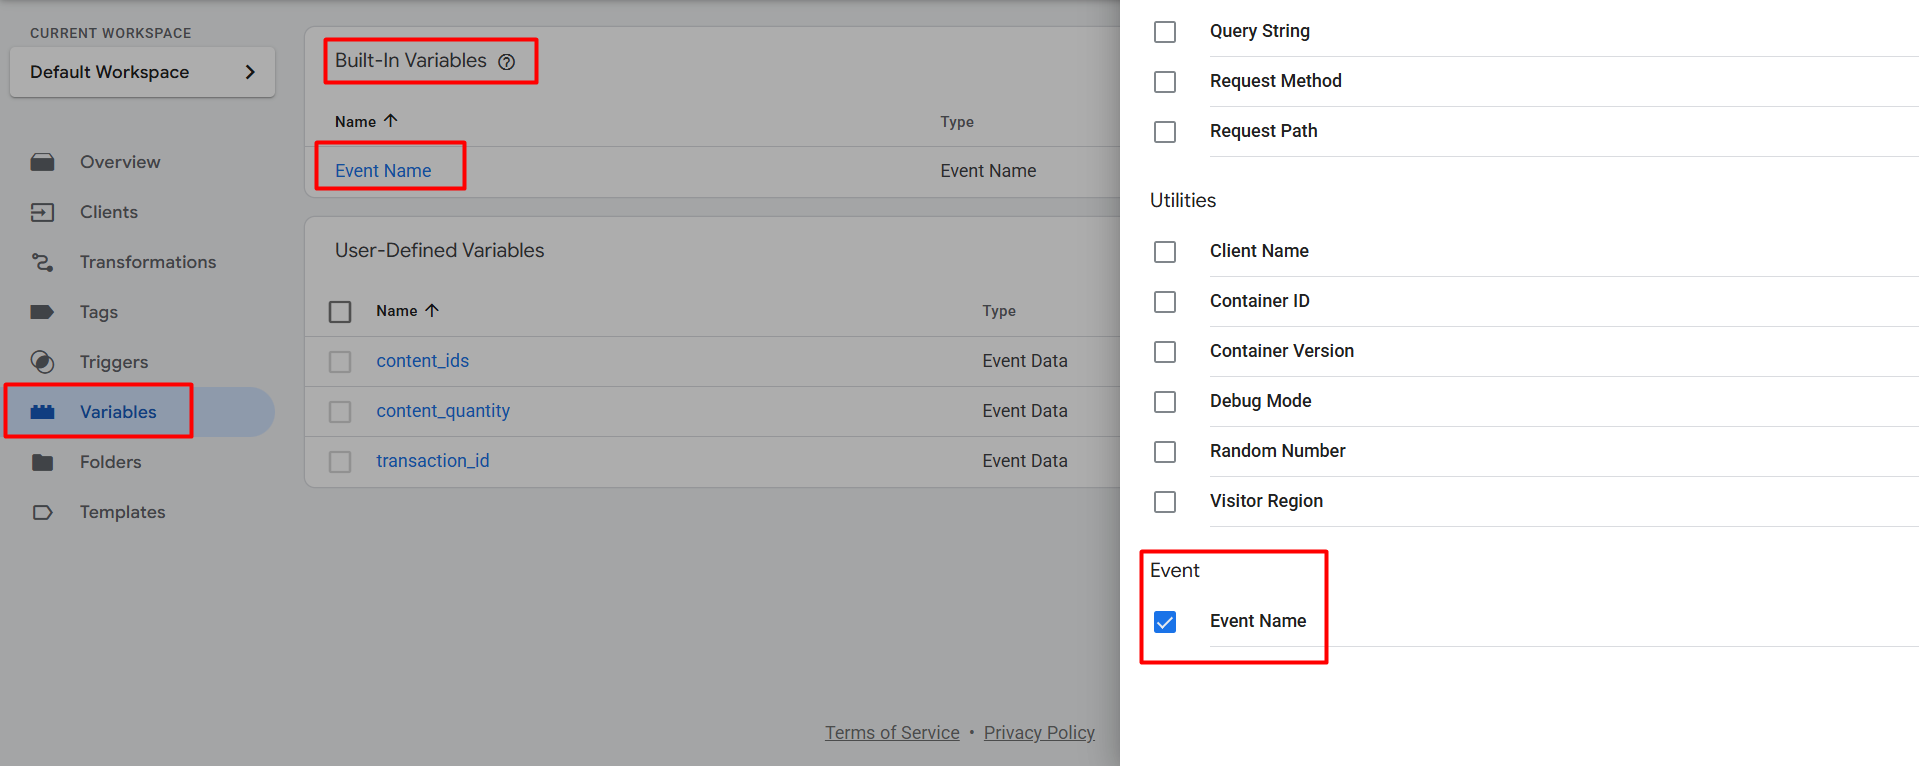
But in the first place, if you find that the “Event Name” is missing, then go to your variables section and from the built-in variables, select the “Event Name,” and you’re done.
So with this, your Server API setup is now done. This server API will collect every single important piece of data as per TikTok rules, and it will send it to TikTok. To check if it is working perfectly or not, you can run one more preview. After the preview, you can publish both of your containers.


