You may have heard of a “UTM” if you’ve ever sent out an email campaign, posted a link on social media, or run an online advertisement. However, what is it and why is it important to you? Let’s put it simply.
A UTM is simply a fancy term for a little code that is appended to the end of a URL. It stands for Urchin Tracking Module, but don’t worry, you don’t need to remember that part. It functions similarly to a tracking tag and aids in determining the true source of website traffic.
Consider that you are sharing a post on Instagram, sending out a newsletter, and running an advertisement on Facebook. You wouldn’t know which one is driving the most traffic to your website if you didn’t have a UTM. However, you can quickly determine whether people are clicking on your email, your advertisement, or that Instagram post you put so much effort into by adding a UTM to each link.
A URL with a UTM looks like this: www.yoursite.com?utm_source= facebook&utm_medium=paid&utm_campaign={{campaign.name}}&utm_term={{adset.name}}&utm_content={{ad.name}}&fbadid={{ad.id}}
Okay, let’s break that down:
utm_source=facebook: This indicates the source of the traffic. It’s from Facebook in this instance. You can therefore be certain that whoever clicked on this link did so as a result of a Facebook advertisement.
utm_medium=paid: This reveals the kind of media or marketing strategy being employed. “Paid” indicates that this traffic originated from a sponsored advertisement rather than from natural reach, such as shares or regular posts.
utm_campaign={{campaign.name}}: The name of your particular campaign is dynamically pulled in this section. Each Facebook ad campaign is given a name when it is set up, such as “Holiday Special” or “Summer Sale.” When you examine your analytics, this enables you to determine which campaign is generating the most traffic.
utm_term={{adset.name}}: This keeps track of the campaign’s ad set name. Facebook lets you group your ads into ad sets, which are typically based on various bidding or targeting techniques. This enables you to determine which target market or approach is generating the most traffic.
utm_content={{ad.name}}: This keeps track of the particular ad that was clicked. This feature assists you in tracking which particular ad is being clicked if you have multiple versions of the same ad (e.g., different headlines, images, or calls to action). For instance, you can determine which of two ad versions is performing better if you are testing them.
fbadid={{ad.id}}: This serves as the advertisement’s unique identifier. This portion of the URL allows you to track which Facebook ad actually resulted in the click or conversion because each ad has its own ID.
Why bother adding all these codes?” you may be asking yourself now. The benefit of UTMs is that they provide clarity. You can see precisely which channel, post, or email is generating clicks, rather than merely speculating about which of your marketing initiatives is effective.
It keeps track of how your audience finds you, much like a personal assistant. You can then improve the things that aren’t working or increase the efforts that are working once you know what they are.
Let’s set up the UTM parameter.
UTM for Facebook: Is this the format for Facebook UTM tracking “?utm_source= facebook&utm_medium=paid&utm_campaign={{campaign.name}}&utm_term={{adset.name}}&utm_content={{ad.name}}&fbadid={{ad.id}}”
Every time, if you add this link after your main landing page URL, then the UTM will start working. After add this link your final url will look like this “www.yoursite.com?utm_source= facebook&utm_medium=paid&utm_campaign={{campaign.name}}&utm_term={{adset.name}}&utm_content={{ad.name}}&fbadid={{ad.id}}”
Every time when you set up your campaign, you can paste this link in the place of your landing page.But before setting up the UTM, don’t forget to complete the GA4 integration in your site.
UTM for Google:Now this is the “{lpurl}?utm_source=google&utm_medium=paid&utm_campaign={campaignid}&utm_content={adgroupid}&utm_term={keyword}&gadid={creative}
” format for Google Ads.
Like the same way you can make your UTM link for Google with this new format, and you can use it in your landing page place. But for Google, you can do something more from the Google Ads setting. Let’s go and check it out.

In the Admin section of your Google Ads, you can set up the tracking link under the tracking section. in the tracking template if you used this format “{lpurl}?utm_source=google&utm_medium=paid&utm_campaign={campaignid}&utm_content={adgroupid}&utm_term={keyword}&gadid={creative}
”Then dynamically this URL will start working in your every single ad campaign.
Final URL Suffix: You can add unique tracking parameters to the end of the URL of your ad using Google Ads’ Final URL Suffix. For improved performance analysis, this aids in tracking particular campaigns, advertisements, or audience data. And Save.
Like the same way you can do it for your other platforms, like TikTok, Pinterest, Bing etc.
Tiktok: ?utm_source=tiktok&utm_medium=paid&utm_campaign=__CAMPAIGN_NAME__&utm_term=__AID_NAME__&utm_content=__CID_NAME__&ttadid=__CID__
Pinterest: ?utm_source=pinterest&utm_medium=paid&utm_campaign={campaign_name}&utm_term={adgroup_name}&utm_content={creative_id}&padid={adid}
Bing: {lpurl}?utm_source=bing&utm_medium=paid&utm_campaign={campaign}&utm_content={AdGroupId}&utm_term={AdGroup}&bingid={CampaignId}
Here are all the formats you can see for those platforms. But when you are not using this whole platform, then!! Then we have to use UTM Builder. Let’s go for it then.
Go to Google and search UTM builder or you can go to this one: “https://ga-dev-tools.google/campaign-url-builder/”
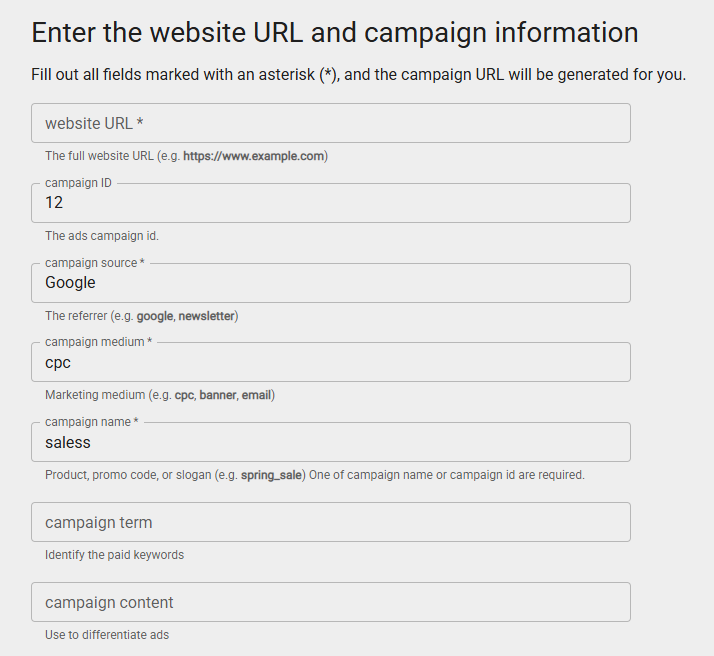
Use all these fields as per your need. Here we already know utm_source tracks the source of the traffic (such as Google or a newsletter), utm_medium tracks the type of marketing (such as email or CPC), and utm_campaign helps identify a specific campaign or promotion, and utm_id aids in identifying a specific ad campaign. While utm_content aids in differentiating between different ad or link variations, utm_term is used to track paid search keywords.
Here in every section you can put anything as per your need, but in the “term” section you can add this “{keyword}” value for dynamic tracking. You can check it out in our previous example. With this UTM builder you can make your targeted link for every single work.
Let’s analyze the data through Google Analytics 4.
A strong tool that offers insightful data on user behavior and website traffic is Google Analytics 4 (GA4). By integrating GA4, you can monitor UTM parameters and assess the success of marketing initiatives. You can enhance your digital marketing performance by using GA4 to measure ROI, optimize strategies, and make data-driven decisions. However, we will only be concentrating on UTM data analysis for the time being.
Go to your GA4 “Report” section.
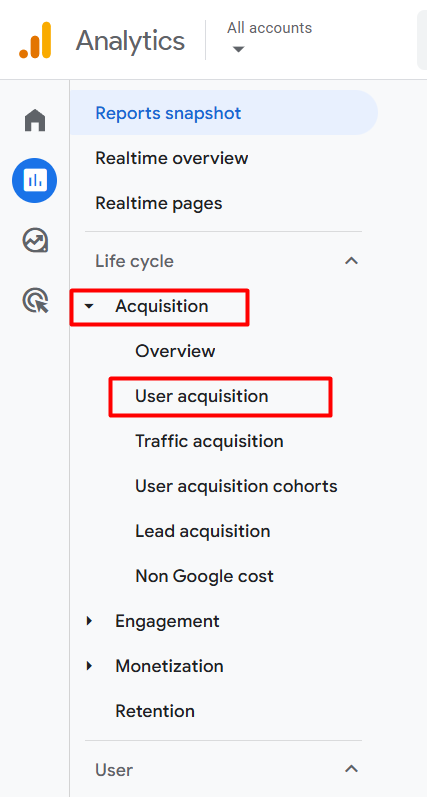
From the report section you have to go to the acquisition section. The two sections, “Acquisition” and “User Acquisition,” in Google Analytics track and analyze how users find and interact with your site in different ways. “Acquisition” gives an overview of how traffic arrives at your site.
User Acquisition: Focuses specifically on how new users first arrive at your site, detailing their sources and channels.
Traffic Acquisition: Shows how all website traffic is acquired, including both new and returning users across various channels.
Select the User Acquisition
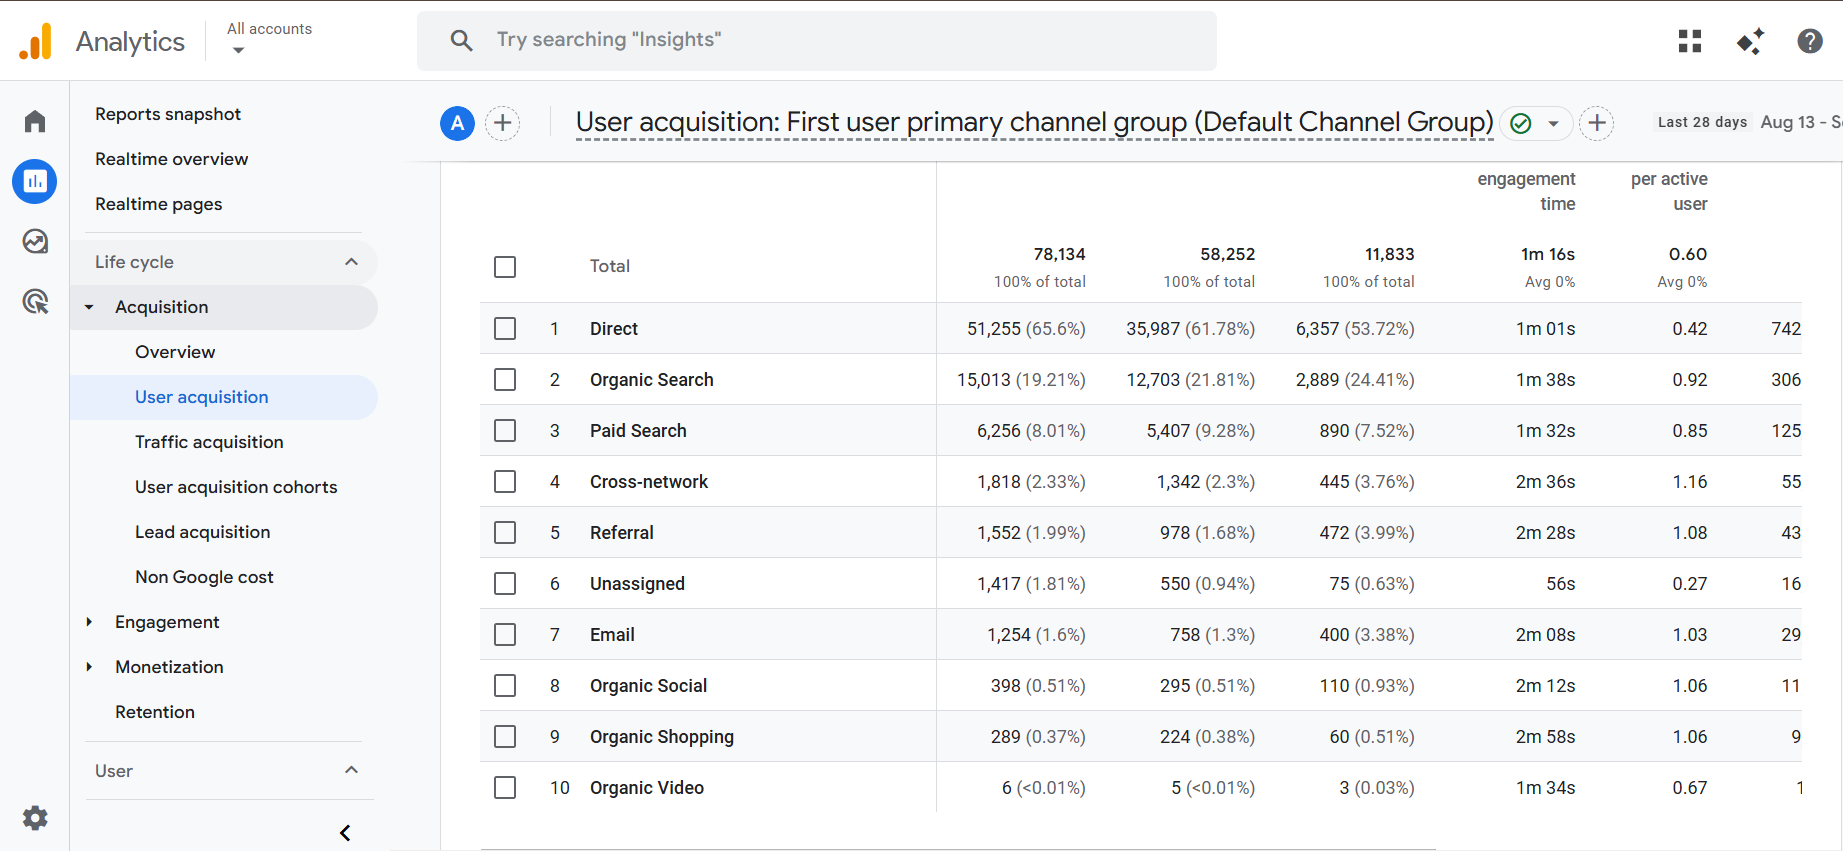
Here on this page you can see how your traffic is interacting with you for the first time. Through the UTM parameter, we already send a lot of different values to the GA4 here in this place; you can check all this data.
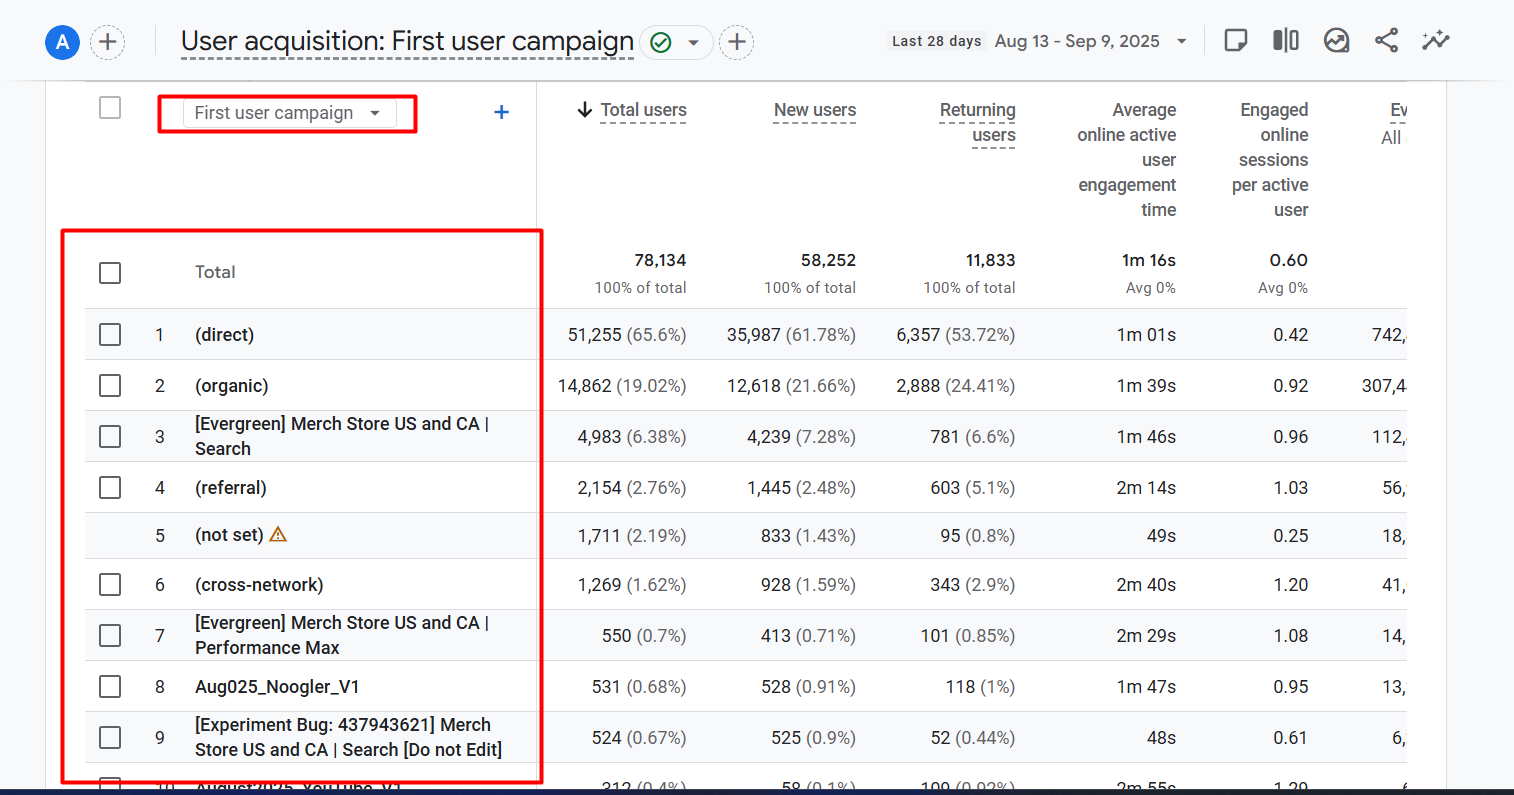
Here in this picture you can see we selected “First User Campaign,” and we started getting all of the campaign names. In the same way, you can identify your data.
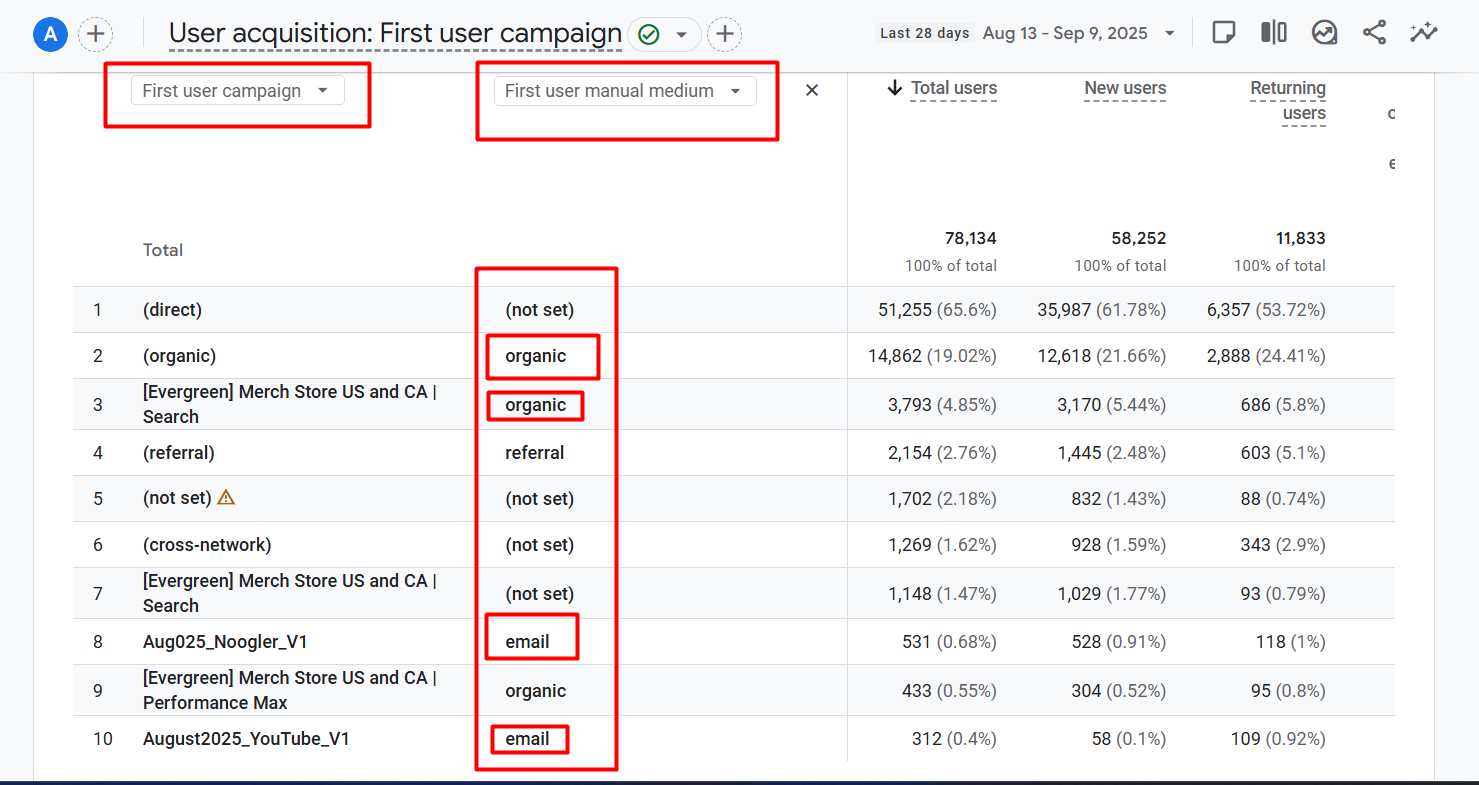
In this picture you can see we created more conditions; we want to see the campaign medium. Like the same way you can watch your data. Here in these two places, you will be able to see every single value that you send through the UTM parameters. So let’s enjoy the data.


