TikTok is the best and top-growing video-sharing platform after YouTube. Because in 2025 TikTok has over 1.5 billion monthly active users globally. That’s why day-to-day it’s making a big space for the marketers to increase their targeted amount of traffic.
As of this time, TikTok has over 1.12 billion daily active users worldwide. That’s why every day our single small activity also can give us a lot of opportunity.
TikTok advertisements have revolutionized the field of digital marketing. TikTok offers marketers a special chance to connect with highly specific audiences because millions of users spend their leisure time interacting with content.
By displaying your ads to the most relevant users based on user behavior and preferences, the platform’s algorithm makes it simpler to increase conversions and meet traffic targets. Essentially, TikTok is a priceless tool for brands looking to optimize their marketing impact because of its capacity to capture attention and encourage engagement.
But whenever we talk about marketing, their tracking is the key point of success. Because an essential component of any effective marketing plan is tracking. Marketers will lose important information that could guide campaign choices if traffic and user activity are not accurately tracked.
Ineffective tracking can result in lost opportunities, resource waste, and a failure to properly optimize campaigns. As a result, accurate tracking guarantees that all marketing initiatives are quantifiable and adaptable for improved results.
That’s why for TikTok ads, first we should confirm the conversion or TikTok pixel tracking. TikTok will gather useful information about our traffic in this way, which is crucial for maximizing ad performance. In order to improve results, we can use this data to optimize our campaigns and make sure we’re reaching the most relevant, targeted audience.
How TikTok Pixel Conversion Tracking Works!
Like the other platform, the TikTok pixel also works by dropping a cookie in the user’s browser to track their activity. With this cookie, the TikTok pixel collects all of the data, like page views and other more standard events.
Also TikTok Pixel can track users across sessions using these cookies. It builds a profile of user behavior to help optimize your campaigns.
So don’t be late; let’s start the browser-side conversion tracking for our TikTok ads account.
Tiktok Standard Events
Predefined actions or behaviors that the TikTok Pixel can monitor on your website are known as TikTok Standard Events. These events help you measure specific actions users take, making it easier to optimize your ads.
All of these are standard events. Below are the predefined standard events that TikTok currently supports: Add Payment Info, Add to Cart, Add to Wishlist, Application Approval, Complete Registration, Contact, Customize Product, Download, Find Location, Initiate Checkout, Purchase, Schedule, Search, Start Trial, Submit Application, Submit Form, Subscribe, View Content.
But at the end, we will just set up the standard events for e-commerce tracking. In the same way, you can track the rest of the standard events as per your need.
Setup Tiktok Pixel Conversion Tracking
To complete this conversion tracking, we will track these five standard events: page view, ViewContent, AddToCart, InitiateCheckout, and PlaceAnOrder.
So first let’s go to your Google Tag Manager. Because through the GTM we will complete our TikTok pixel tracking. But before starting the work, we have to add one new tag template in our GTM.
Tag Template: In Google Tag Manager (GTM), a tag template is a pre-configured, editable framework that makes managing tags easier. Without having to write custom JavaScript, it enables you to swiftly deploy tracking codes (tags) such as Facebook Pixel, Google Analytics, and others.
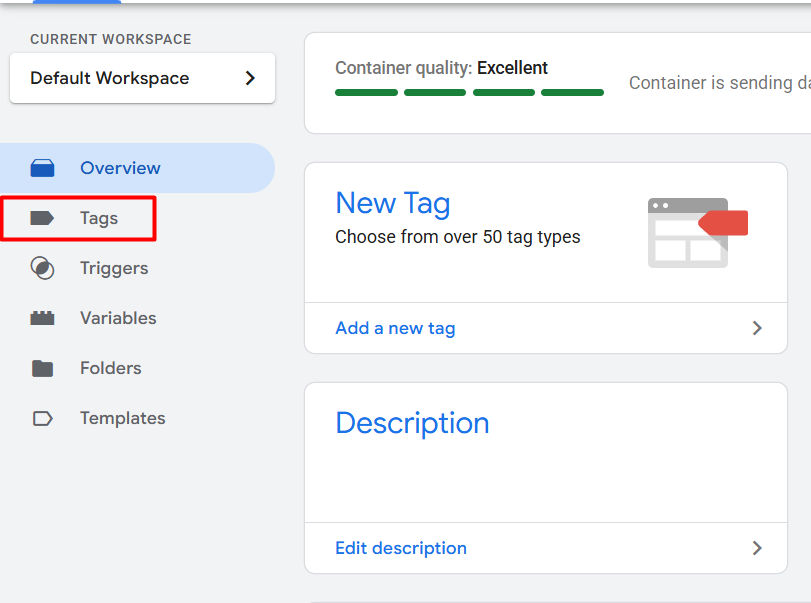
So go to your GTM and click on the “Template” section.

Then click on “Search Gallery” and search “TikTok.”
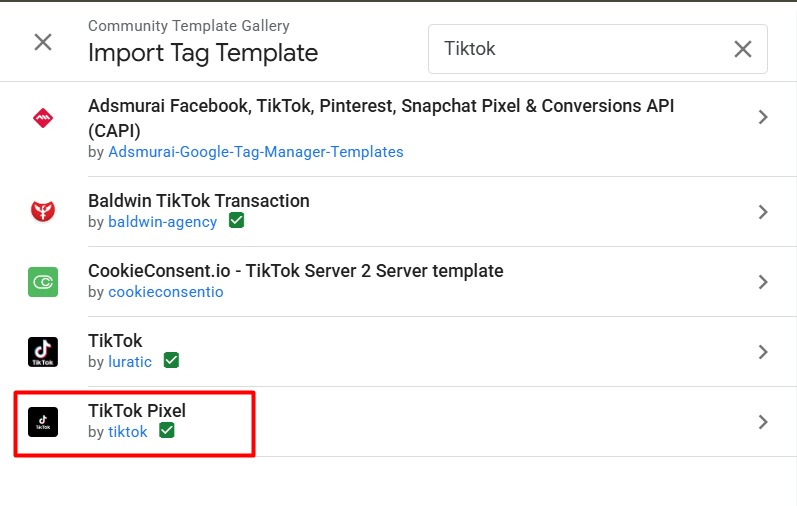
Now add this template to your workspace.

Now after clicking on the “Tag” section on the GTM. Click on the “New” button to create a new tag in your GTM.
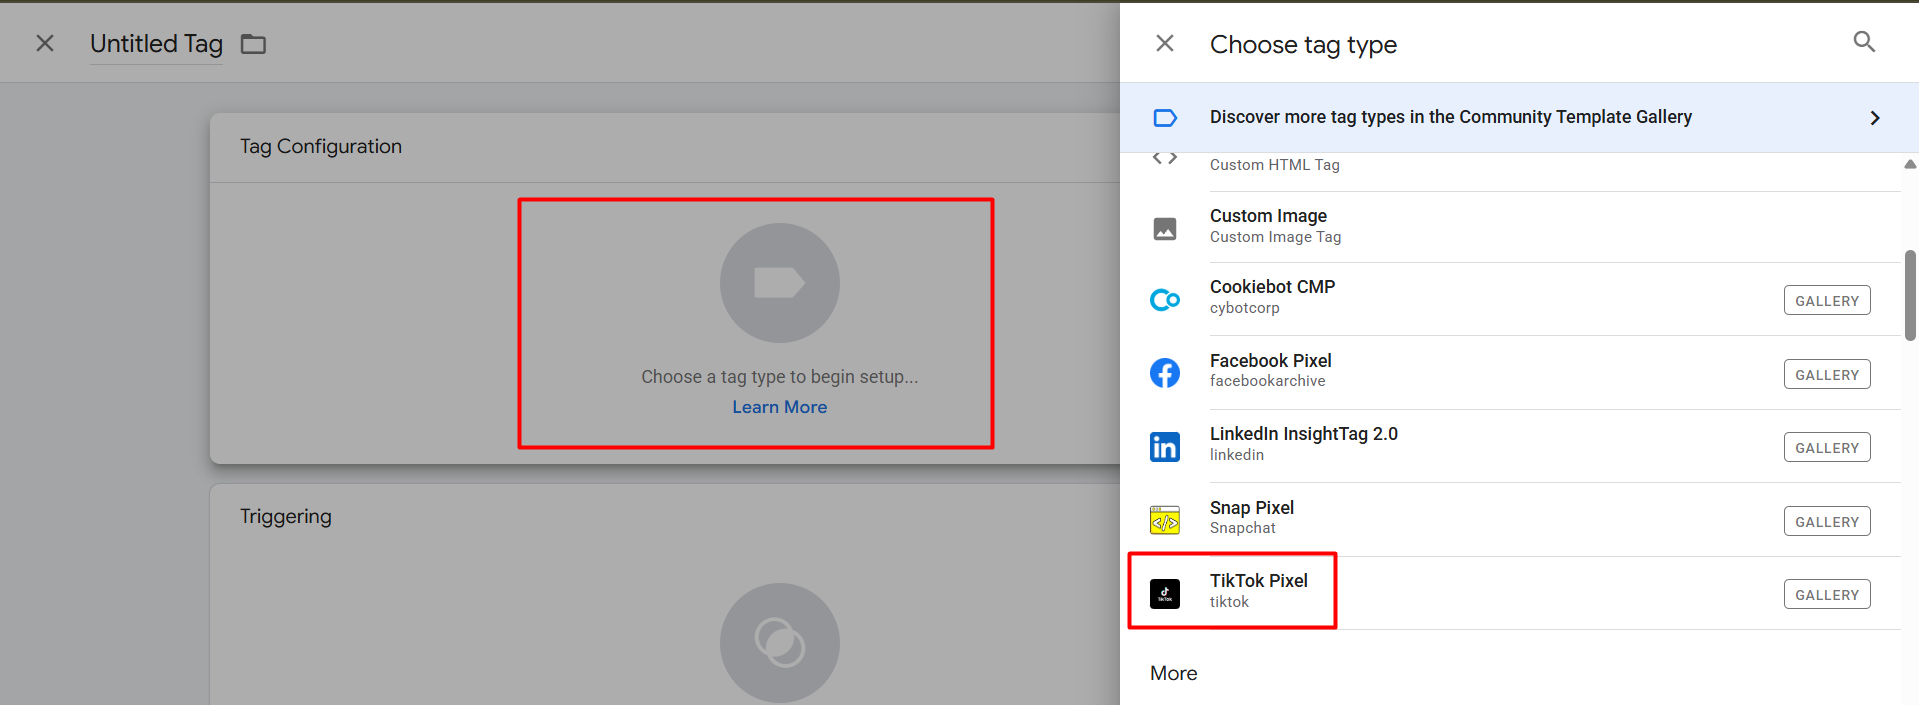
Here you can see your “Template” is now ready to work for you. Simply select this and start working with us.
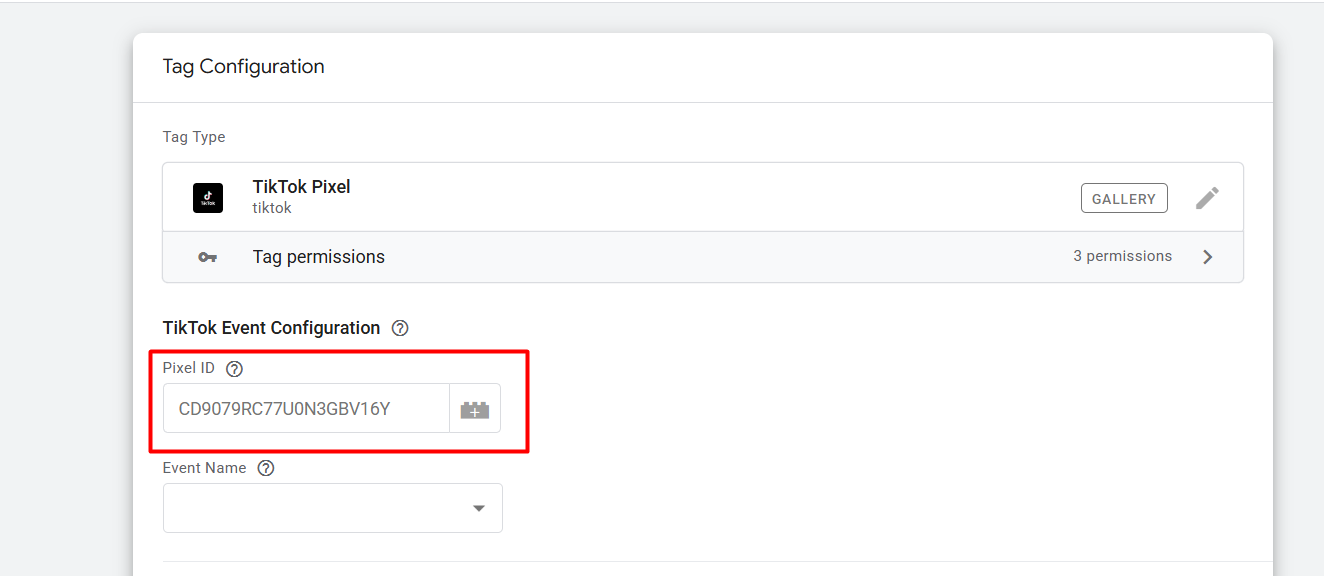
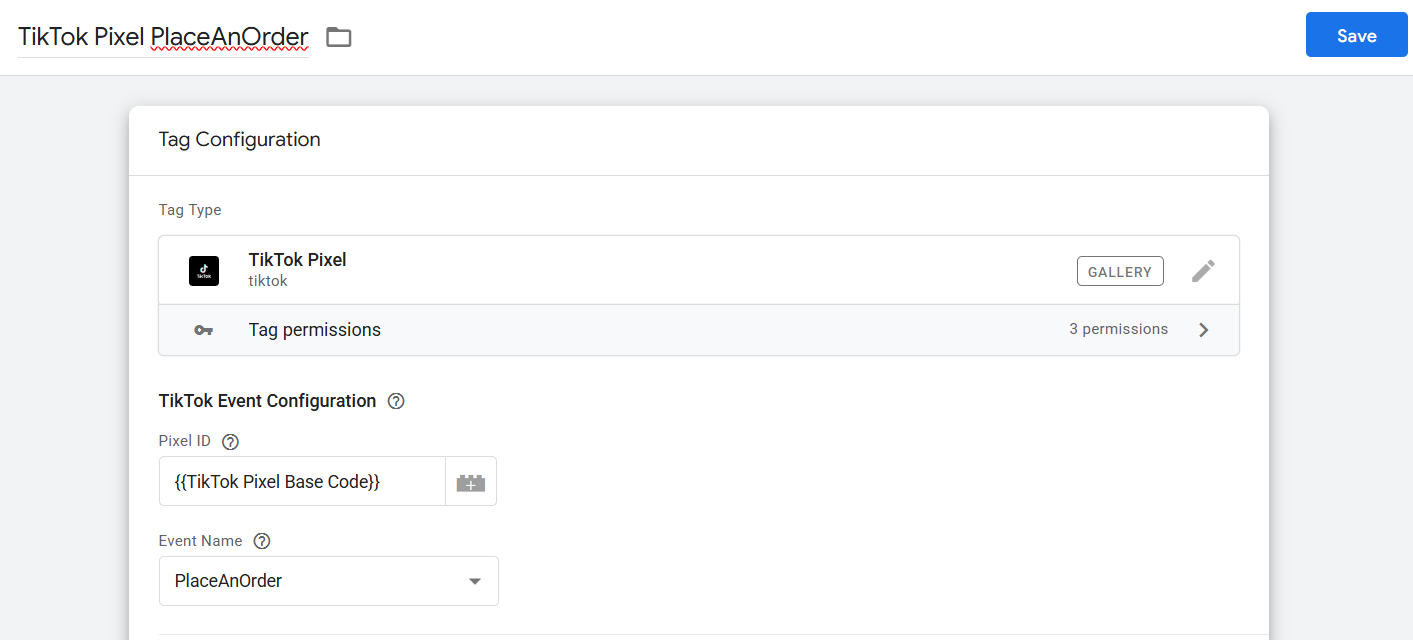
After selecting the targeted template for your TikTok pixel tracking, here you can see the first option is asking for the pixel ID.
This is a unique ID that will be provided from the TikTok Ads account. Also from the “Event Name” section, if you try to find out the page view event, you will not be able to get it.
TikTok’s Tag Template in Google Tag Manager (GTM) doesn’t include a specific “Page View” event because TikTok Pixel automatically tracks page views by default as part of its core functionality. When you implement the TikTok Pixel.
So for the first page view event, we have to use the TikTok pixel base code in our GTM, and then it will easily start working. So let’s go to collect the base and pixel ID from the TikTok Ads account.
Tiktok Pixel Base Code Installation
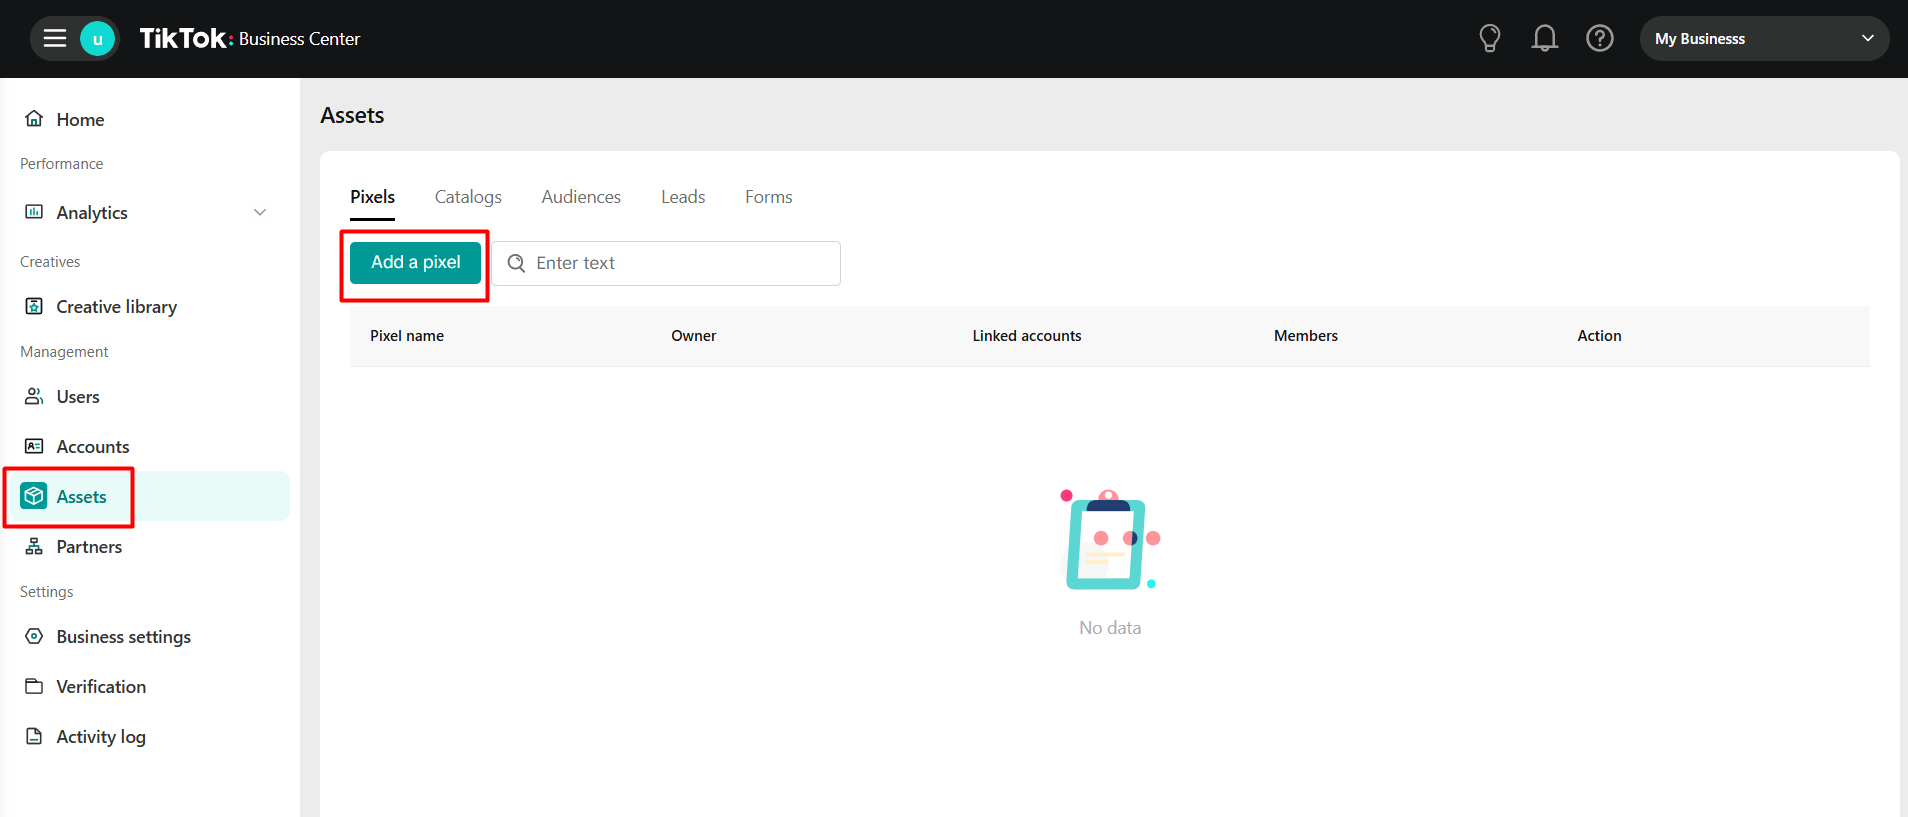
After going to your TikTok business center, you will get this interface. So from here, select the “Assets” section, then click on the “Add a pixel” button.
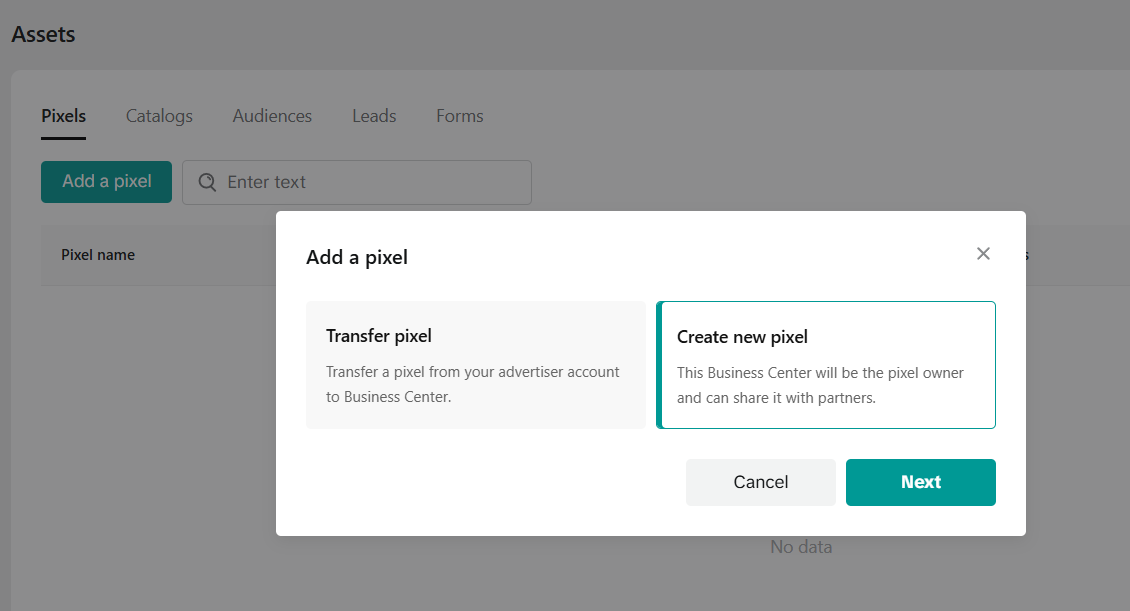
After clicking on the “Add Pixel” button, you will get this top-up. From here, select “Create new pixel” and next.
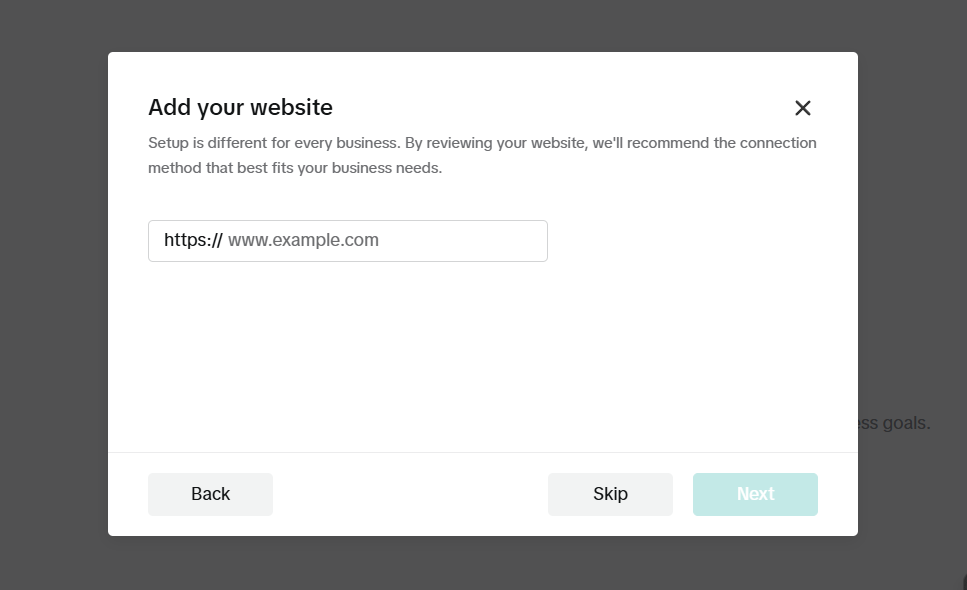
Now, from the new interface, paste your site link to go next.
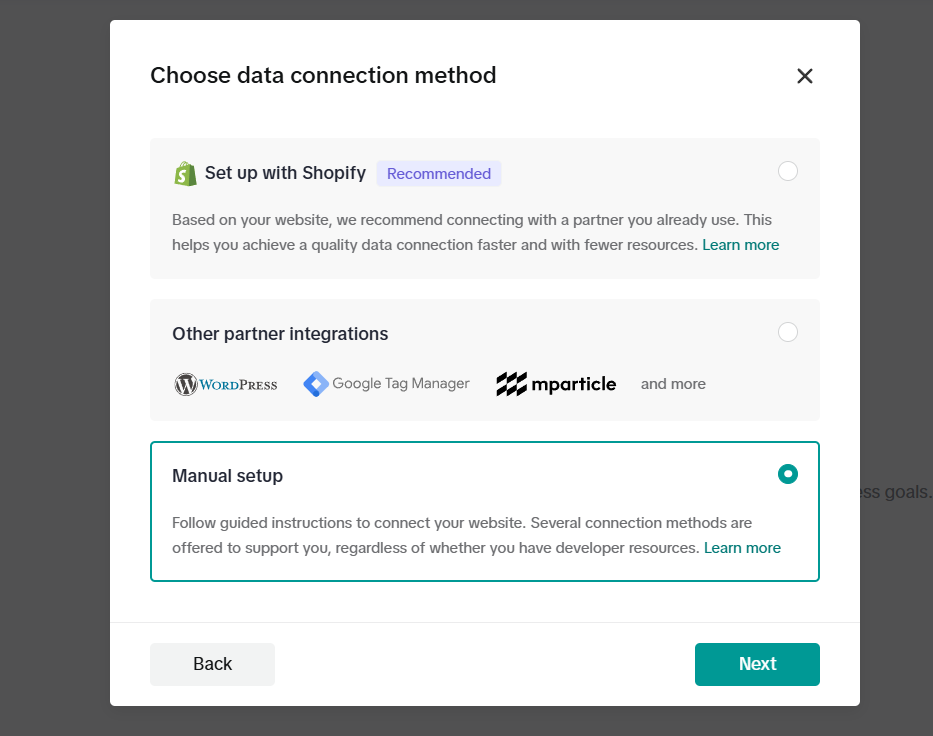
From the new interface, select the “Manual Setup” option and next.
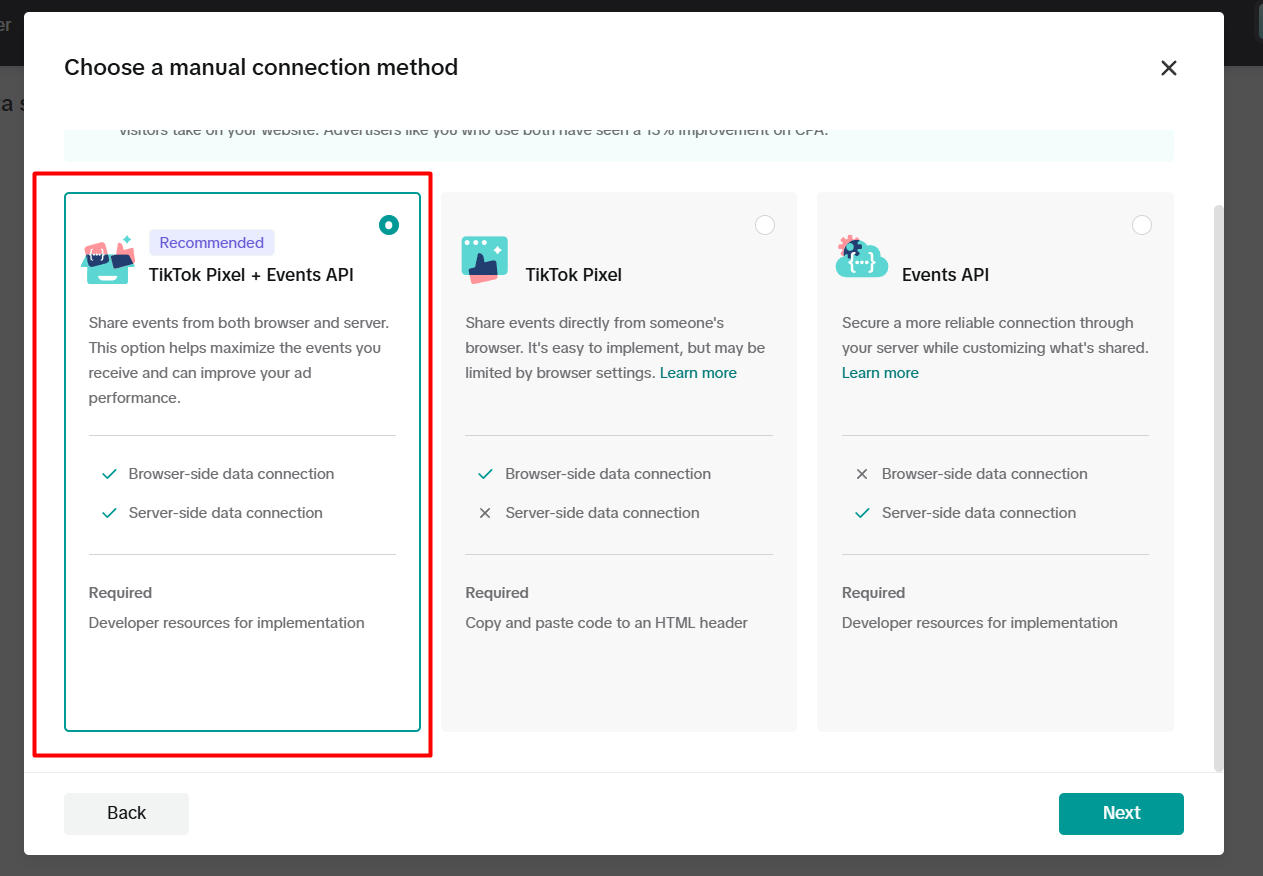
From here, select the first one and next.
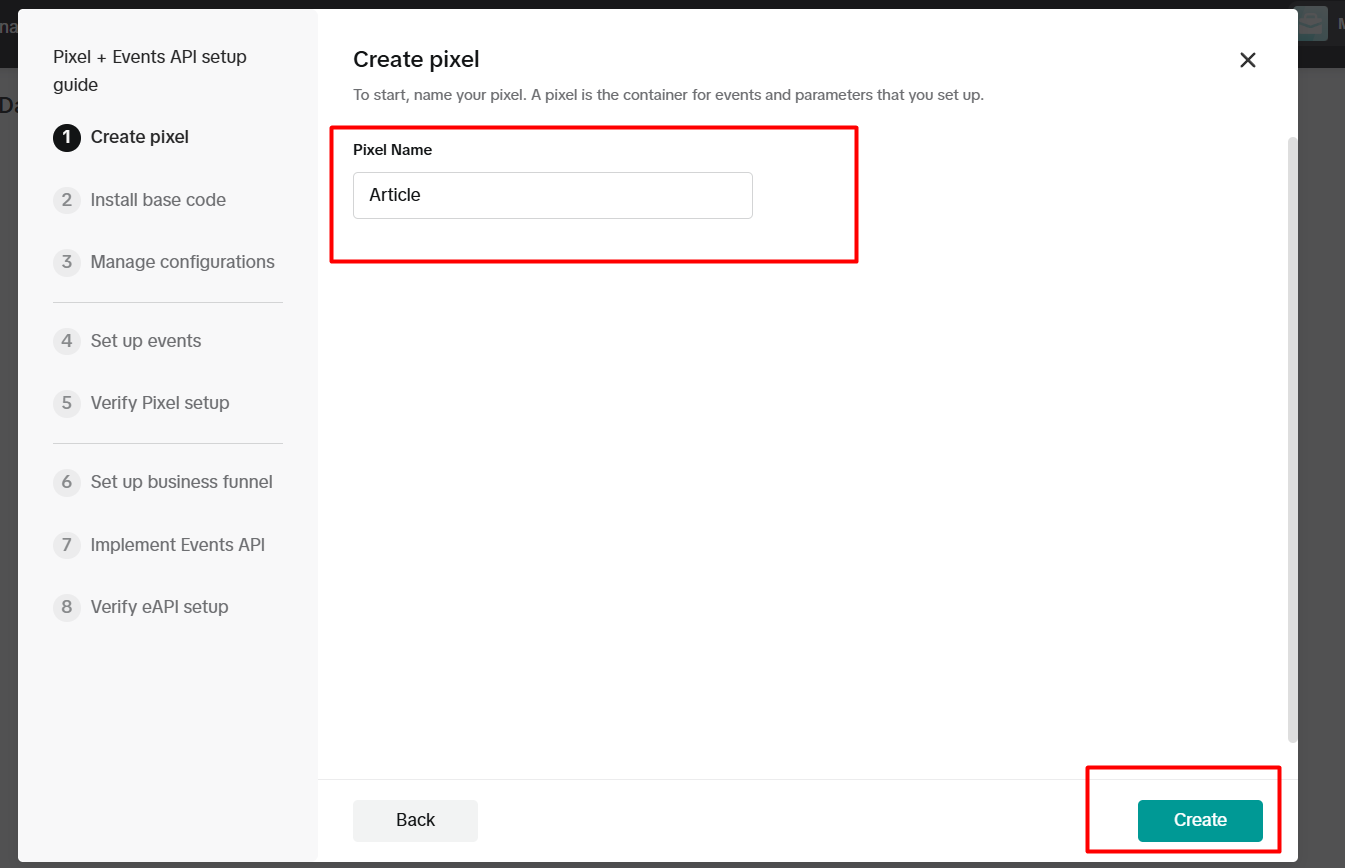
Select the pixel name and click on create.
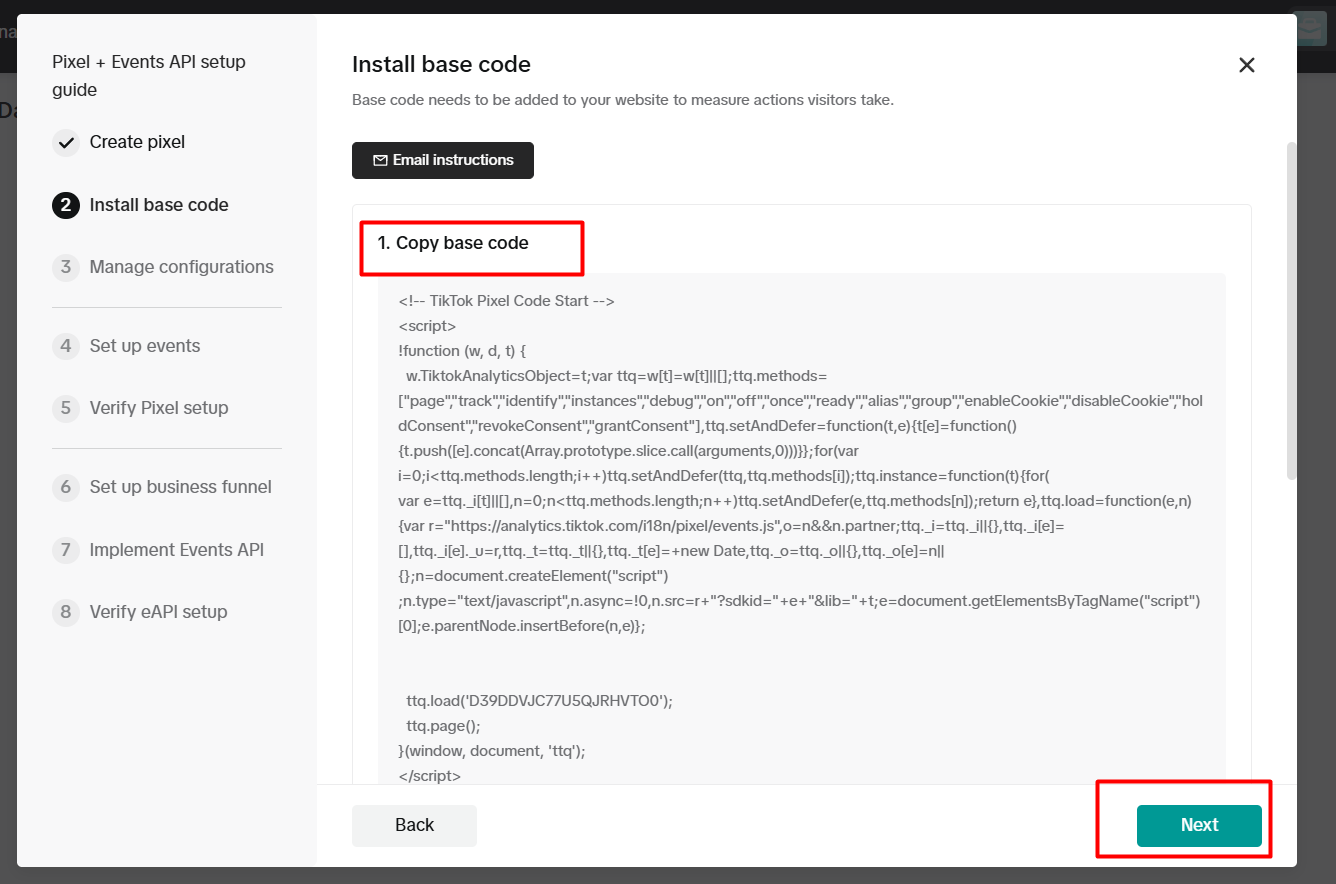
From here, copy the base code and save it in your notepad.
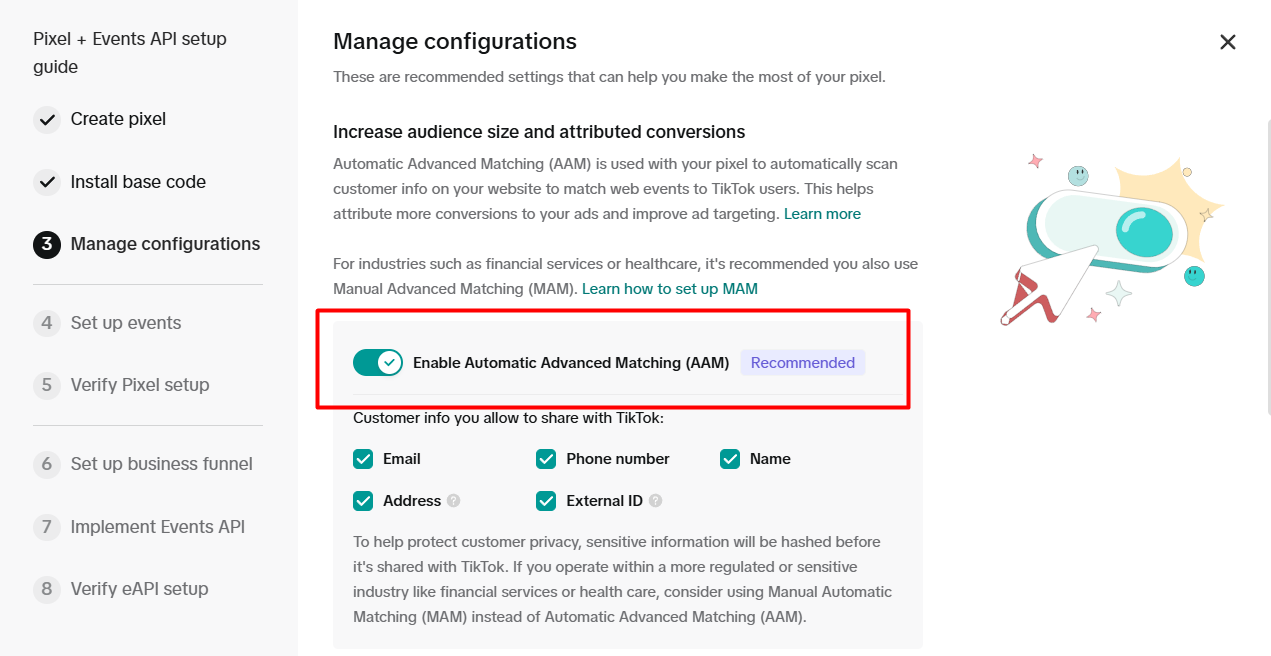
On the page, enable the option, and from now on, click on the next for every new interface.
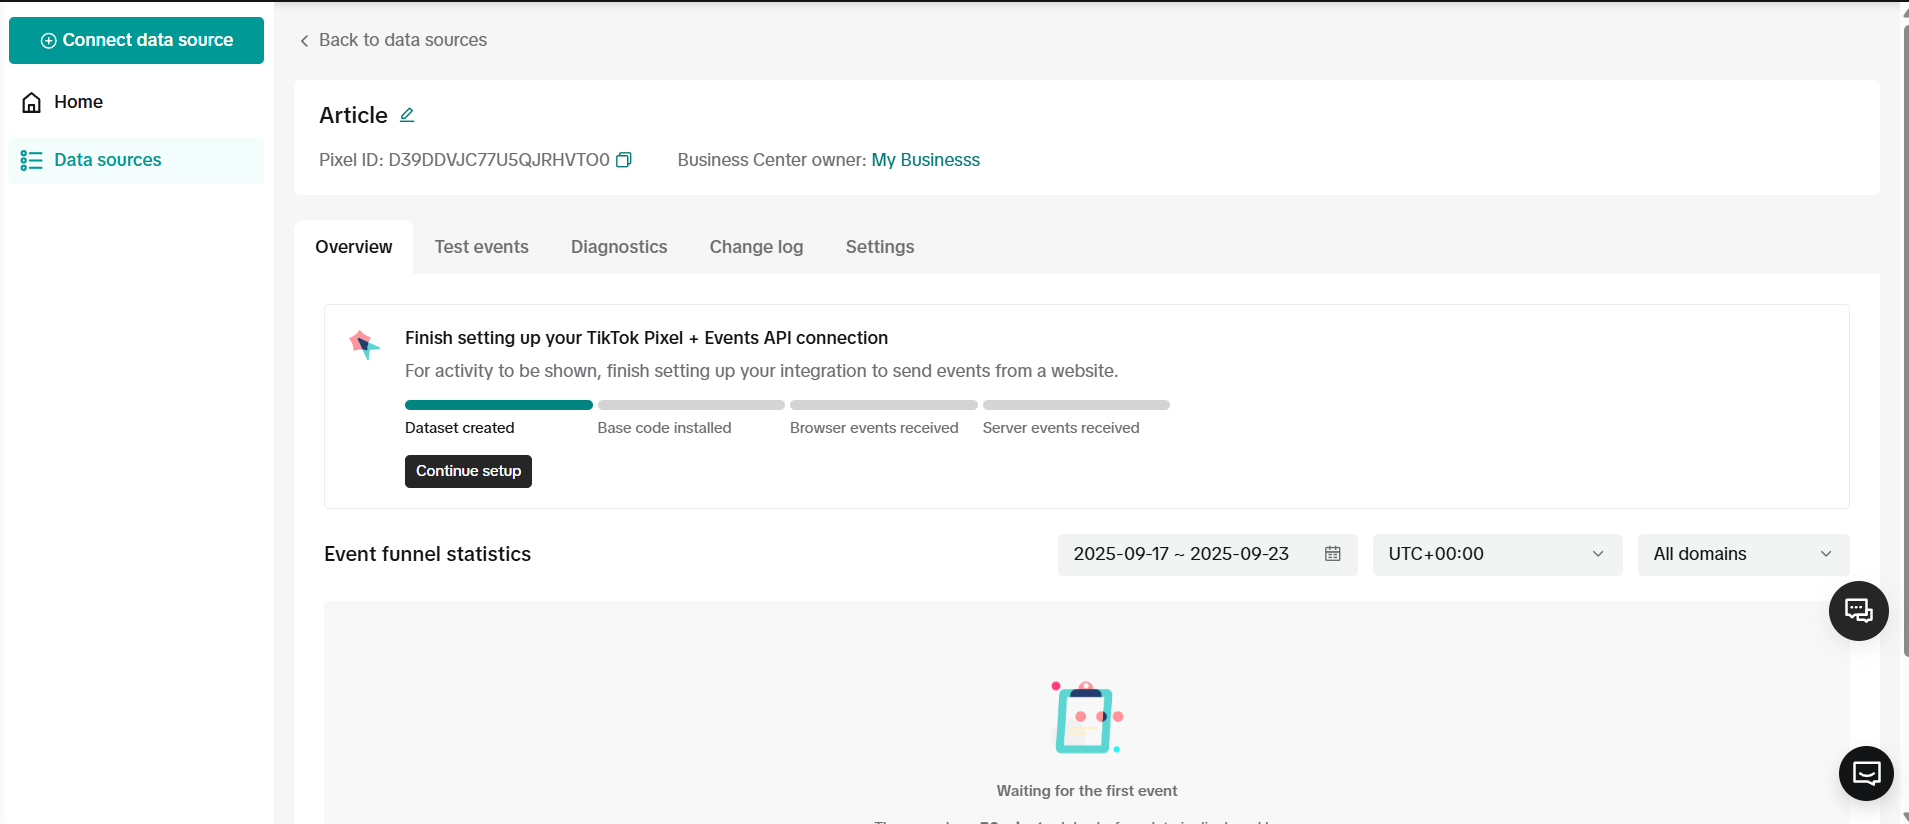
Now here is your interface after successfully creating the pixel. Now let’s go to the GTM for the base code installation. Don’t forget it; we already saved one code in our notepad.
Setup TikTok Pixel by Google Tag Manager
With the pixel base code, let’s go to your GTM. From there, select the “Tags” section to create a new tag where we will place our base code that we get from TikTok.
Here select “CustomHTML” as the tag type. In the place we will paste our TikTok pixel base code.
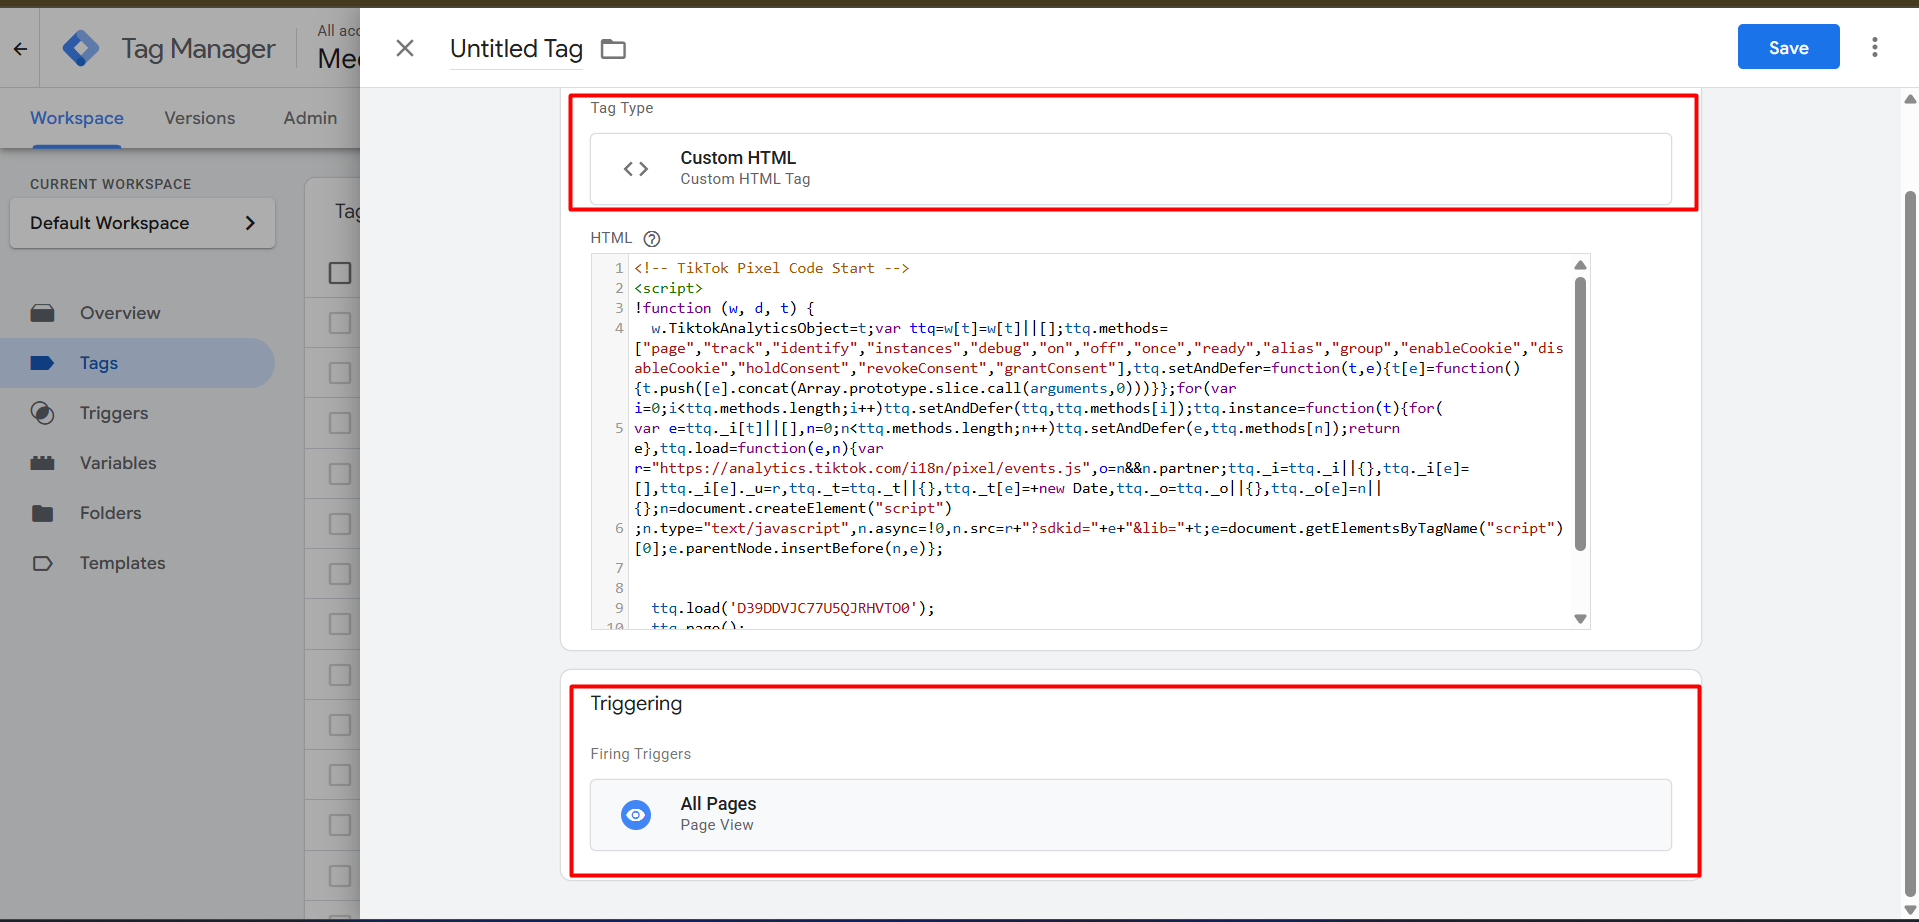
After perfectly placing your base code, now from the trigger section, select “All Pages” as the trigger type. Because we want to count every single visited page as a new page view event by our traffic for our TikTok.
| Event Types | Event Parameters |
| PageView | NO |
| ViewContent | content_type
content_name content_id value currency |
| AddToCart | content_type
content_name content_id value currency |
| InitiateCheckout | content_type
content_name content_id value currency |
| PlaceAnOrder | content_type
content_name content_id quantity value currency |
Here is the list of standard events for our TikTok e-commerce tracking. Even here we are also covering the side of TikTok pixel e-commerce tracking, so we will cover these 5 events to send in our pixel event manager.
Already we have completed the “PageView” events; now it’s time for “ViewContent.” So every time our traffic views our product page, the GTM data layer will give us one new event in the name of “viewitem.” From there we have to collect our important data to send to the TikTok platform. The Clear Concept Of GTM DataLayer
Now let’s go to set up the “ViewContent” events. To do that, first we have to go to our tag manager, and as a trigger type, we have to select “TikTok” as the trigger type that we added in our workshop.
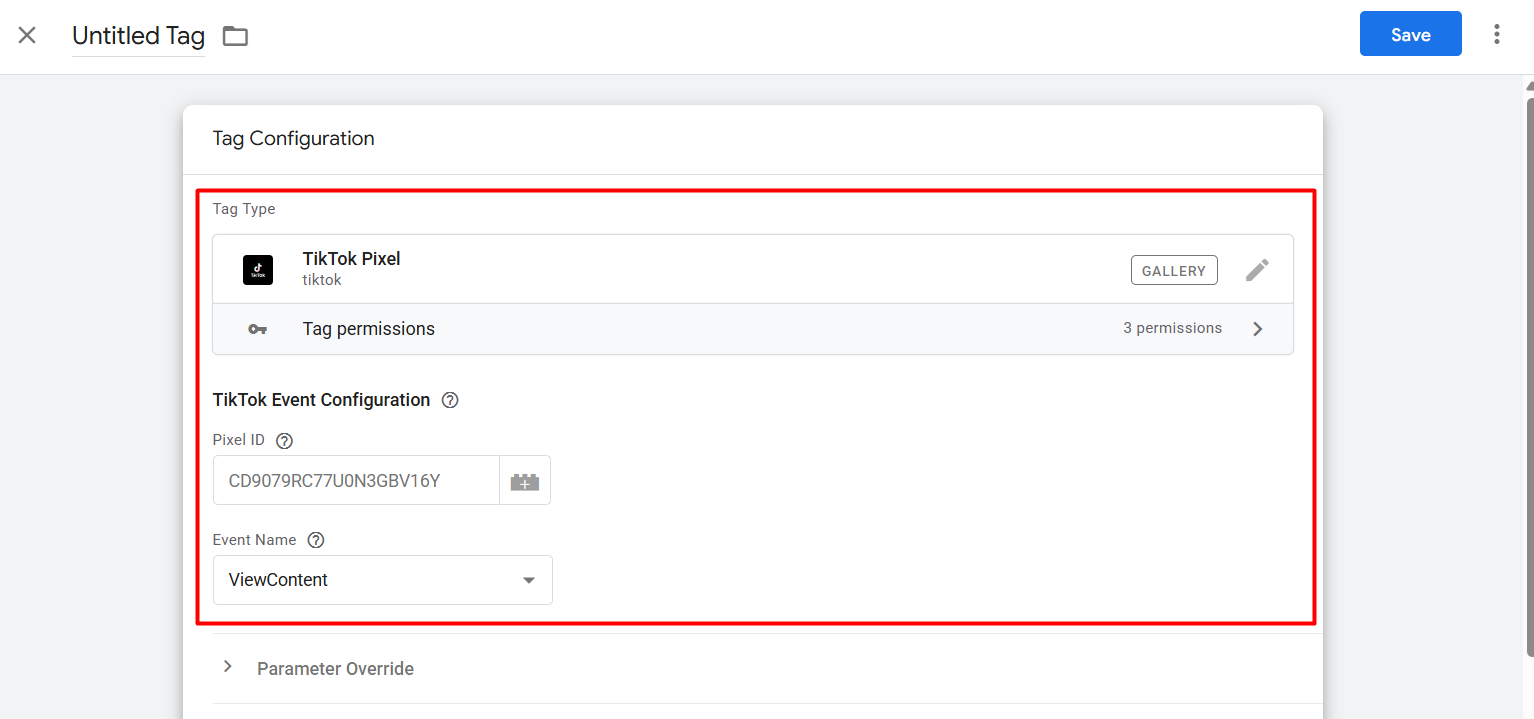
Here you can see in the place of “Event Name” we selected “ViewContent” as an event. Because at the time we are creating “ViewContent” events. But in the first place of “Pixel ID,” you place your pixel ID.

From your TikTok events manager, collect the pixel ID and paste it here. Now it’s time to set up event parameters.
Event Parameters: Additional information about the action being performed can be provided by sending event parameters with a tracked event in TikTok Pixel. These settings enable more thorough reporting and campaign optimization while also helping to fine-tune tracking.
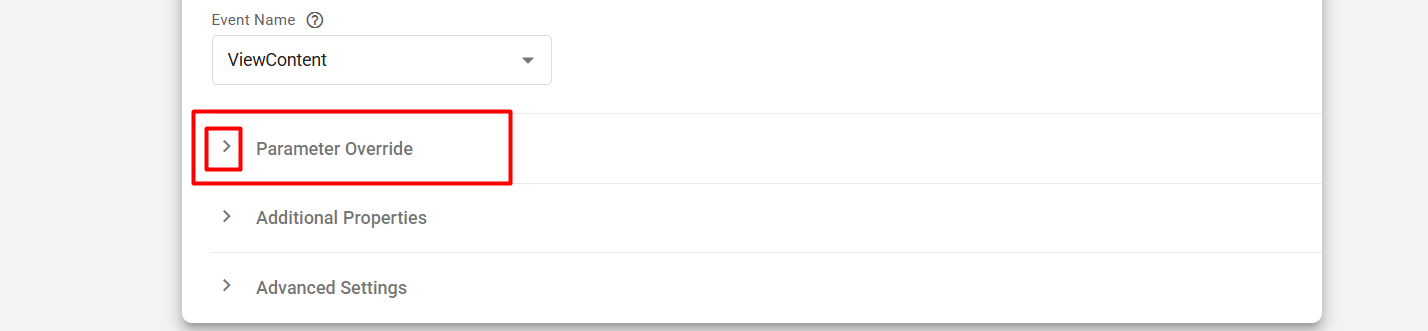
To set up your targeted parameter, first click here.
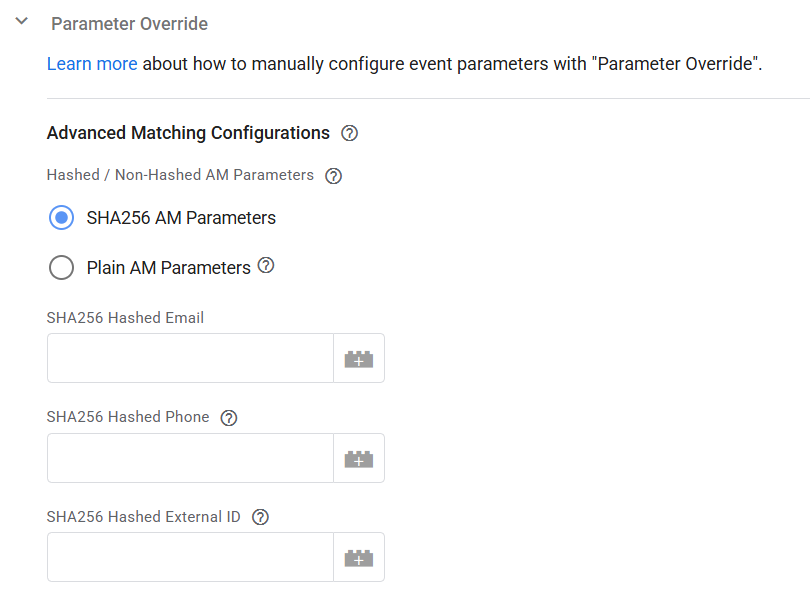
After clicking here, you will get this option first. But here you don’t have to do anything. But yes, if you see that your data layer is collecting data about traffic, email, and phone number. Then you can use this option to send your data to TikTok. Otherwise avoid it; we will use this option for “PlaceAnOrder.”
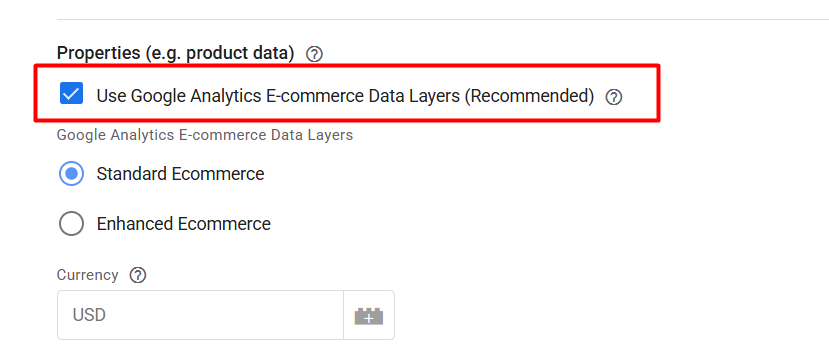
Now scroll down more for these options. If you think your data layer is made as per the GA4 schema, then you can use it easily just by enabling the option.
Example Data Layer Schema for GA4
window.dataLayer = window.dataLayer || [];

dataLayer.push({

  event: "purchase",

  ecommerce: {

    transaction_id: "T12345",

    affiliation: "Online Store",

    value: 99.99,

    currency: "USD",

    coupon: "SUMMER21",

    items: [{

      item_name: "Product Name",

      item_id: "P12345",

      price: 49.99,

      quantity: 2

    }]

  }

});
If your data layer structure also looks the same, then you can use it; otherwise, remove the mark from there, and you will get more options.
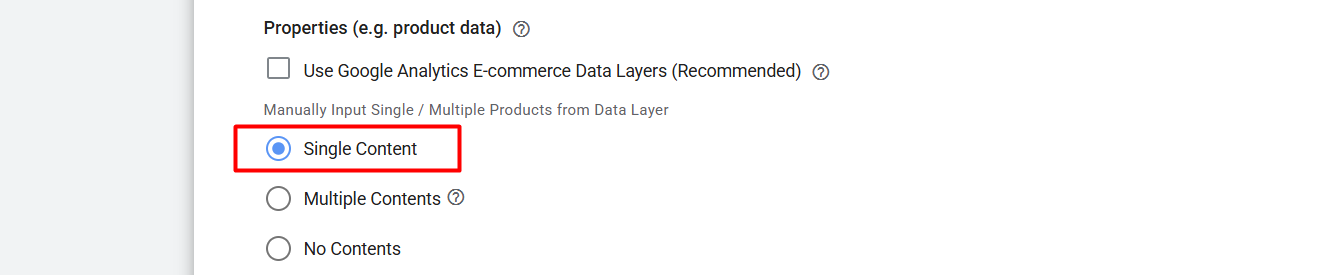
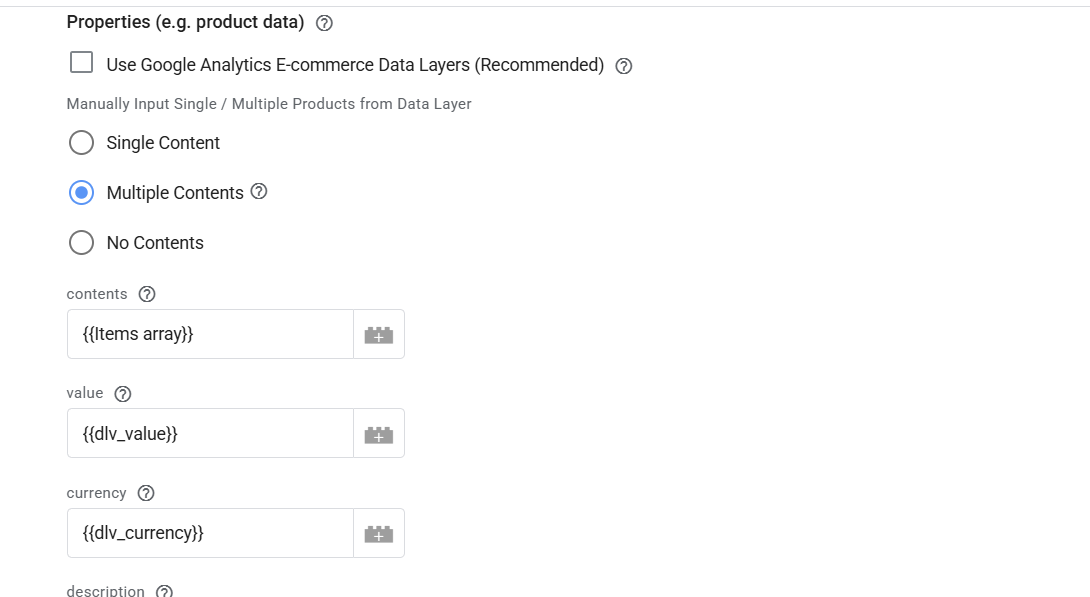
After removing the mark from there, here is the new interface. Here we have to select “Single Content.” Because in a time we can view just one single product. But at the time of checkout or purchase, we will use “Multiple Contents.” And for the “No Contents,” we can use it for other events where we don’t want to send any data.
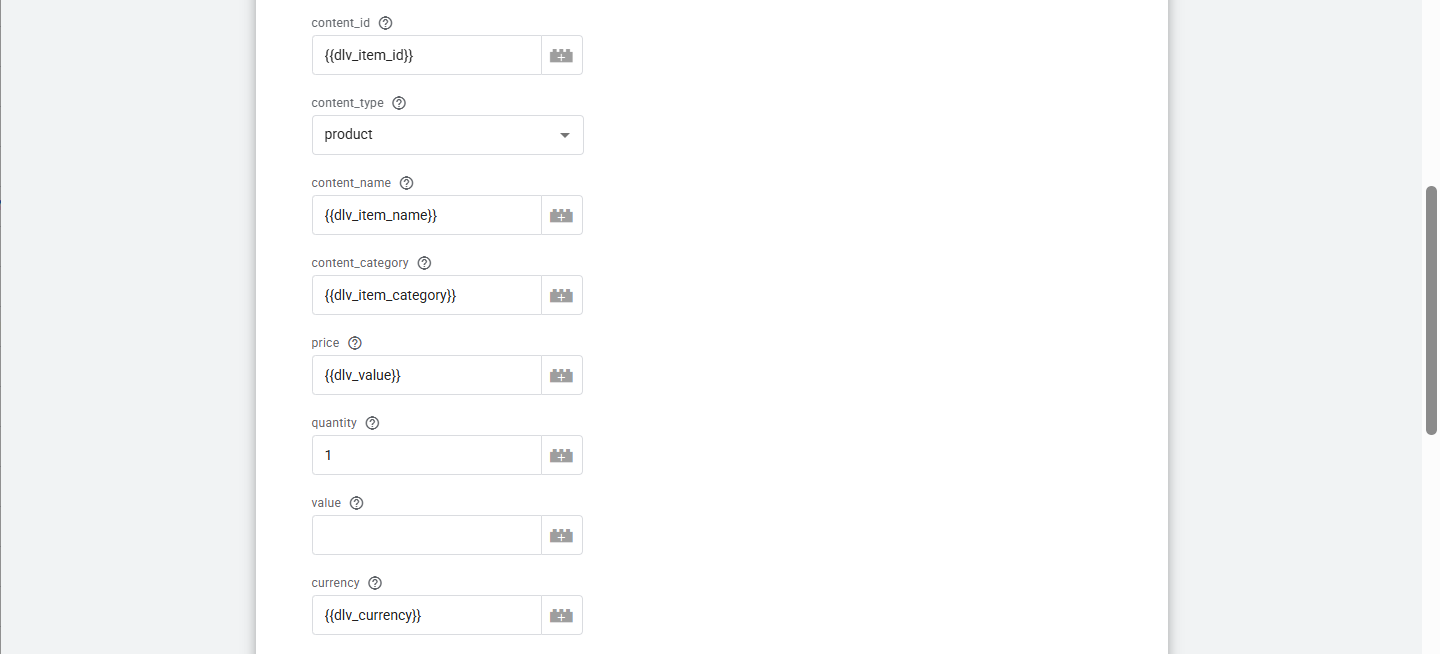
Now here you can see how we are sending data; we already created all of the important variables in previous time. In the trigger section, set up your custom event as per your data layer.

The Clear Concept Of GTM DataLayer
In the same way we can complete our tracking for the “AddToCart” events. Because everything is the same, and you just have to change the trigger here in the tag and be done.
InitiateCheckout
Now let’s set up the “InitiateCheckout” events. After every time when someone goes for checkout for their selected product, we can track one more event in the name of “InitiateCheckout.”
That means every time after clicking on the “Checkout” button, we can track this event in the name of “InitiateCheckout.”
But here’s one point: a single person can check out different types of products for purchase at a time. So that means here we will have to select the “Multiple Contents.” In this one way we will be able to send every single piece of data that will be collected through the items array in the data layer about our product.
So first, let’s set up one more new variable to do it. Go to your variable section to create a new variable. From the variable section, click on the “New” button to create a new variable under User-Defined Variables.
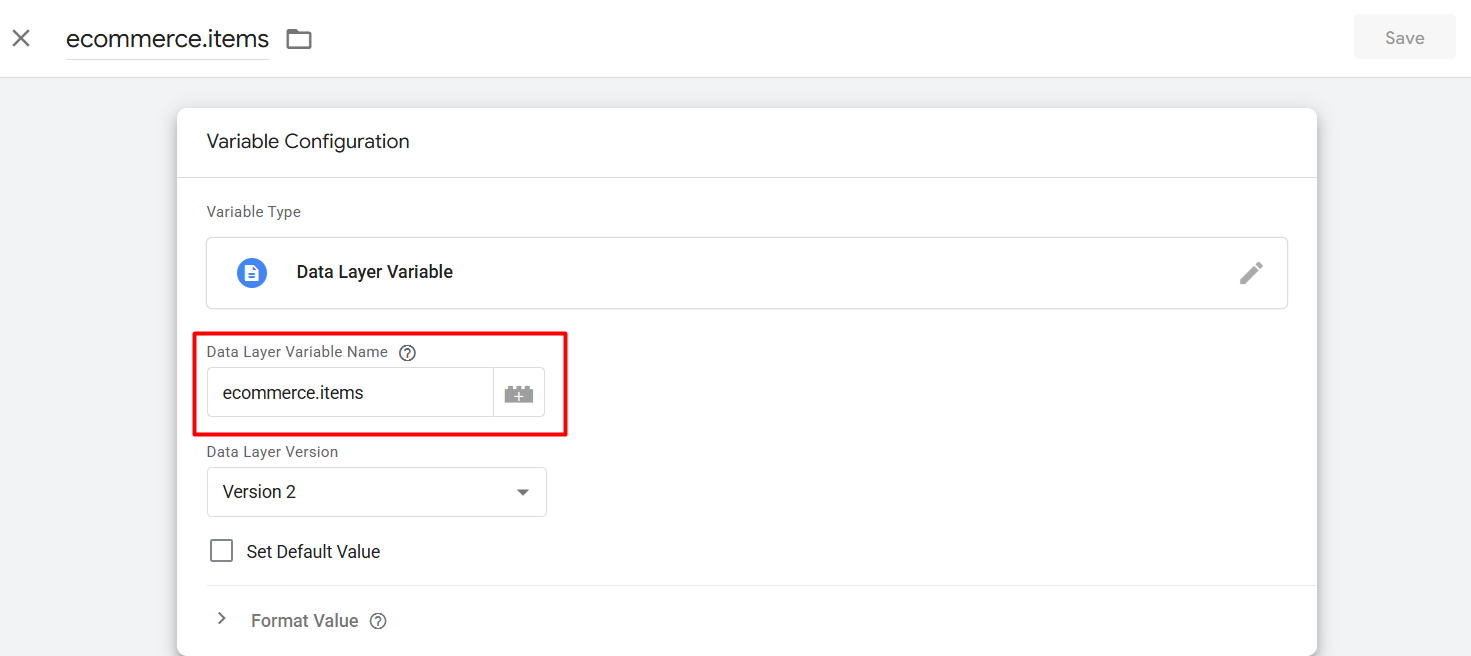
From there, select the “Data Layer Variable” as the variable type, and then in the place “Data Layer Variable Name,” type this. With this variable you will be able to collect all of the data under the “items” array.
Let’s create one more variable that will change this array as per the TikTok schema. Create one more new variable and remember this variable name.
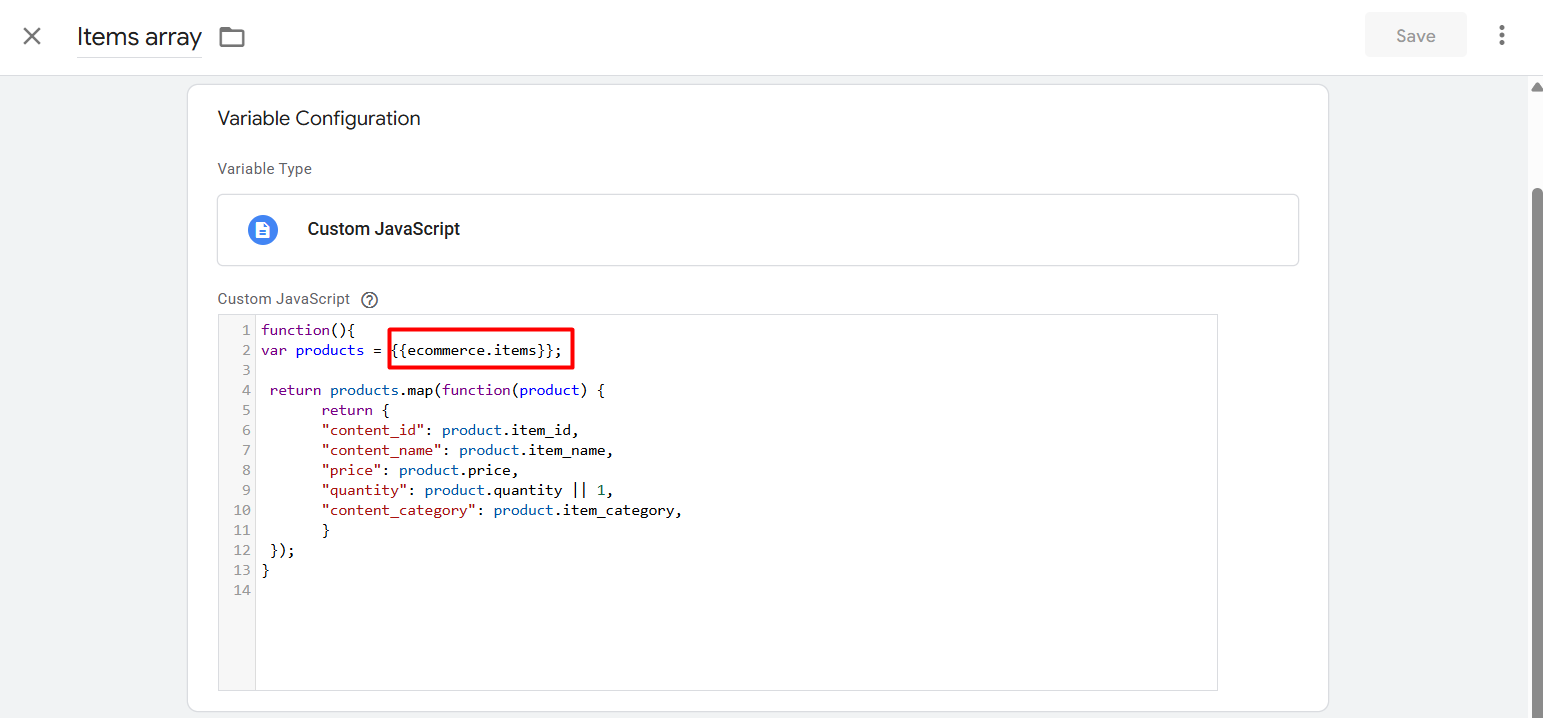
Now here for the new variable, select “Custom JavaScript” as the variable type. Now here, paste the code, and in the red mark, change it to your previously created variable.
function(){

var products = {{your variable name}};

 return products.map(function(product) {

       return {

       "content_id": product.item_id,

       "content_name": product.item_name,

       "price": product.price,

       "quantity": product.quantity || 1,

       "content_category": product.item_category,

       }

 });

}
So it’s simple: your first created variable will collect all of the data from the “items” array. Then, with this JavaScript code, you can change it as per the TikTok schema.
Now let’s set up the “InitiateCheckout” events. Go to your Google Tag Manager and select the option to create one more new tag with TikTok templates.
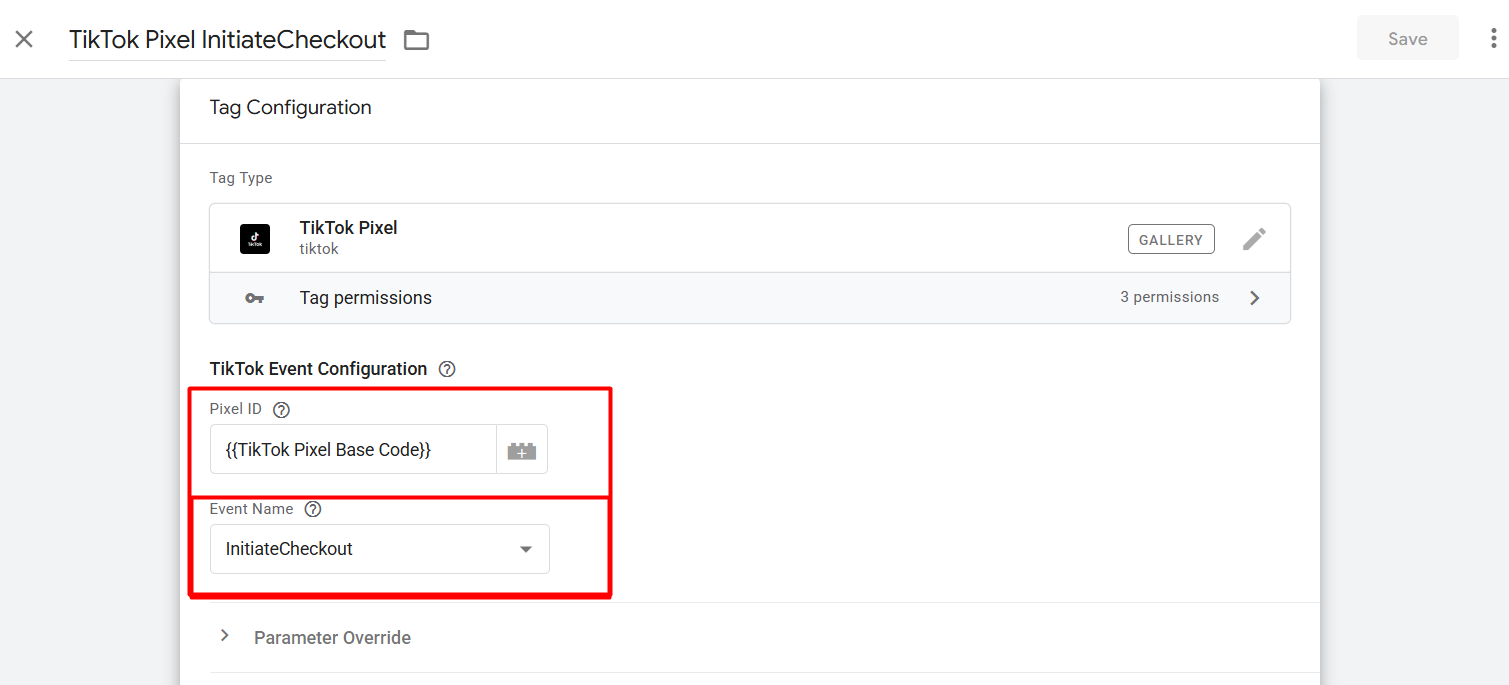
In the same way, paste your TikTok pixel ID here and select the event name. Now scroll for the next option.

Now from here select the “Multiple Contents.” You already know why. Now it’s time to set up the parameters.
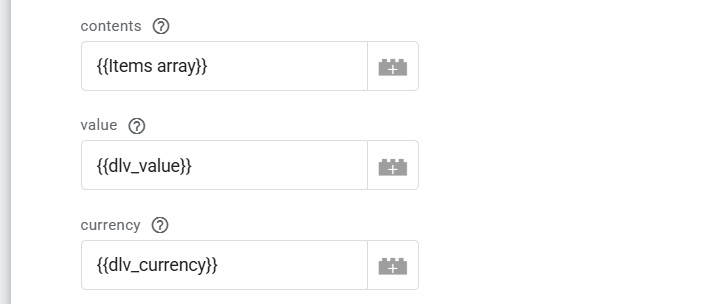
Here you can see in the place of “Contents” we selected our recently created JavaScript variable. Because this one single variable will provide us the total item array. For the other two, we did it in the same way. Checkout is now done.
PlaceAnOrder
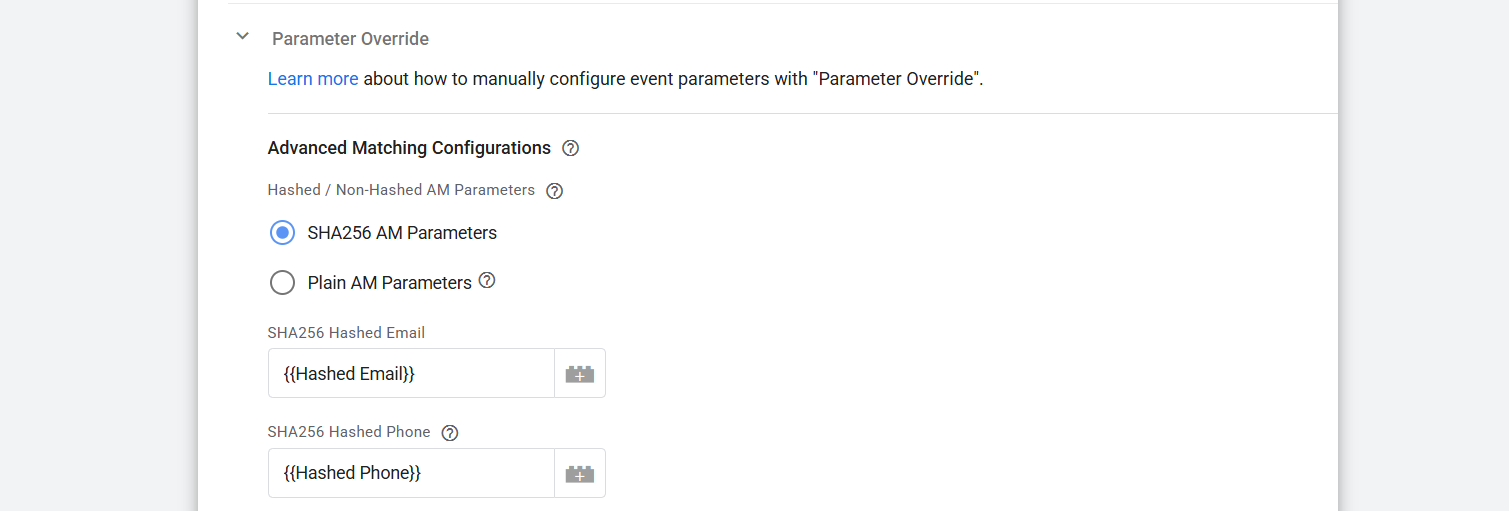
In the same way, you can complete the purchase event tracking parameters, but here in this place, we have to provide the purchase customer email and phone number in a hashed way.
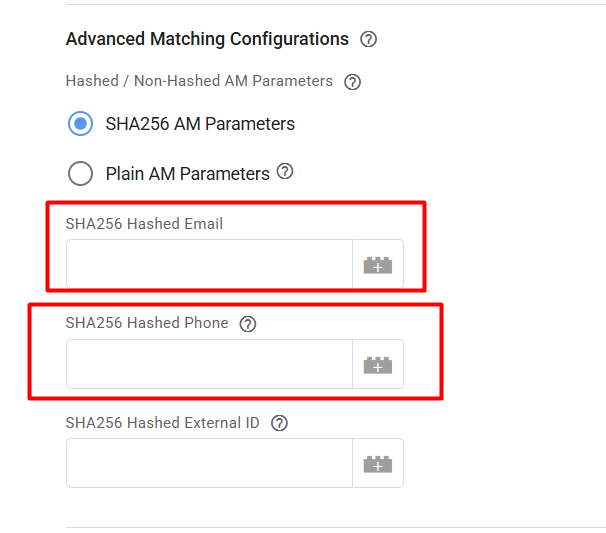
After completing one testing purchase in your data layer, you will be able to see your used email in your data layer under any object or in an independent way. Create a variable and set it up in the place.
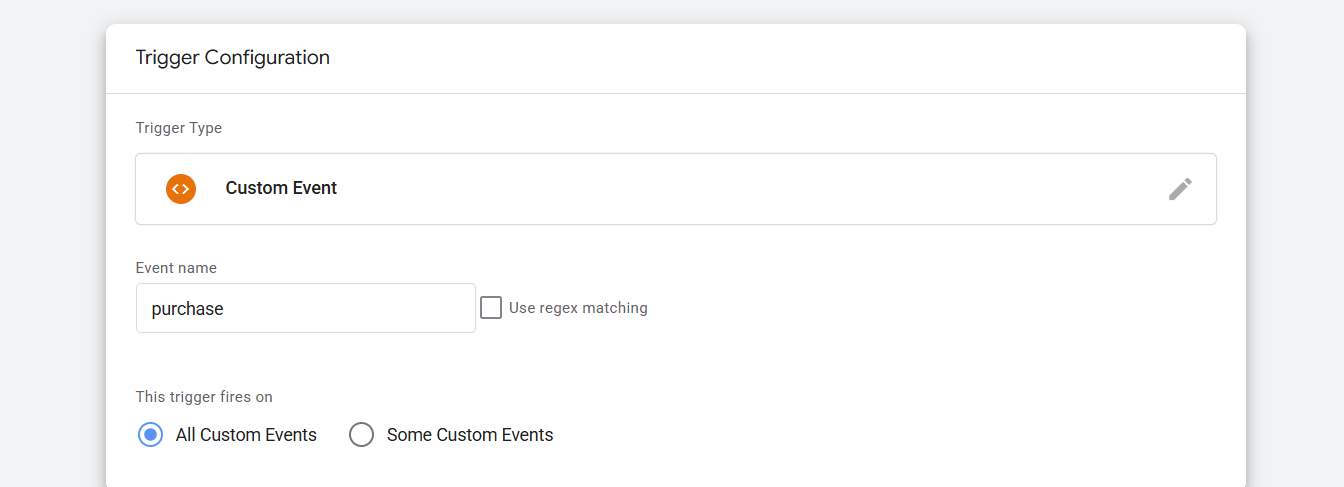
Here in this short screen, you can check how we did it. Now for the trigger section, select the purchase event through the custom event.

Because every time after complete the purchase, your data layer will push one event in the name of “purchase,” like the way

So simply every time, copy the event name and come to the trigger section and select “Custom Events” as the trigger type. And set up the trigger like that.
Okay guys, now it’s done. You successfully completed the TikTok pixel browser-side tracking.
So don’t forget to share your thoughts or confusion with us. Thank you so much for staying with us on the journey.


