
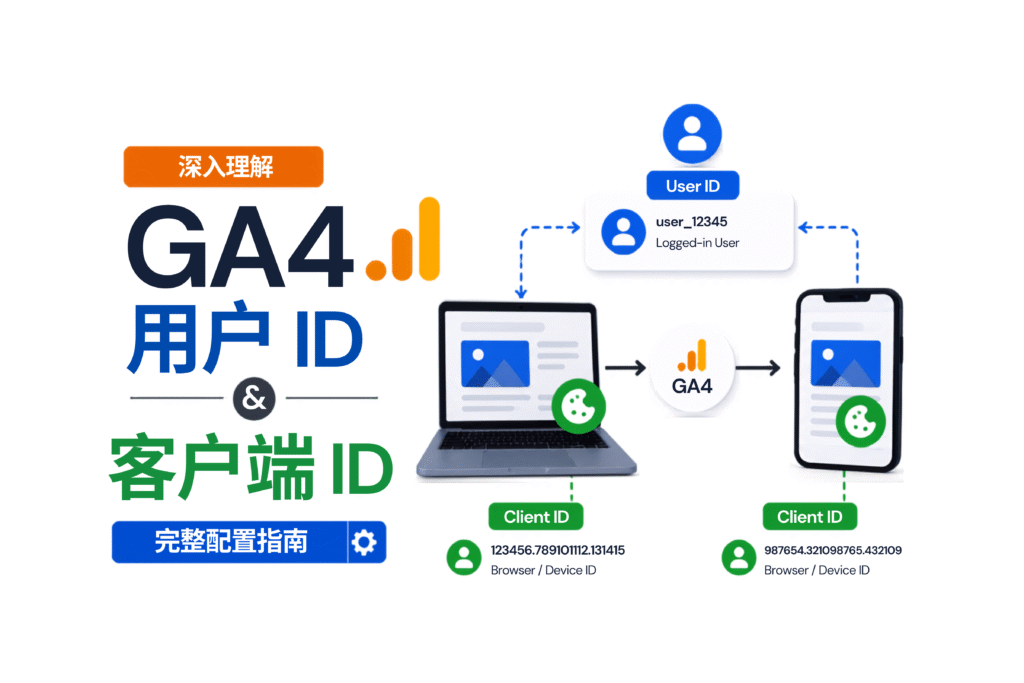
While working with Google Analytics 4 (GA4), the terms “GA4 User ID & Client ID” come to our minds the most. It is very important for those working in the digital marketing and analytics sector to have a clear understanding of these two “GA4 User ID & Client ID” topics.
Why are these two topics so important? Because how exactly GA4 identifies a visitor and tracks his behavior depends mainly on these IDs. If you want to make your tracking setup perfect or ‘perfect,’ then it is necessary to know the technical aspects of User ID and Client ID in detail before starting the configuration. Without proper knowledge, it is almost impossible to complete these setups professionally through the data layer or GTM.
This article will explain what these IDs are in simple terms, show you how they look in real time, and walk you through the steps to set them up to improve your tracking system. Let’s get started with the Client ID.
Client ID
Let’s say you’ve successfully installed Google Analytics 4 (GA4) on your website—either by placing the global site tag (gtag.js) directly in the header section or through Google Tag Manager (GTM). After setup is complete, whenever a visitor visits your website for the first time, GA4 automatically drops a **first-party cookie** (which we usually call the `_ga “cookie”) into that visitor’s browser.
This cookie contains a unique identifier, called the **Client ID**. Why is this ID important?
Page Navigation Tracking: When a visitor moves from one page to another on your website, this cookie helps GA4 understand that it’s the same person.
Returning User Identification: If the same visitor returns to your site later using the same browser, GA4 can easily identify that this is ‘Old’ or ‘Returning’ traffic by reading the previous cookie in their browser.
Simply put, Client ID is a browser-level identifier.
But
So far we have learned that Client ID works using browser cookies. But to be honest, analyzing data based on Client ID alone can lead you to many wrong conclusions. Why? Because this method has some real limitations that reduce the accuracy of our tracking:
Device or browser changes make a difference:
Suppose a user visited your site on his phone while going to the office in the morning. Then in the afternoon, he returned home and accessed the site again from his laptop. Here, there is only one person, but GA4 will show him as two different ‘new users.’ Why? Because the client ID is stuck only in the specific browser where the cookie was first set. Cookies from one device cannot be transferred to another device and work.
Once the cookie is deleted, it’s all over:
Many of us regularly clean the browser’s cache or cookies. Whenever the user manually deletes the cookie, the old Client ID will also be deleted. Then when he returns to the site again, GA4 will not be able to recognize him and will count him as a completely new visitor. This will reduce your ‘Returning User’ count and incorrectly increase the ‘New User’ count.
Ad Blocker and Privacy
These days, many browsers and add-ons block cookies by default. Client ID doesn’t work well for people who are very concerned about their privacy. Because of this, it’s very hard for us to keep an eye on their actions.
Apple or iOS device challenges:
The problem is a little more in the case of iPhone or Mac users. Due to Apple’s ITP (Intelligent Tracking Prevention) feature, the cookie lifetime has now been reduced a lot in Safari or iOS browsers.
Although a cookie is usually supposed to last a long time, on iOS devices it is seen that it is deleted automatically after just a few days (such as 7 days or in some cases 24 hours). As a result, if a regular visitor comes back to your site after 10 days, GA4 will also see him as a new user. That is, getting the real data of your returning user is becoming more and more difficult day by day.
Look at the screenshot below. If you go to the Application tab from your browser’s Inspect Element while browsing a website and click on the Cookies option on the left, you will see a cookie named _ga.
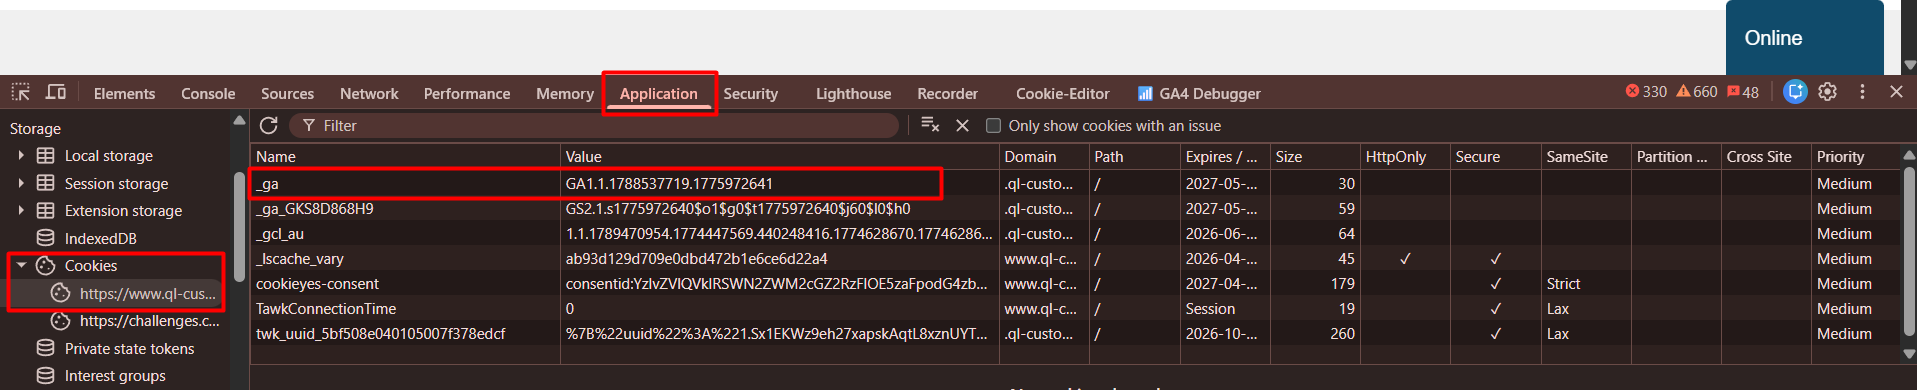
The long numbers you see next to this _ga cookie (for example, 1778537719.1775972641) are basically your client ID for that session. GA4 recognizes you with this unique number.
A fun experiment: If you delete this _ga cookie from your browser and reload the page, you will see that a brand new ID has immediately appeared there. This means that as soon as you delete the cookie, all your previous identity is erased from GA4, and it considers you as a brand new visitor.
In simple terms, Client ID is an identifier that is unique to a device or browser. It doesn’t keep track of a person or “human” but of a browser session. The User ID feature in GA4 is used to fix this problem.
User ID
The limitations of Client ID that we have seen so far were solved by User ID. Where Client ID only recognizes the browser, User ID directly recognizes a flesh-and-blood person (cross-device tracking).
How does it work?
The main condition for tracking through user ID is to identify the user. And this is possible only when a user logs in to your website. In simple words, the whole point of a user ID is directly related to the login system of your website.
Understand the technical process simply:
When a user signs in or logs in to your site, a unique ID is generated for that user from the backend of your website. Your developer then pushes that ID to the GTM (Google Tag Manager) Data Layer as user_id or visitor_id. Then we can easily send this ID to GA4 using GTM.
Why is this the best solution?
- No problem even if the device changes: If the user logs in from the phone in the morning and from the laptop in the afternoon—as long as he is logged in, GA4 will recognize him as the same person.
- No fear even if the cookie is deleted: Even if the customer deletes his browser cookies or uses a completely new browser, there is no problem. Because here the tracking is not based on cookies, but on the user’s unique ID.
Finally, if you can set up this User ID tracking professionally using GTM, the accuracy of your data will increase several times.
Setup Process of User ID
Now that we’ve talked about the theory, let’s look at a real-life example. Look closely at the screenshot below:

In this image, we can see a view of the Data Layer from the Preview Mode of Google Tag Manager (GTM). The visitor ID: 1 part enclosed in the red box is our desired user ID. Our website has a login system, and whenever someone logs in, the system automatically sends this unique ID to the data layer.
An important tip:
If you do not find any such ID in the data layer even though your website has a login system, there is nothing to worry about. In this case, you should talk to your website developer and tell him to push a unique ID (such as User ID or Visitor ID) to the data layer after the user logs in. After this is done in the data layer, it will be very easy for you to complete the rest of the setup through GTM.
Set up User ID Through Google Tag Manager
Our first job after getting the ID in the Data Layer is to make a variable in Google Tag Manager (GTM). This will let GTM read that ID and send it to GA4.
How to create a variable in GTM?
- First, click on the Variables section in the left-hand menu of your GTM container.
- Under “User-Defined Variables,” click the New button.
- Choose “Data Layer Variable” as the type of variable.
- In the “Data Layer Variable Name” box, type in the exact name you saw in your data layer. For example, in our screenshot, it would be “visitorId.”
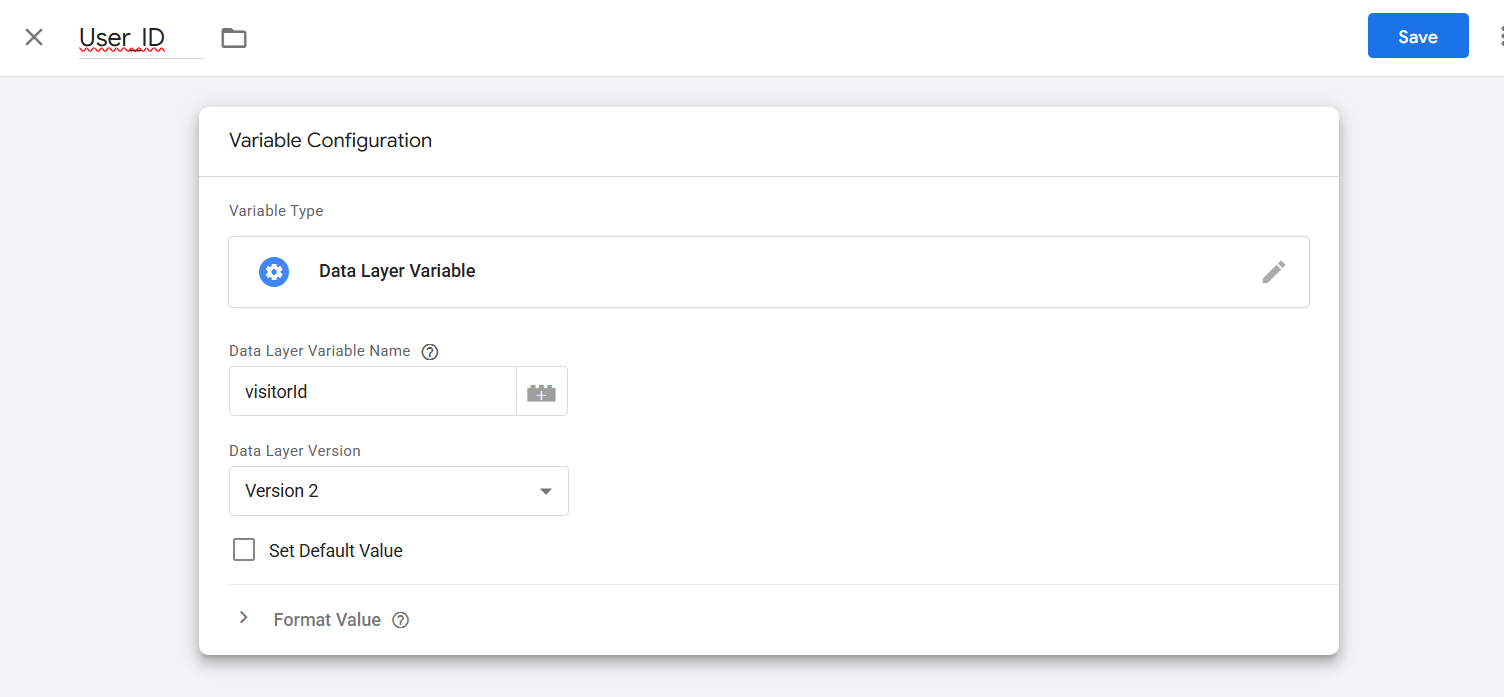
- Give the variable a nice name (e.g., DLV – User ID) and save it. Now your variable is ready to use.
Google Tag Configuration for this User ID
After complete the variable creation, we need to associate it with our GA4 tag.
- Go to the Tags section of GTM.
- Open the Google Tag (or GA4 Configuration Tag) used for your GA4 setup.
The last step is to send this ID to GA4 through our Google Tag. You can understand the whole thing clearly by looking at the screenshot below:
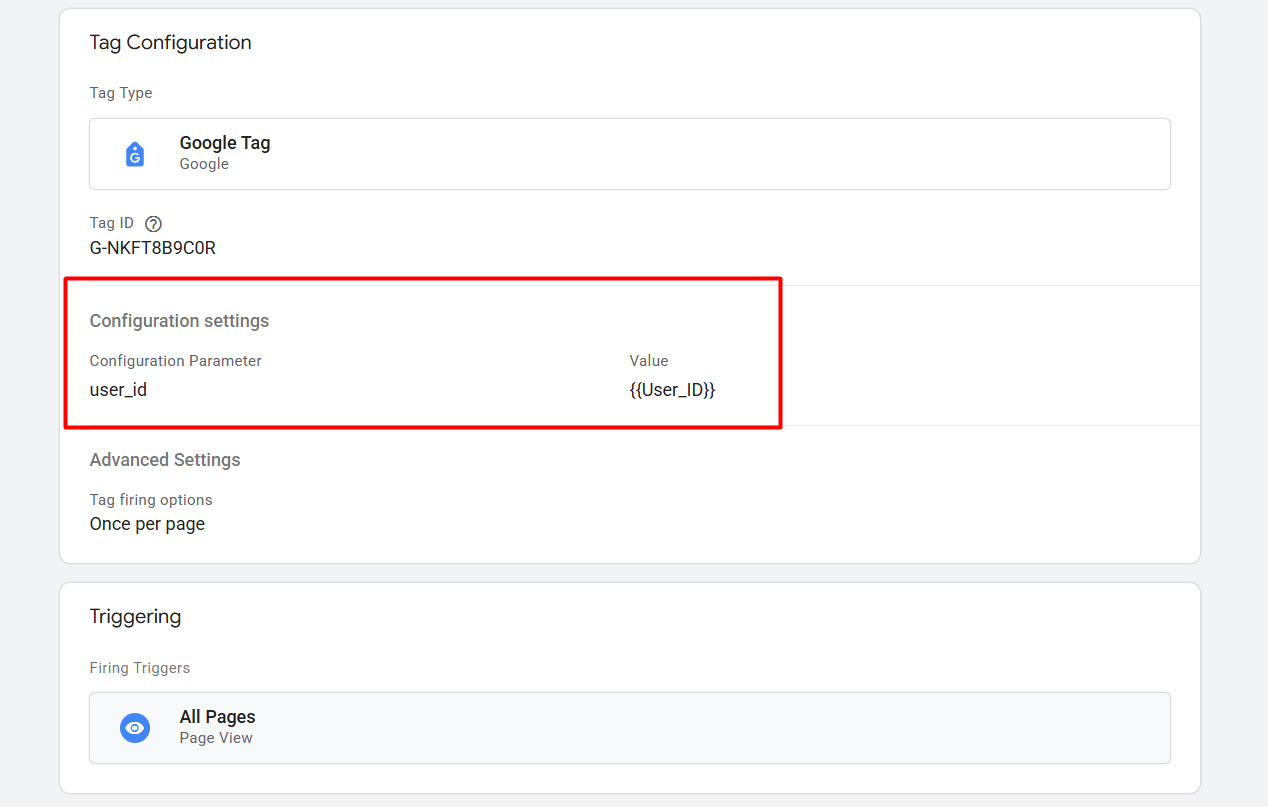
In the “Configuration Parameter” column, type in user_id. Next, pick the variable we made earlier from the “Value” column.
That’s it! . From now on, every time a user logs into your site, GTM will automatically send that unique ID to your GA4 property. You will now be able to see correct cross-device tracking reports because of this.
To-the-point
Proper tracking means making the right decisions. By professionally setting up a user ID on your website, you can eliminate data inconsistencies and get a complete picture of the customer journey. Good luck with your analytics project!
If you have any questions about GA4 User ID & Client ID setup in GA4 or face any issues during setup, please comment below. We would love to talk to you about the GA4 User ID & Client ID.