
This is the new article from the series on GA4. In our previous article, we already explained a lot about what GA4 is, how it works, and how many ways we have to add it to our website.
We also discussed the essential or frequently occurring events and the crucial parameters that need to accompany them in our previous article. In this article, we’ll show you how to set up all these events using GTM and our website.
So if you’re not very knowledgeable about the important event and its parameters for e-commerce tracking, then you should definitely read our first article. Today, we will explain how to track events and send their parameters; we will not discuss any specific events or their parameters in detail. Events & Parameters Explained
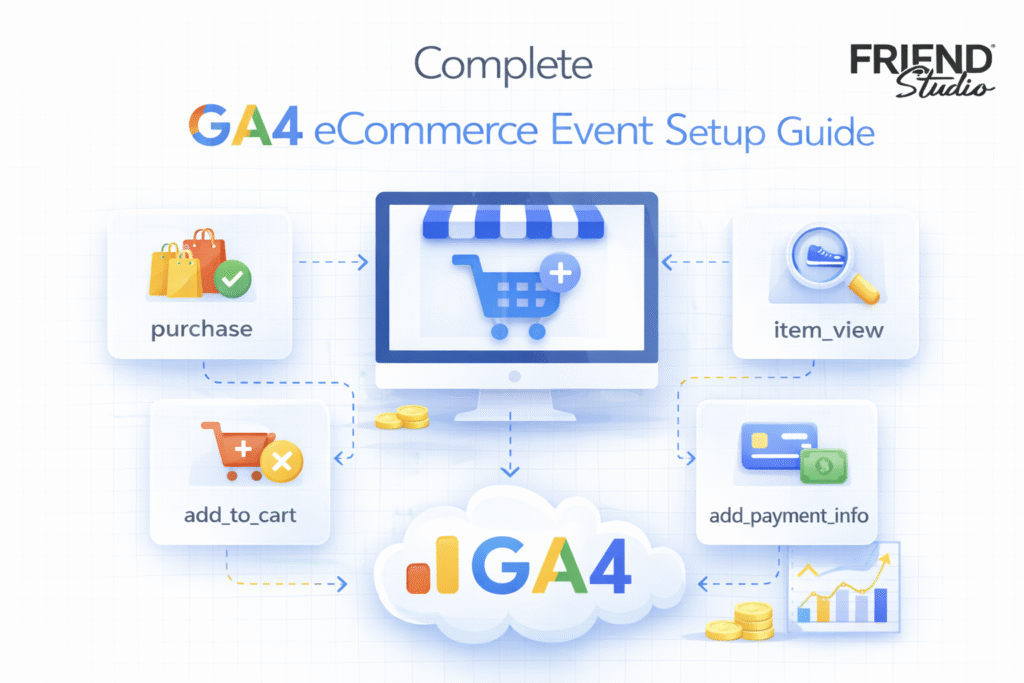
So let’s start the setup process one by one for every single common event of GA4 eCommerce events tracking.
Collect Measurement ID for GA4 eCommerce events setup
At the start, our first job is to connect the GA4 with our website. That’s why we have to collect the GA4 measurement ID from the GA4 backend. So let’s go to the setting.
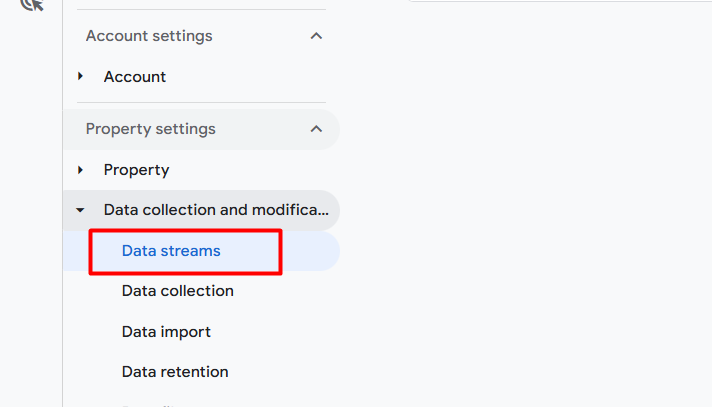
At first, click on the setting, and then under “Data collection”, select “Data streams” to get the measurement ID.
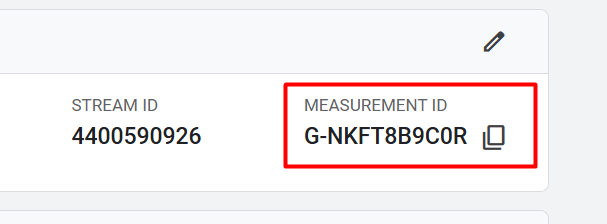
From this location, please copy the measurement ID.
Start setting up the GA4 eCommerce events
Well done, you got your measurement ID. Now log in to your Google Tag Manager. This is crucial, as it allows us to configure all our targeted GA4 eCommerce events on our website.
Connect GA4 with a website.
To connect your GA4 with your website, go to the tag section of your Tag Manager. Then go for a new tag.

To select your tag type, click on “Google Analytics”.
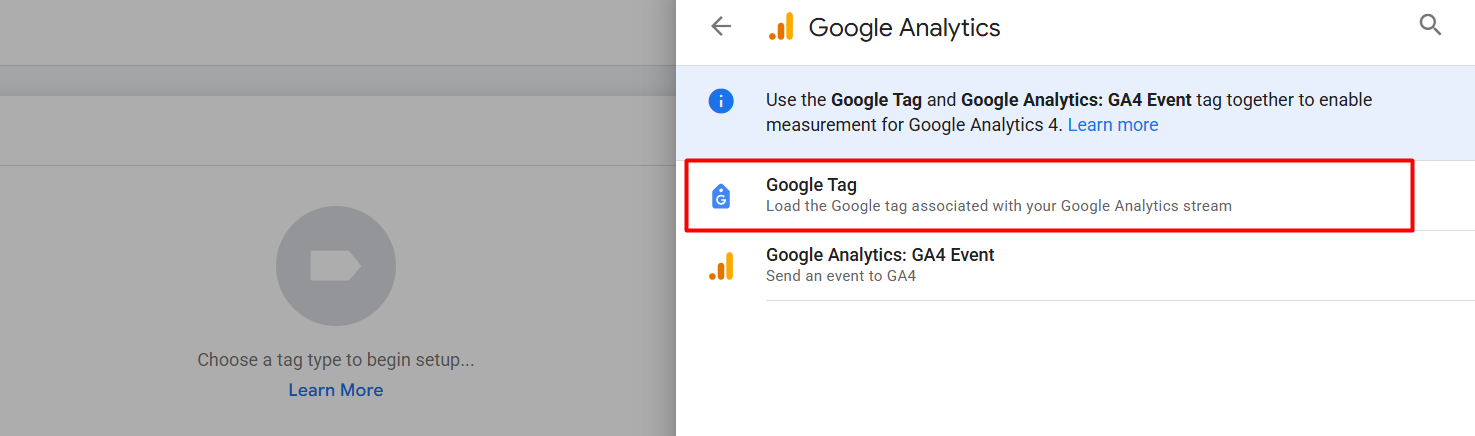
The first one will be used to connect the GA4 with our site. However, we can also send our page_view event to GA4 using the first tag type. For all of the other standard events, and for custom events, you have to use the second one.
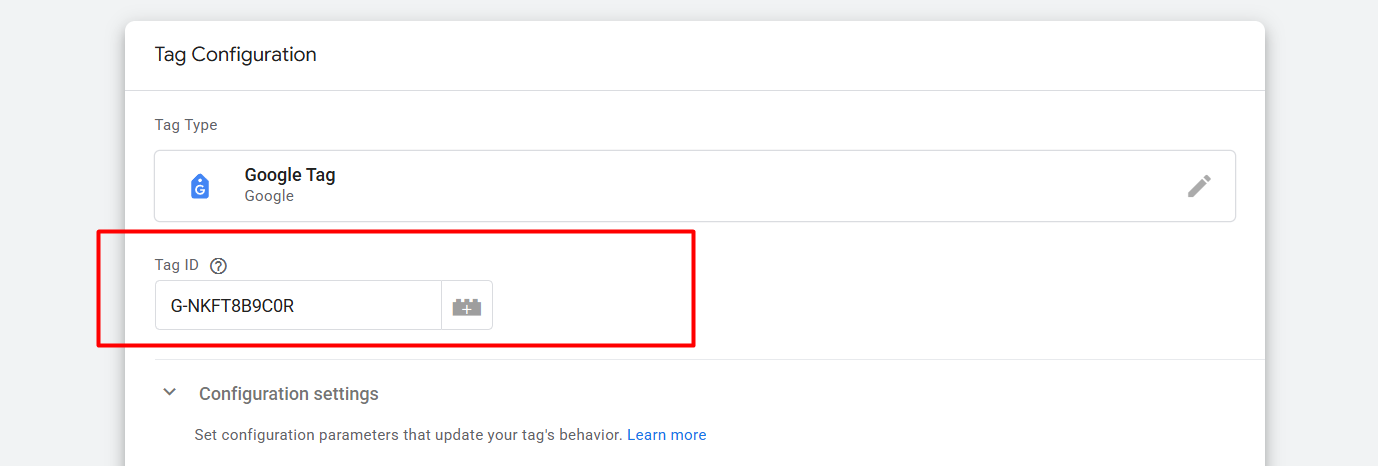
After selecting the tag type, replace the tag ID with your copied measurement ID.
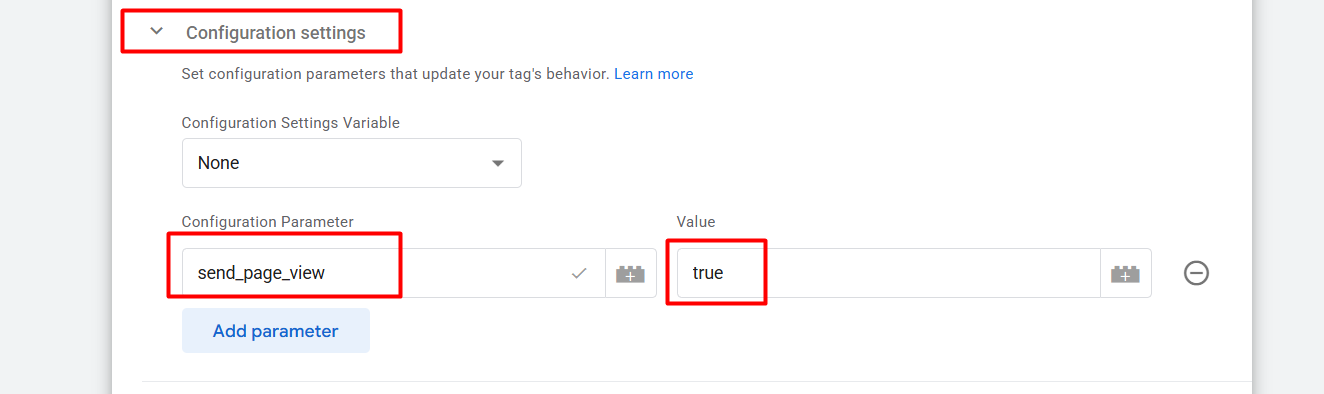
After placing the tag ID, go to “Configuration settings”, click the “Add parameter” button, and enter “send_page_view” in the first box and “true” in the second box. Now this tag type will record all of the page view events whenever someone visits any of the pages on your website
Now it’s time to set up the trigger. ‘Trigger’ means when the tag should work.

Here you can see we select “Initialisation – All Pages” as our trigger type. So when any new page loads with our traffic, this event will fire, and this GTM tag will send page view events to GA4.
Great, we have already successfully connected GA4 on our side and used this tag to record page_view events and send them to GA4.
View_item GA4 eCommerce events
After completely setting up the page_view events, now it’s time to set up the view_item events. I hope you already know about the GTM data layer. Every time when we visit any of our product pages, we get one custom event in the data layer.
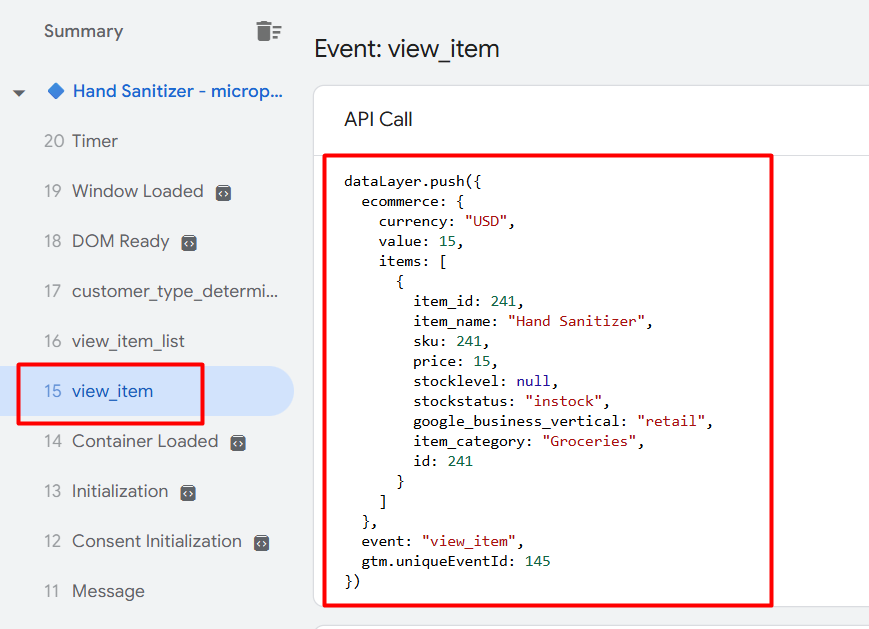
Also, with the event, we got many different types of data about our product. In the same way, we got “add_to_cart”, “begin_checkout”, “purchase”, and all of the other custom events with data. So let’s start the tracking.
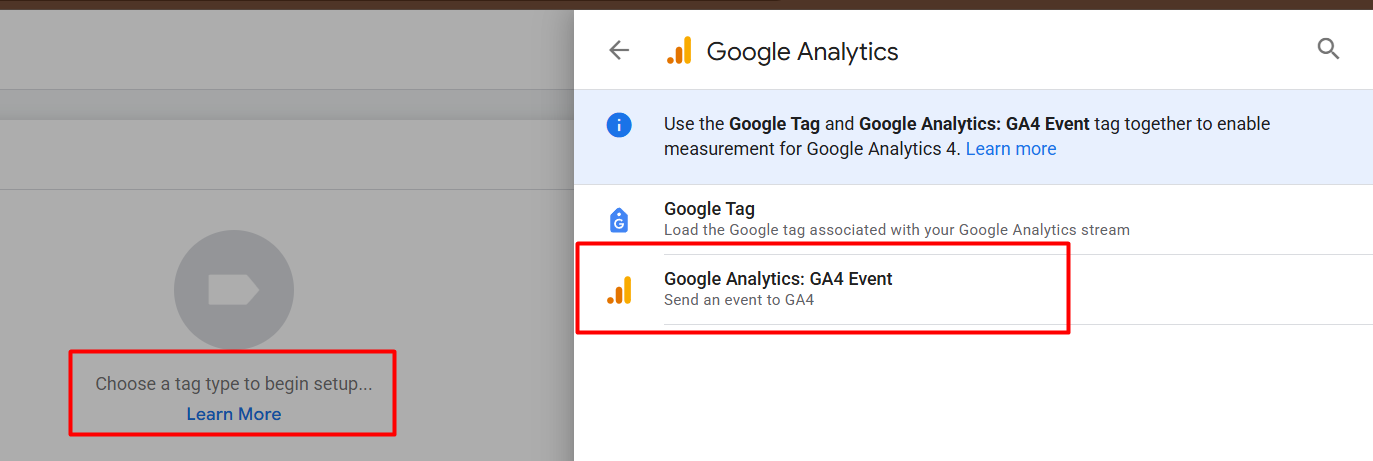
To set up the view_item event, select the second one as your tag type.
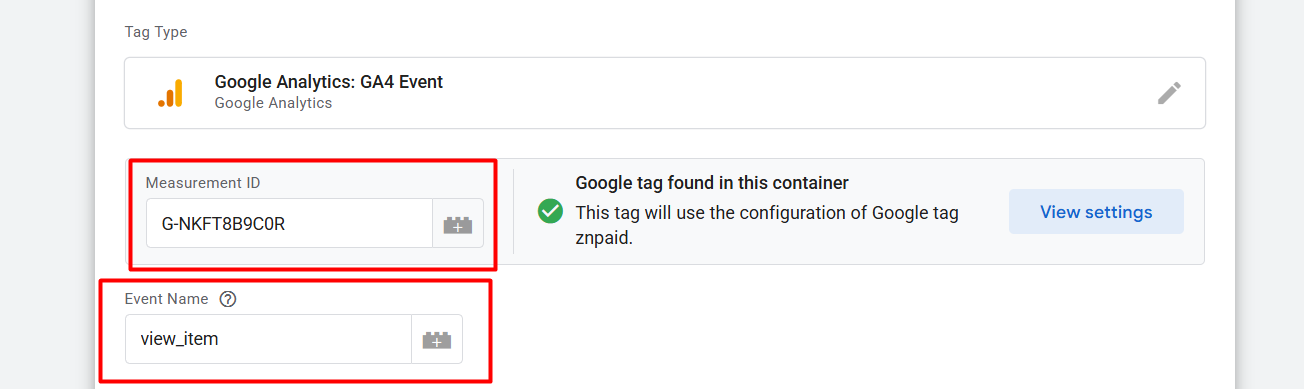
Now that you are in the first position again, you will need to add your measurement ID. Then, in the box for event names, write “view_item” down. This is the place where you can write down the event name according to your need, but for some events we have to follow the rules of GA4.
Now it’s time to set up all parameters needed to send important data. If you already read our previous article, you know the important parameter names.
Create parameters
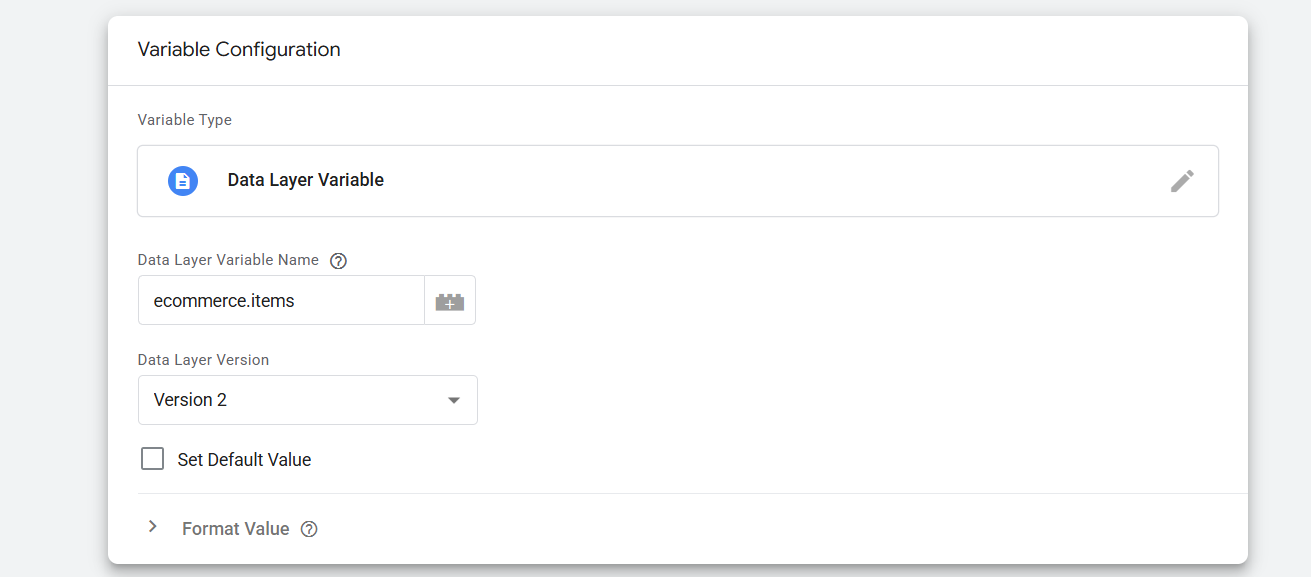
Follow it if you don’t know how to do it or if your parameters aren’t ready yet. First go to your variable section and as your variable type, select “DataLayer variable”

Now here you can see what we did with “ecommerce.currency”. The currency data is under the object name “ecommerce”. That’s why first we write down “ecommerce”, then “.”, then “currency”.
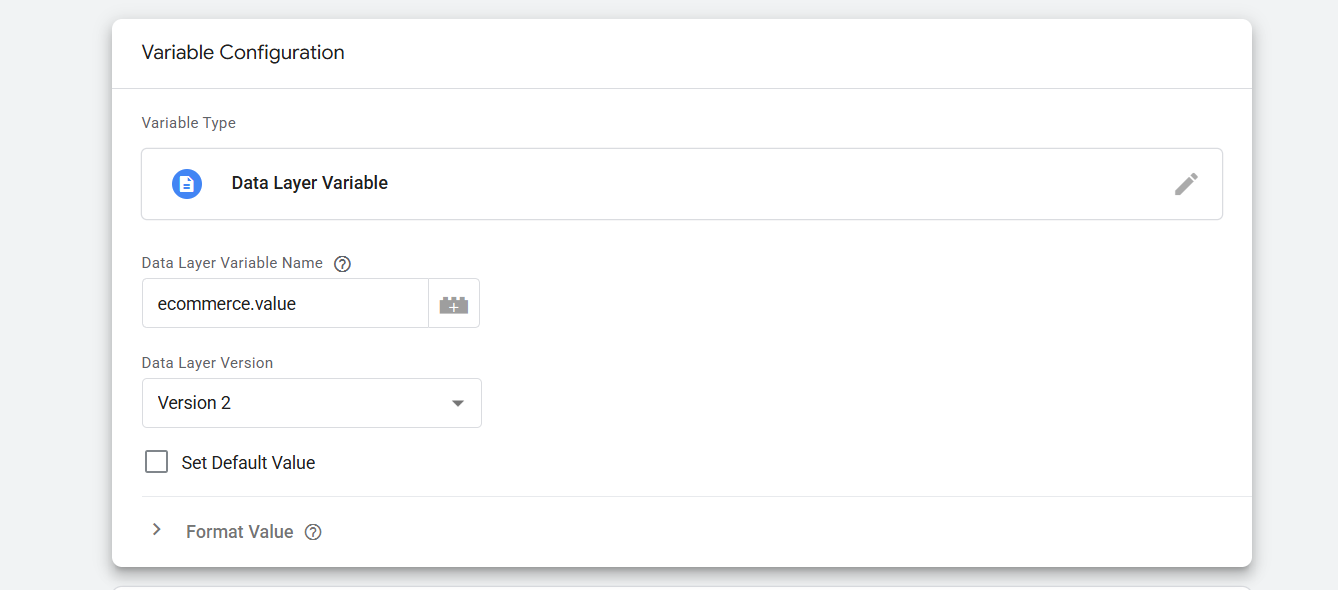
In the same way, we collect product value data. Read this article to learn more about gathering data from the data layer. Datalayer explanation.
In the same way we can collect the “items” parameters, but here is one problem.
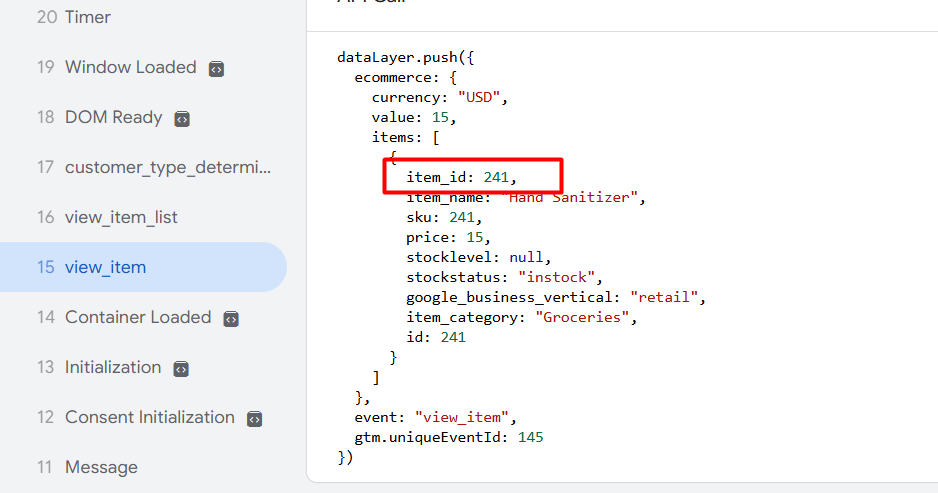
If you focus on the item_id, it’s in number format. But according to GA4, the data should be in string format.
To solve this problem at first, collect data from the data layer. Now save it with a unique name so next time you will be able to retrieve it easily.
Now, select one additional new variable. But at the time, as your variable type, select “Custom Javascript” and copy this code.
function(){
var items = {{Items Array}}; // Items Array

return items.map(function(item){

return {

item_id : item.item_id.toString(),

item_name : item.item_name,

item_brand : item.item_brand,

price : parseFloat(item.price),

item_category : item.item_category,

quantity : item.quantity ? parseFloat(item.quantity) : 1

}


})
}
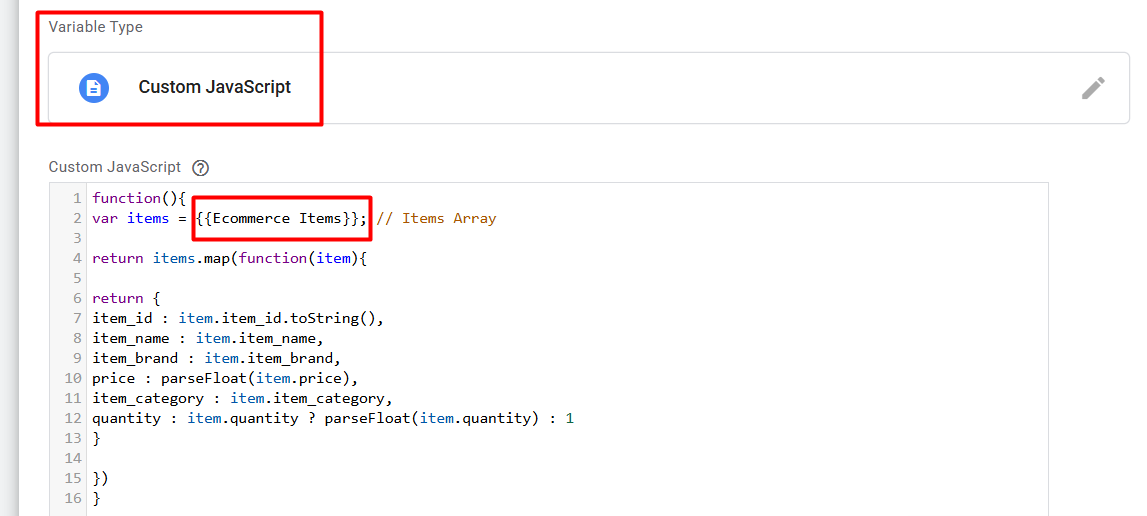
After placing the code in the box, change the red box to your previously created variable name. This variable will resolve the problem, and it will collect all of the important data.

The picture illustrates the successful resolution of the problem.
Please return to the tag section and select your tag type. Then place the measurement ID again one more time and write down the event name.
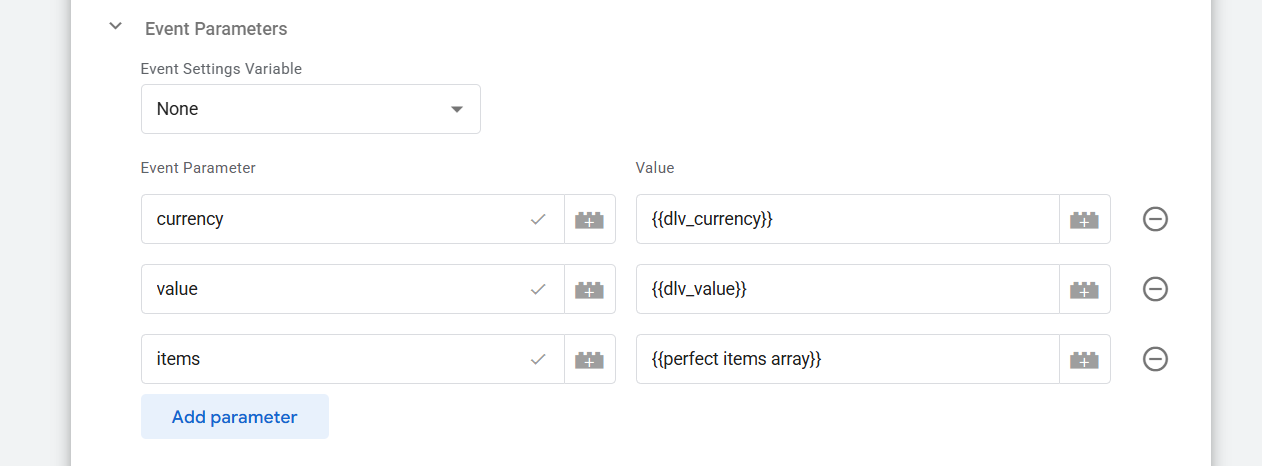
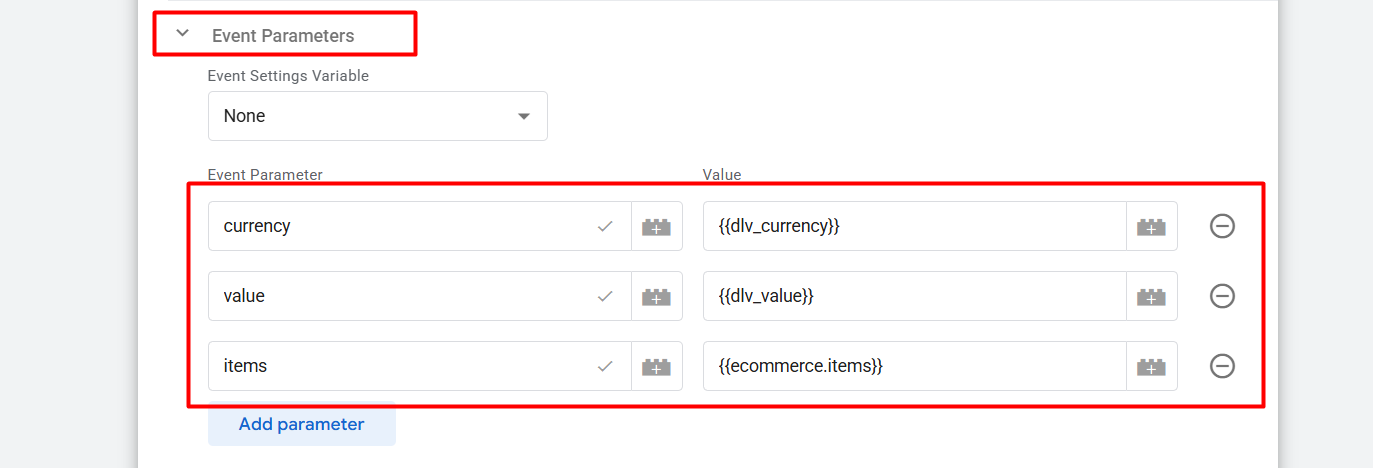
Now, under the “Event Parameters,” add all the variables you have created. Now it’s time to set up the trigger.

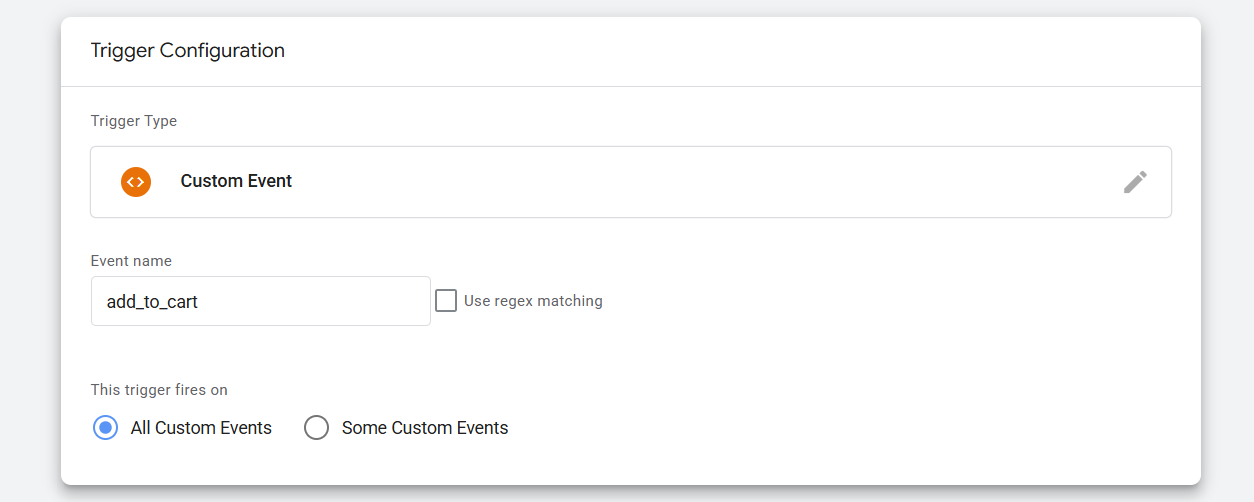
Go to your trigger section, and as your trigger type, select “custom event. ”.
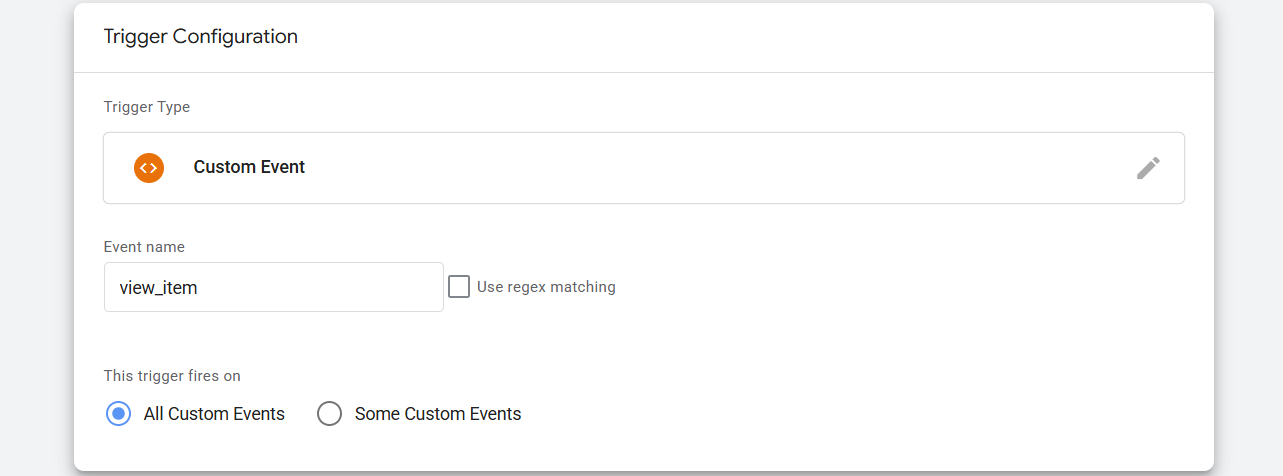
Now, in the event name field, enter the event name from the data layer. Now, this is how your view_item event setup is done.
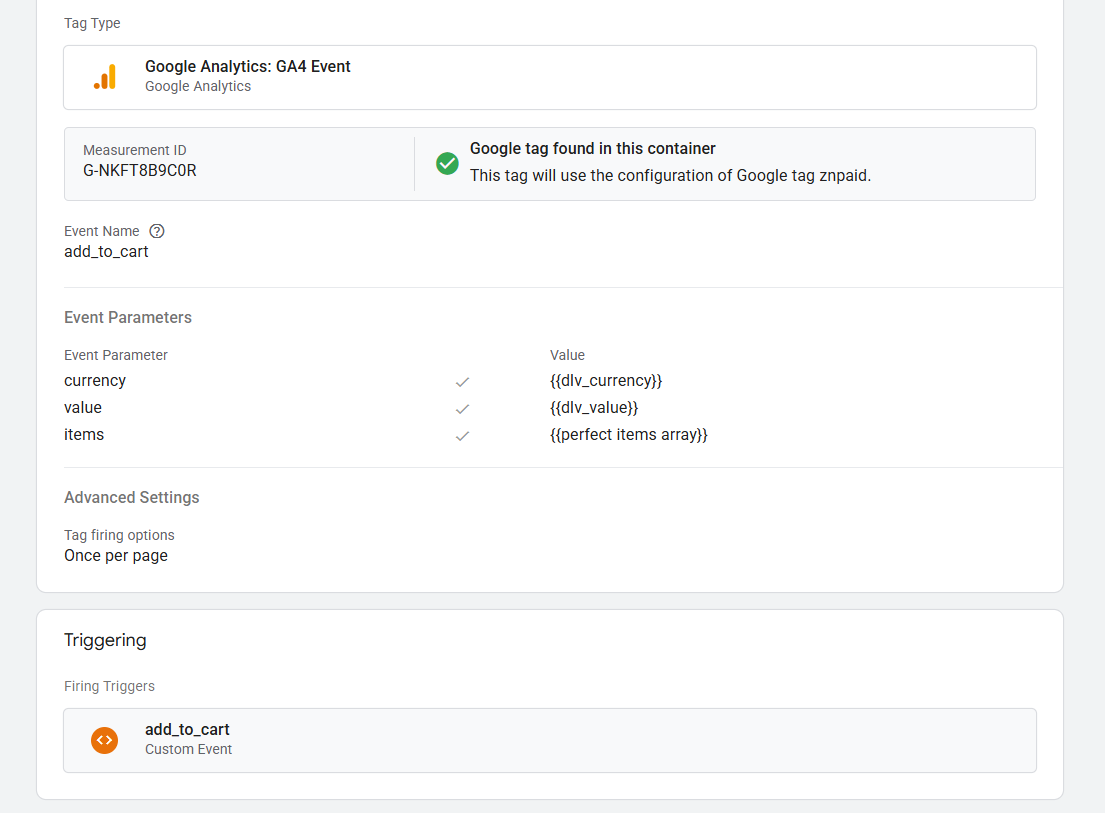
Add_to_cart GA4 eCommerce events
In the same way, you can complete your add_to_cart event setup. Because the parameters will be the same here also, and the trigger setup method is also the same for that.
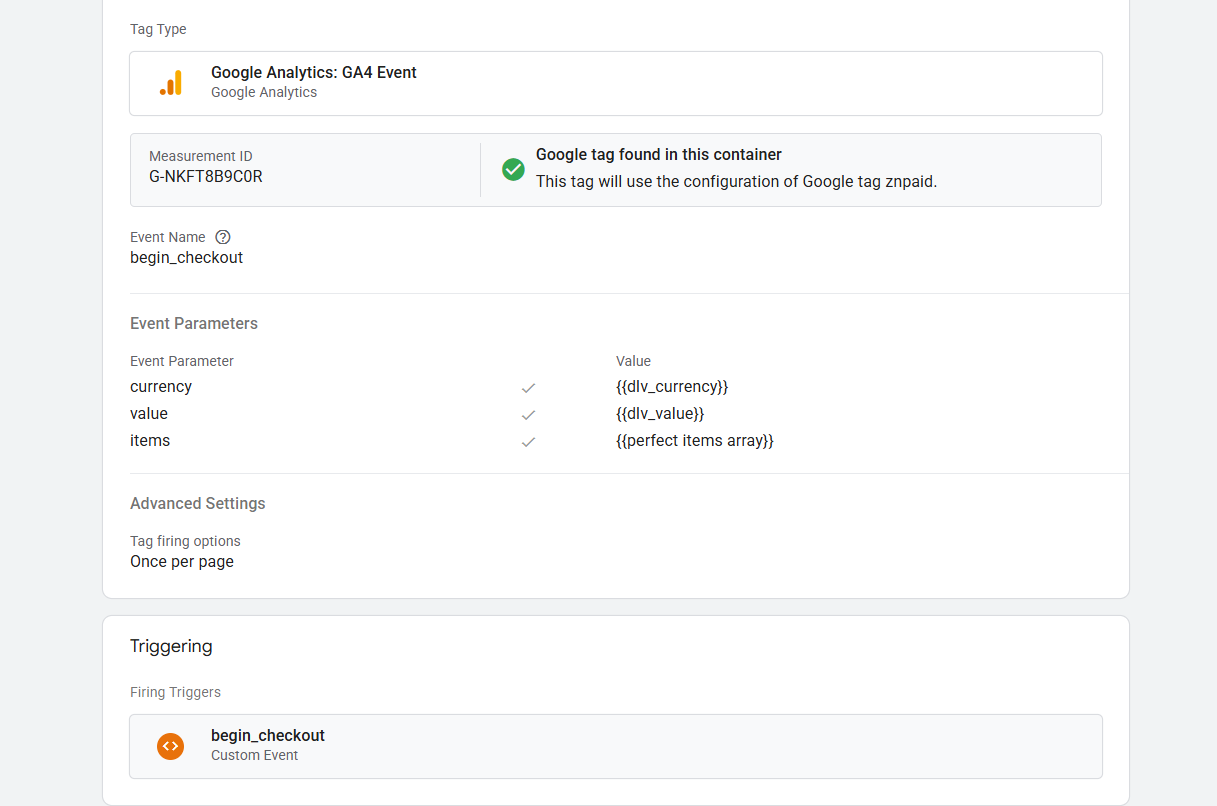
begin_checkout GA4 eCommerce events
In the same way, select your tag type, then add all of the important parameters for this event under the “Event Parameters” section and apply the same process to set up the trigger.

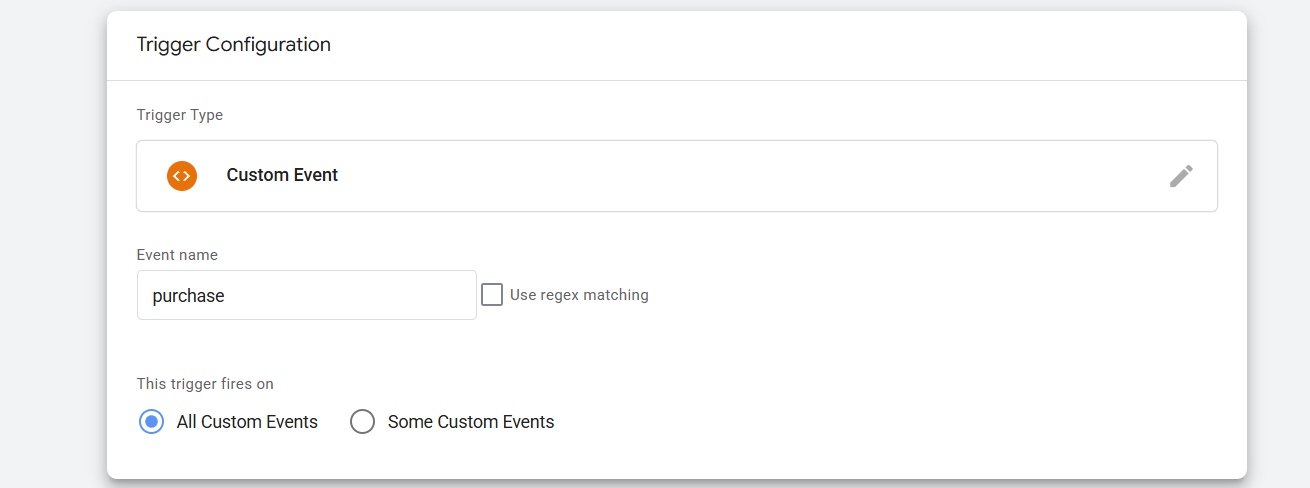
Purchase the last GA4 eCommerce events
The setup is the same for this event, but you must add some extra parameters.

In the picture, you can see we added one extra parameter, and this is “transaction_id”. If you already read our article about collecting values from the data layer, now you know how to collect them from your data layer. As with the other event, the trigger setup is the same here, too.
You’ve successfully completed all the essential and typical GA4 eCommerce events configurations. If you have any questions about the standard or any custom event creation, you can share them with us. Here we write about standard or GA4 eCommerce events, but if you need any help with a custom event, you can talk to us for a solution.


