
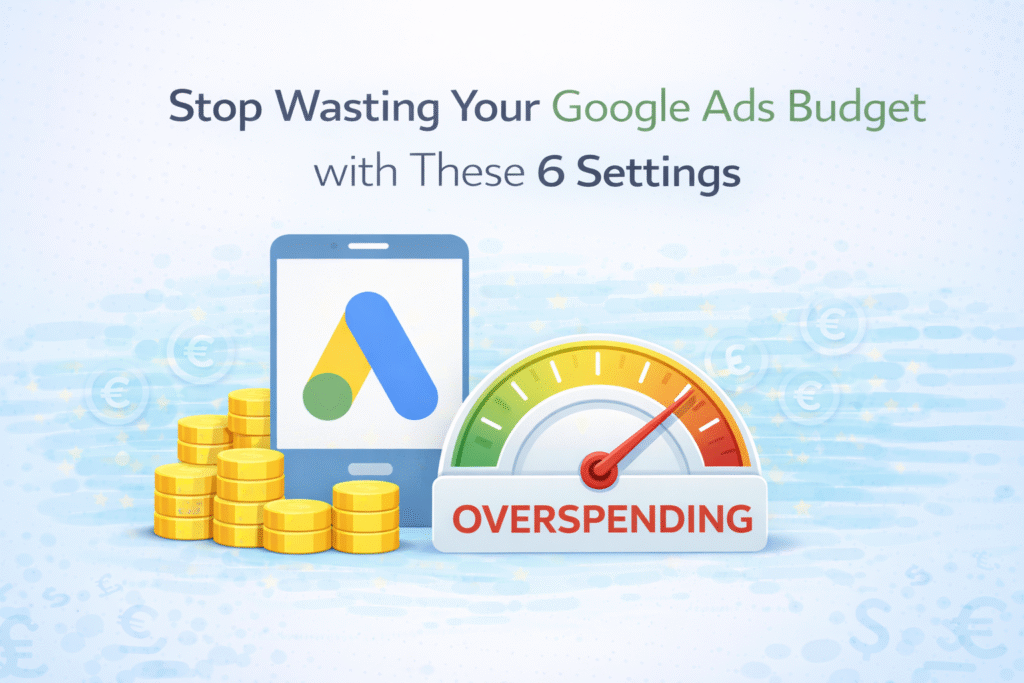
You’re here in this article; that means you are facing the problem of Google Ads budget wasting. Don’t worry; in this article we will explain 6 important settings to you to control your Google Ads budget waste.
Google Ads is a bit like a casino game; you have to keep that in mind. Google’s algorithms or rules are set in such a way that the advantage is always on Google’s side. This is why we have to be very careful while working with Google Ads.
Nowadays, Google is a vast platform, where countless people are constantly searching according to their needs. As a businessman or service provider, you also have to come to this platform.
However, you have to be very careful while running Google Ads. Running ads without proper planning can waste a large part of your Google Ads budget. So, let’s learn about some settings that will help you reduce unnecessary costs and keep your campaign under control.
Recommendations for Google Ads budget optimization
Google Ads accounts have a “Recommendations” system that turns on certain settings by default. If you forget to turn them off, Google can make important changes to your campaigns without your knowledge.
Problems that may occur if automatic settings are turned on:
Unnecessary keyword targeting: Ads may start showing on keywords that are outside your target.
Display Network waste: The budget for the Search campaign can be spent on the Display Network without your permission, often resulting in low-quality traffic.
Bad traffic: When traffic comes from outside your target audience, the chances of conversions decrease and your valuable budget is wasted.
Smart Bidding conversion: Also, Google may automatically change your bidding strategy to Maximise Conversions or Maximise Conversion Value, which may not be compatible with your current budget.
So it’s important to turn off these automatic options from your “Recommendations” section to stay in control of your ad account, because you won’t want to give Google control to change important campaign settings without your knowledge.
So
To check and turn it off, first go to the “Recommendations” section in your Google Ads account.
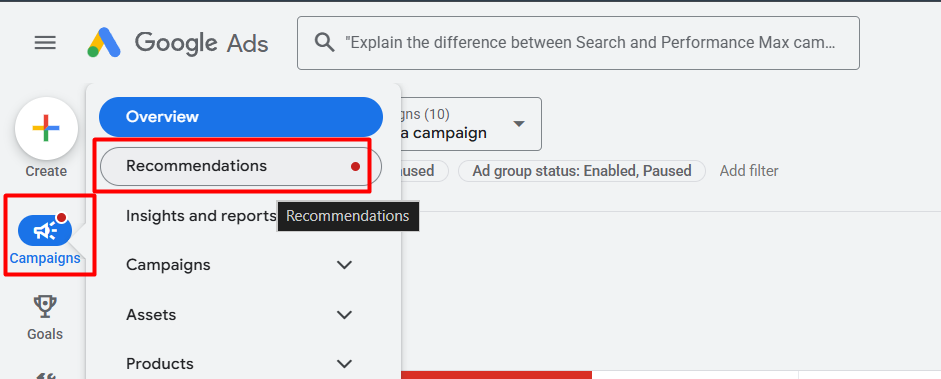
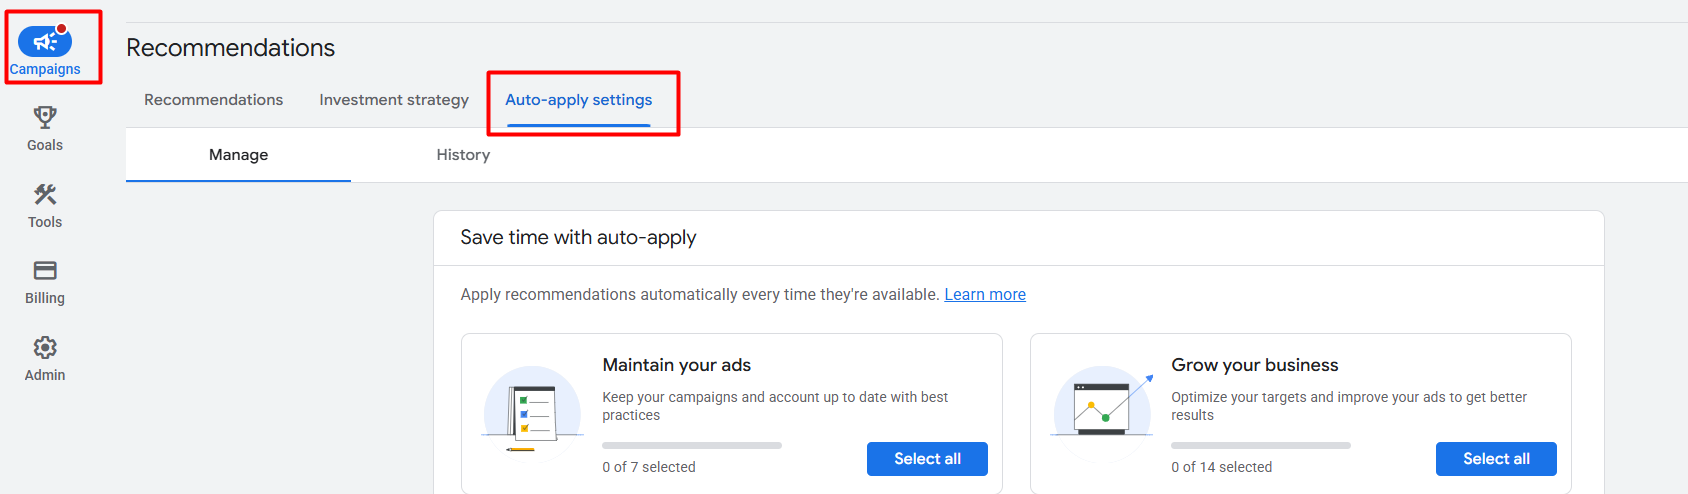
After entering this section, now you have to go to the “Auto apply” settings.
If you can’t access this section, your first job is to confirm that you’re viewing the entire campaign. You have not selected any individual campaigns.

If you select any individual campaign, then the auto-apply settings will be missing for you. Now after entering this section, you will get many options with checkboxes.
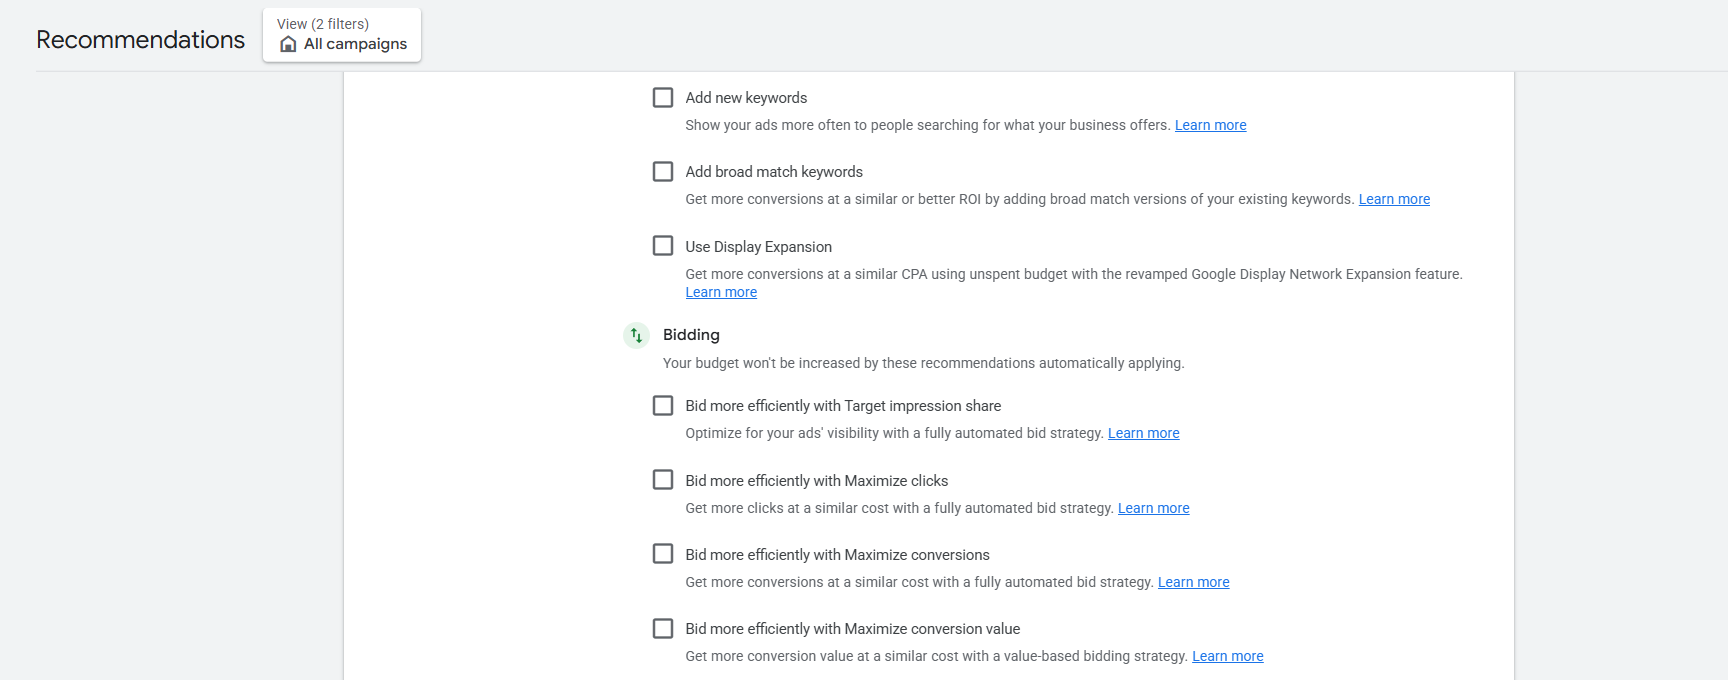
Here you will see many options and check boxes. Look at each option carefully and make sure the boxes are unchecked or turned off.
If these boxes are checked, Google will automatically be allowed to change your budget, keywords, and bidding strategy, among other things. It’s important to manually verify each setting to prevent these changes from happening without you noticing.
Location Targeting for Google Ads budget optimization
Our general idea about location targeting is that when we target a specific city or area, Google may only deliver our ad to people in that area. But in reality, Google’s algorithm doesn’t always work that easily.
With default settings, Google often shows your ads to people who are not currently in your targeted area but who have an interest in that area. As a result, you may unknowingly spend a large portion of your budget in the wrong place. Therefore, it is important to choose the right settings from the location options cautiously when setting up Google Ads.
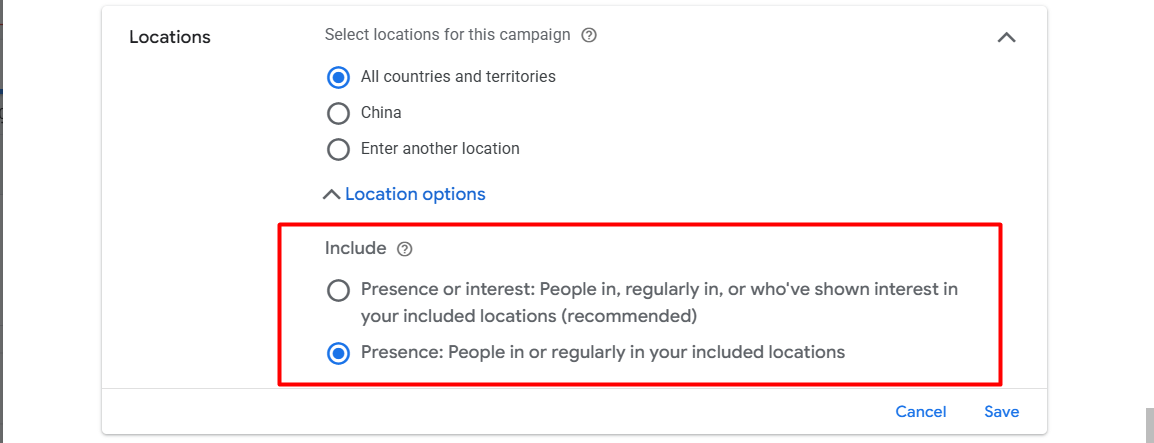
To properly target location, you first need to select your specific campaign. Then go to the ‘Settings’ option of the campaign and re-check the ‘Location’ settings. There, when you click on ‘Location Options’, you will see that Google is offering you two different targeting methods.
- Presence or interest.
- Presence.
Difference
The main difference between these two methods is the ‘Presence’ option. When you choose this option, Google only shows your ad to people who are currently in your targeted area or who regularly visit it. This option essentially limits your ad to a specific geographic area, greatly reducing the risk of unnecessary clicks and wasted budget.
On the other hand, the ‘Presence or Interest’ option greatly expands the scope of targeting. It shows ads to people who live or regularly travel in your specific area, as well as those who have shown interest in that area or have searched for it. This means that someone outside your targeted location can see your ad simply because of their interest. Leaving this option on without the right strategy can often lead to untargeted traffic.
Let’s understand this through an example. Suppose you have a local e-bike store, and you sell and deliver your products only in New York City.
Now if you select the ‘Presence or Interest’ option, then if a person sitting in London searches for ‘Best beach cruiser e-bike in New York’ looking for a gift for his friend, he will see your ad. If that person clicks on the ad, the money will be deducted from your account, but since you do not have the facility to deliver outside the country, this cost is a complete waste.
But if you had selected the ‘Presence’ option, Google would have shown the ad only to the person who is currently in New York City. In this way, your money would have been spent on the right customer for each click.
But
If your business is in a sector like tourism or real estate, where it is very important to get customers outside a specific area, then a different strategy should be adopted. In this case, we get good results if we can create two separate campaigns.
- First campaign: This is only for those people who are currently in your targeted area (Presence).
- Second campaign: This will be for those people who are showing interest in the services or properties in your targeted area from somewhere else (Interest).
By conducting two separate campaigns, you will understand which type of audience generates more sales or leads, allowing you to allocate your budget accordingly.
The biggest advantage of this strategy is that you can tailor your offers or messages to specific audiences. For example, if you want to launch a special discount or offer that is only applicable to local residents and not to tourists, then this separate campaign method is very effective.
This allows you to show one type of ad to locals and another type of ad to tourists according to their needs. This approach will make your marketing strategy more precise and cost-effective.
It’s important to remember that targeting isn’t the whole story; your business’s operational capacity is a factor too. If you opt for the “Presence” setting, your ad will only be shown to people who can actually buy what you’re selling from the area you’re focusing on.
Conversely, if you’re aiming to connect with folks outside your immediate vicinity who might be interested in your offerings down the line, the “Presence or Interest” option is the way to go. Ultimately, the choice hinges on your specific business goals and your capacity to fulfill them.
AI Max for Google Ads budget optimization
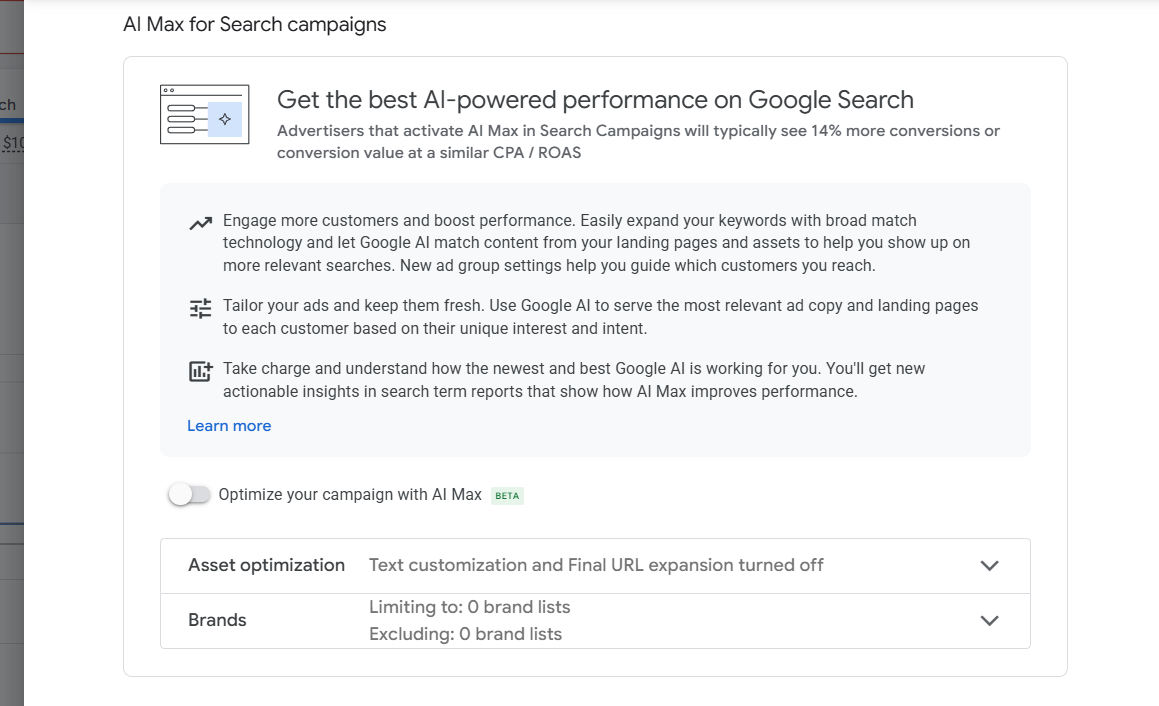
When you go to the settings section of your campaign, you will see this section. You will see a ‘Toggle Button’ or switch there, through which it can be controlled. When you activate the option using this button, Google will automatically start the AI Max process within that campaign.
Now let’s discuss the risks of using AI-based ‘Max’ features within campaigns. For those of you who are not familiar with this feature, let me tell you it was first introduced at the Google Marketing Live event last year. Google promoted it as a ‘keyword-less’ targeting system and made big promises that it would provide incremental growth to your campaign performance.
However, what we’ve seen from our internal testing and data is a bit different. Currently, this automation system is not making a significant contribution to performance. This doesn’t mean that it won’t improve in the next 6-12 months; it’s just that it’s failing to deliver the expected results at the moment.
So, our advice is not to directly implement this feature within any of your ongoing or successful campaigns. If you want to test it, it would be wise to create a completely separate campaign and test it there.
Conversion & Conversion action for Google Ads budget optimization
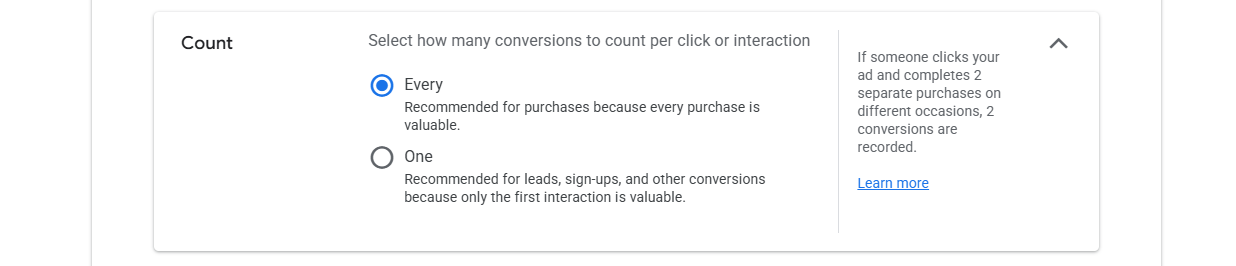
Another reason for wasting budget in Google Ads is using the ‘Every’ option in the conversion action settings. Let’s understand this issue in detail.
Suppose your main goal is to collect form fill-ups or leads from customers. For this purpose, you have set up conversion tracking. If you select ‘Every’ in the counting option, and the same person clicks on your ad, goes to the website, and fills out the form three times by mistake or repeatedly, Google will count it as three separate conversions. Since Google optimises bidding based on your conversion data, this incorrect data will increase your budget cost, but in reality you will not obtain any new customers.
Solution: If your goal is lead generation or form submission, then you should select ‘One’ instead of ‘Every’ in the conversion settings. In this case, no matter how many times a person fills out the form, Google will consider it as a unique conversion.
However, if your business is an e-commerce or online sales centre, the “Every” option is the right one. Because here every single piece of purchase data is valuable.
You should remember that running Google Ads without proper data tracking is like walking a blind path. Incorrect data or tracking problems can waste your entire budget, but they won’t yield the desired results. Therefore, regularly auditing or checking your tracking system with an expert is crucial.
No brand exclusions in PMAX
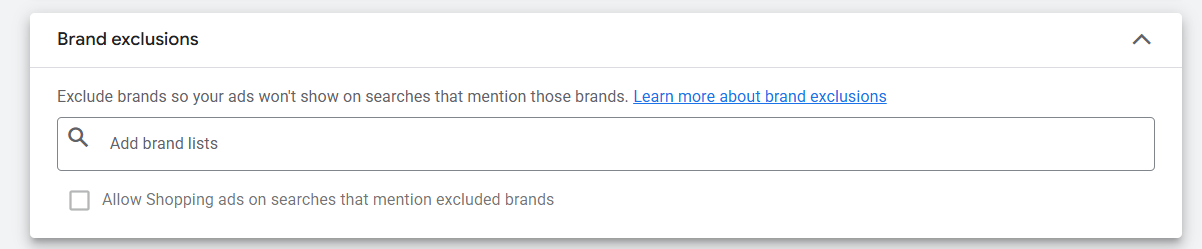
Sometimes PMax campaigns show ads against your brand name or your competitors’ brand names.
Own Brand: Those who already know your name will find you organically. Spending money on ads for them is often a loss.
Competitor: Sometimes, if anyone searches for a big brand name, your ad may get clicks, but there is no conversion. Such behaviour only increases CPC (cost per click).
Target the right audience
If you are a premium brand, and your ad shows on a “cheap” or “budget” brand keyword, then those who are looking for those less expensive items will go back from your site. If you stop receiving irrelevant traffic, you can allocate your budget effectively.
Increase Conversion Rate (CR)
When you exclude irrelevant brands, your ads will only reach people who are genuinely searching for your product category. This improves both your Click-Through Rate (CTR) and Conversion Rate.
To ensure the protection of your brand and maintain accurate targeting of your ads, you can create a ‘Brand List’. Creating a list of your brand name and the brands you want to target and adding them to your campaign is a very effective step.
Optimise Targeting
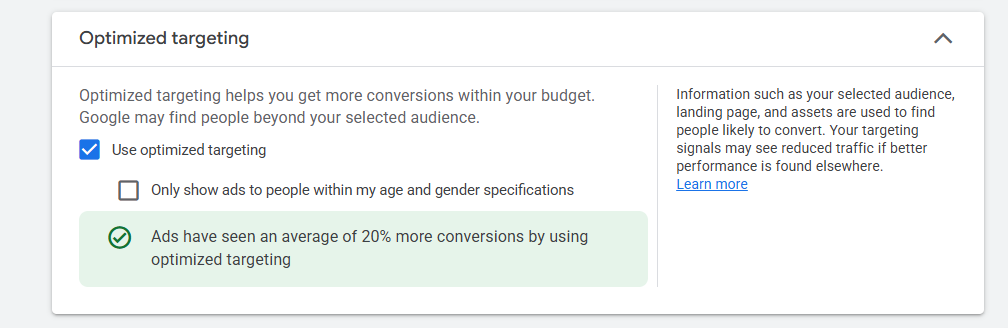
‘Optimized Targeting’ is an important feature in Google Ads display, video and especially Demand Gen campaigns. It is enabled by default in Performance Max (PMax) campaigns.
Let’s say you have created a Demand Gen campaign and your goal is to retarget people who have already visited your website or added a product to cart. When you set up your specific audience list, Google will use this ‘Optimized Targeting’ option to try to find new traffic outside of your list. Google then uses the list you provide as a signal only and delivers ads to any audience it wants.
Tip: When you are working with a specific or narrow audience list (such as Retargeting), it is wise to keep this option OFF. Because if it is enabled, Google can spend budget outside of your specified boundaries.
But that doesn’t mean this feature is bad. If you want to build brand awareness and your goal is to reach as many people as possible, this option can be very useful for you.
Simply put: if your goal is to target a specific audience, keep it off. If your goal is to increase brand reach, you can keep it on.
Thank you for staying with us. If you want to share any ideas with us, you are welcome. We would love to know your thoughts, so please remember to comment.


