Engaging with website visitors is one of the most powerful ways to build trust and drive conversions. A well-designed form acts as a bridge between your business and your audience—helping turn traffic into valuable leads or customers.
That’s why form tracking is so important. By tracking form submissions, we can measure engagement, identify conversion rates, and understand how our audience interacts with our site.
Even better, this data can be shared with marketing platforms through Google Tag Manager (GTM). With GTM-powered tracking marketing platforms gain deeper insights into customer behavior—allowing campaigns to be optimized for more traffic, better targeting, and higher ROI.
Start tracking your forms today and unlock the true potential of your website traffic!
Form Submission Tracking with Page Url
One of the simplest and most effective ways to track form submissions is by using the page URL. Many websites redirect users to a new page with a “Thank You” message after they complete a form.
For example, once a visitor submits a form, they might be redirected to:
👉 https://yourwebsite.com/thank-you
This makes it easy to track conversions—because every visit to the thank-you page indicates a successful form submission.
To set this up in Google Tag Manager (GTM):
- Go to Triggers in GTM.
- Click New Trigger.
Select your new trigger based on your setup.
![]()
- Page View → Fires as soon as the page starts loading.
- DOM Ready → Fires when the page structure (HTML) is fully loaded, but images/scripts may still be loading.
- Window Loaded → Fires when everything on the page (including images, CSS, and scripts) is fully loaded.
You can remember it simply:
Page View = start, DOM Ready = middle, Window Loaded = finish.
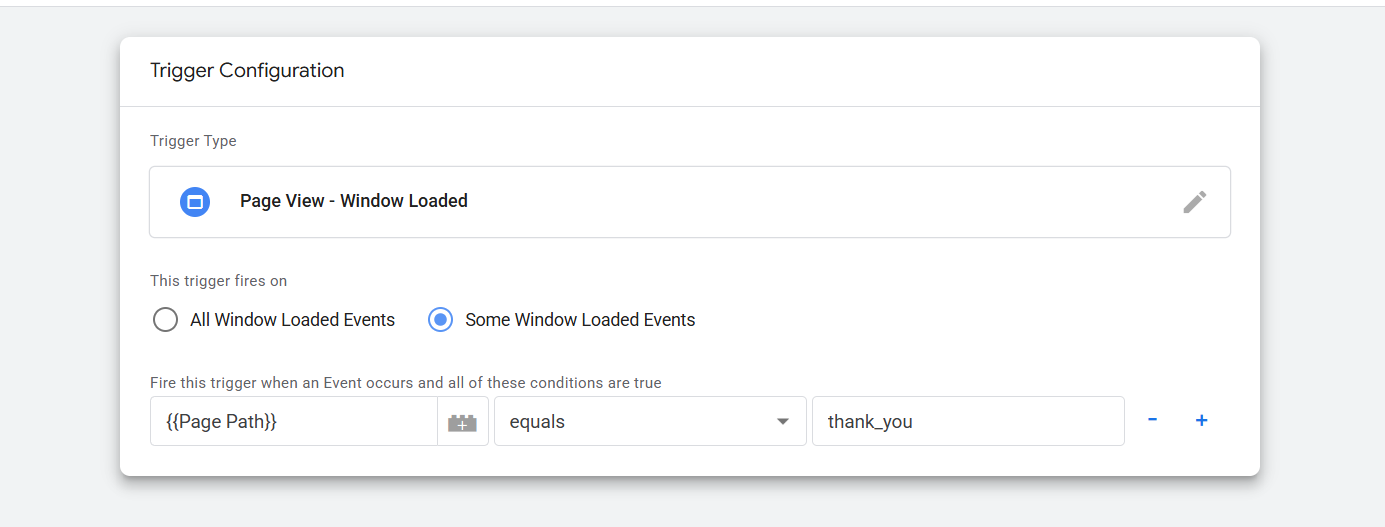
At this stage, you’ll see three options for setting up your trigger in Google Tag Manager (GTM). You can choose the one that best fits your tracking needs—but in this case, we’ll go with Window Loaded for reliable tracking.
Here’s how to configure it:
Select Window Loaded as the trigger type > Set the Page Path to equals. > Enter the final link: thank_you.
That’s it! Your form submission trigger is now fully set up. Every time a user submits a form and lands on the thank-you page, GTM will accurately capture the event.
Form Submission Tracking with Button Click
Another way to track form submissions is by monitoring the form button click.
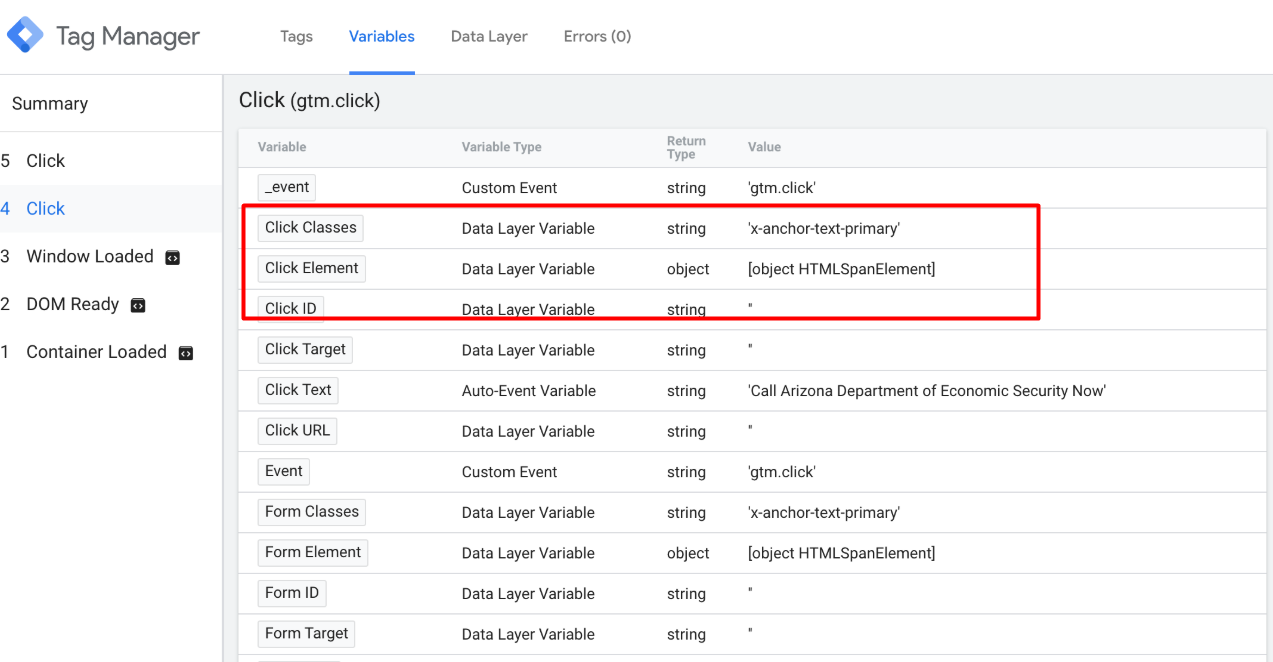
By enabling variables such as:
- Click ID
- Click Text
- Click Classes
Google Tag Manager (GTM) can capture valuable details in the Data Layer whenever a user clicks the form’s submit button.
With this data, you can set up tracking using the “All Elements” trigger type in GTM.
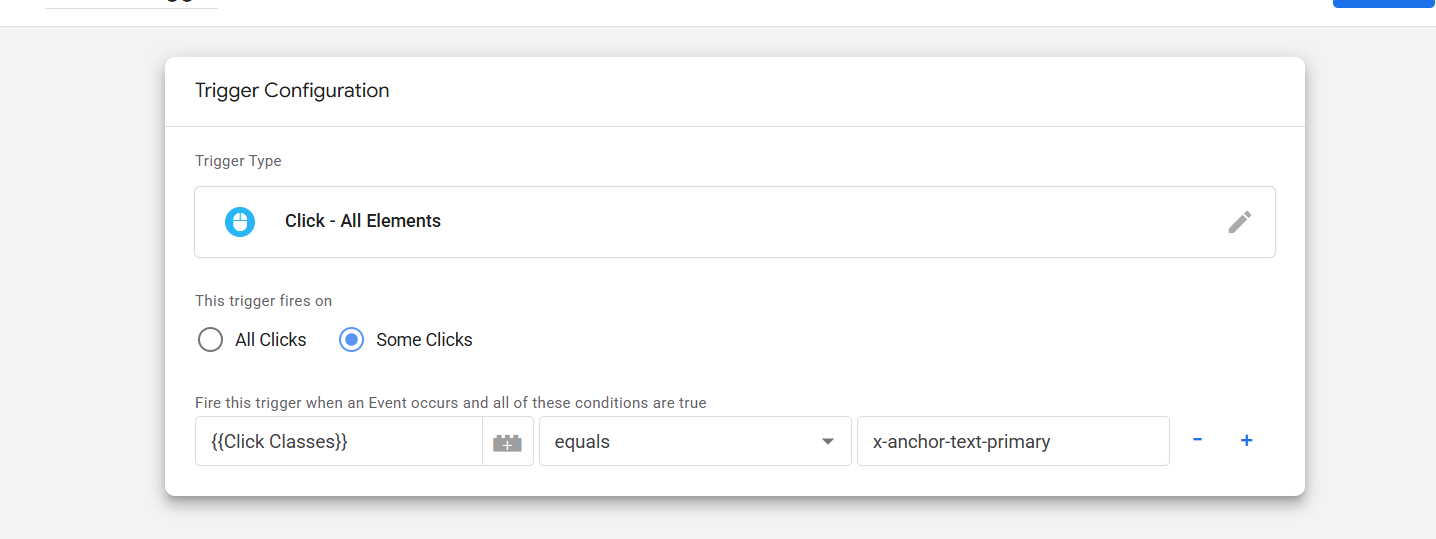
However, tracking forms through button clicks isn’t always the most reliable method.
Why? Because if we set up a trigger only on the button click, the tag will fire every time a visitor clicks the button—even if the form isn’t successfully submitted. This can lead to inaccurate data and mislead us when analyzing form conversions.
That’s why relying solely on button-click tracking is not an ideal approach for measuring true form submissions.
Form Submission Tracking with Element Visibility Trigger
After the thank-you page method, another effective way to track form submissions is by using the Element Visibility trigger in Google Tag Manager (GTM).
Many websites don’t redirect users to a new page after form submission. Instead, they display a confirmation message (like “Thank you for submitting”) directly on the same page. In such cases, the Element Visibility trigger is the best solution.
Here’s how it works:
- After submitting the form, look for the confirmation message or line that appears (e.g., a “Thank You” text).
- Right-click on it and choose Inspect to open the developer tools.

Now, select the CSS Class you identified. Then go to Google Tag Manager (GTM) and follow these steps: Navigate to Triggers > Click on New Trigger > From the Trigger Type options, select Element Visibility.
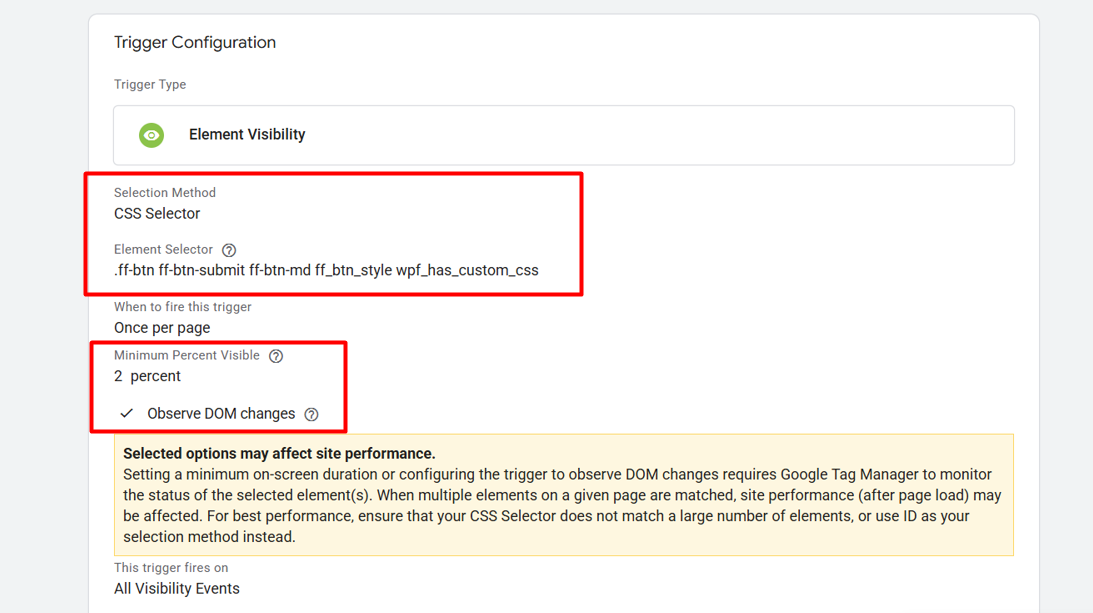
In the Element Visibility Trigger setup, follow these steps:
- In Selection Method, choose CSS Selector.
- Paste the collected CSS Class into the selector field.
Don’t forget to add a “.” (dot) before the class name.
- Reason: In CSS, a dot (.) is used to target classes. Without it, GTM won’t recognize the element properly.
- Set the Maximum Percent Visible to 2%.
Reason: The thank-you message is usually small. Even if only a tiny portion of it (2%) is visible on the screen, GTM will detect it. This ensures the trigger fires without requiring the entire element to be in full view.
- Check the option Observe DOM Changes.
Reason: Many confirmation messages are dynamically loaded after form submission. By enabling this option, GTM keeps watching the page for new elements that appear, ensuring the trigger works even if the thank-you message wasn’t present when the page first loaded.
With this setup, your Element Visibility Trigger will accurately detect form submission events and fire your tags reliably—without false positives.
Form tracking through Listener
We’ve already explored several methods to track form submissions—using Thank-You Pages, Button Clicks, and Element Visibility. But in some cases, none of these approaches will work for certain forms.
That’s where Event Listeners become a game changer.
For example, with plugins like Contact Form 7 (WordPress), we can set up a custom Listener to reliably capture form submission events. This method ensures we don’t miss tracking data, even when traditional approaches fail.
Let’s walk through how to set up Contact Form 7 with a Listener in Google Tag Manager.
- Go to the Tags section in GTM.
- Create a new tag specifically for your Listener.
- Copy and paste the provided code.
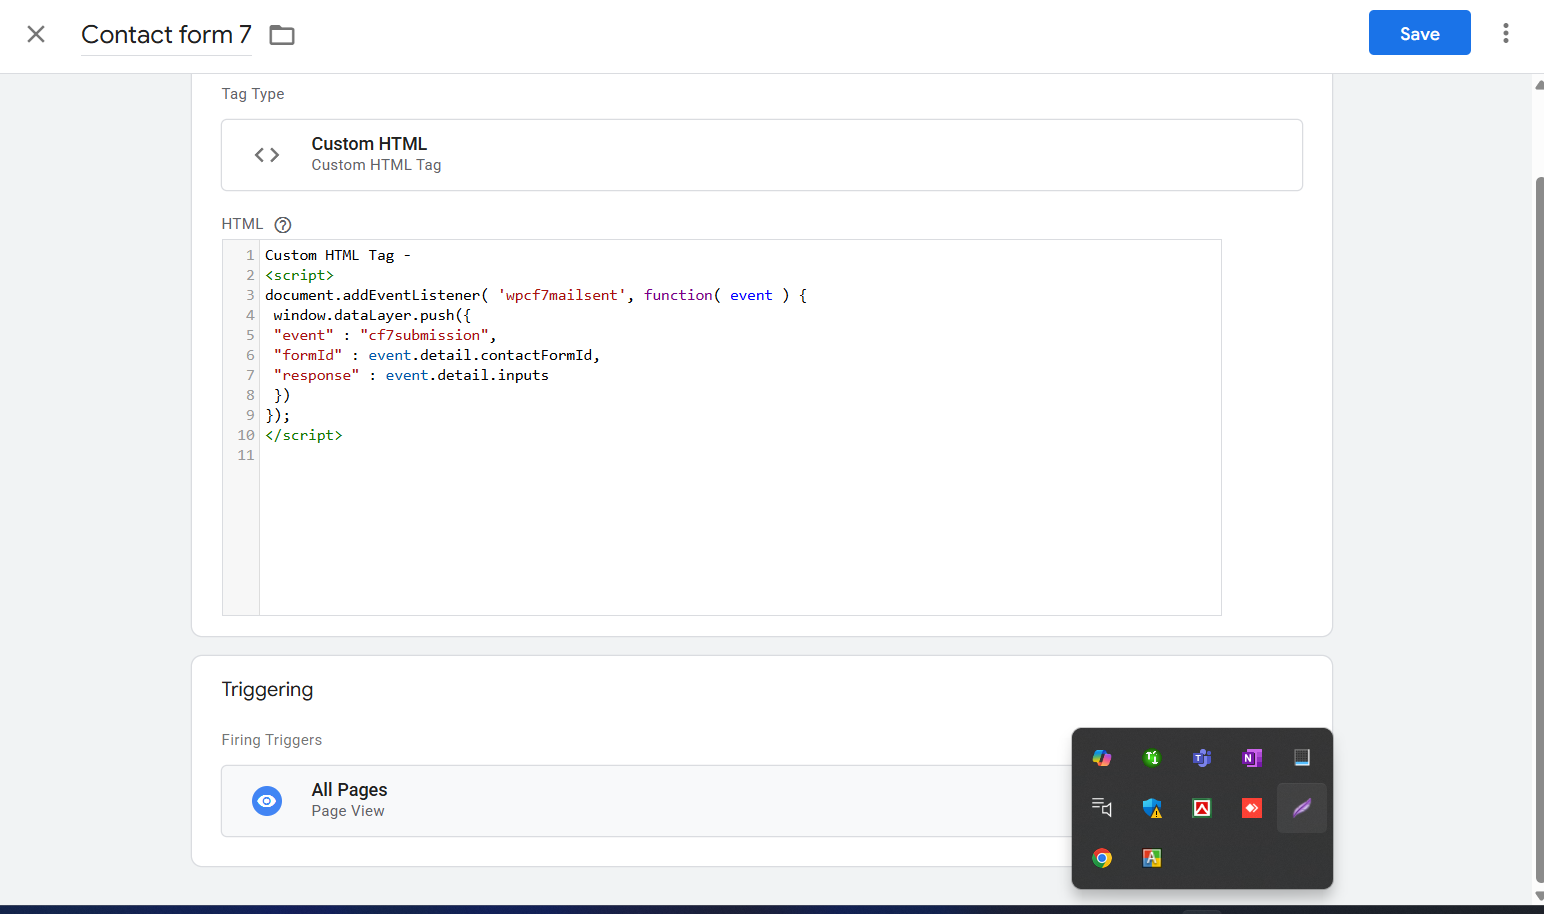
Custom HTML Tag –
<script>

document.addEventListener( 'wpcf7mailsent', function( event ) {

 window.dataLayer.push({

 "event" : "cf7submission",

 "formId" : event.detail.contactFormId,

 "response" : event.detail.inputs

 })

});

</script>
4.Set the trigger to “All Pages” so the Listener is always active.
This approach guarantees seamless form tracking, even when other methods fall short.
This script is a listener for Contact Form 7.
- It waits for the event wpcf7mailsent (form successfully submitted).
- When triggered, it pushes data into GTM’s dataLayer:
- event: custom name (cf7submission)
- formId: which form was submitted
- response: the form inputs
Once the code is successfully installed, you’ll notice a new pushed “event” in your data layer each time a “Contact Form 7” submission occurs.”
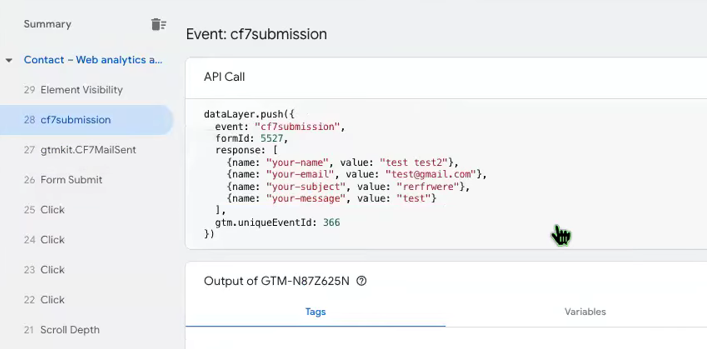
And here you go. With this data now you can complete your tracking for “Contact Form 7”
HubSpot Form Tracking with GTM
HubSpot Forms are also widely used across the world—and just like with Contact Form 7, they require a Listener for reliable tracking. Traditional methods such as Page URL or Element Visibility simply don’t capture submissions from HubSpot Forms in a professional way.
The solution? We’ll use the same Listener setup process to track HubSpot Forms accurately. Let’s walk through it together.
- Go to the Tags section in GTM.
- Create a new tag specifically for your Listener.
- Copy and paste the provided code.
Custom HTML Tag
<script type="text/javascript">

  window.addEventListener("message", function(event) {

    if(event.data.type === 'hsFormCallback' && event.data.eventName === 'onFormSubmitted') {

      window.dataLayer.push({

        'event': 'hubspot-form-success',

        'hs-form-guid': event.data.id

      });

    }

  });

</script>
Set the trigger to “All Pages” so the listener is always active.
![]()
- When someone fills out and submits the form, HubSpot sends a “message” back.
- The script “hears” that message and then tells Google Tag Manager’s Data Layer that a form was successfully submitted.
- It also sends along the unique form ID so you know exactly which form was filled.
Also in the same way you can track this ( Gravity From and Any Ajax Form )
Once the code is successfully installed, you’ll notice a new entry in your Data Layer each time a submission occurs.
Gravity Form tracking:
<script>

jQuery(document).ready( function() {

jQuery(document).bind('strattic-form-success', function(e){

  var formId = e.detail.form.id

  var formDetails = e.detail.formattedData

window.dataLayer.push({

          'event' : 'gravityFormSubmission',

          'gfformID' : formId,

          'gfformSubmission' : formDetails

});

});

})

</script>

Any Ajax Form tracking:


<script id="gtm-jq-ajax-listen" type="text/javascript">

 (function() {


 'use strict';

 var $;

 var n = 0;

 init();


 function init(n) {


 // Ensure jQuery is available before anything

 if (typeof jQuery !== 'undefined') {


 // Define our $ shortcut locally

 $ = jQuery;

 bindToAjax();


 // Check for up to 10 seconds

 } else if (n < 20) {


 n++;

 setTimeout(init, 500);


 }


 }


 function bindToAjax() {


 $(document).bind('ajaxComplete', function(evt, jqXhr, opts) {


 // Create a fake a element for magically simple URL parsing

 var fullUrl = document.createElement('a');

 fullUrl.href = opts.url;


 // IE9+ strips the leading slash from a.pathname because who wants to get home on time Friday anyways

 var pathname = fullUrl.pathname[0] === '/' ? fullUrl.pathname : '/' + fullUrl.pathname;

 // Manually remove the leading question mark, if there is one

 var queryString = fullUrl.search[0] === '?' ? fullUrl.search.slice(1) : fullUrl.search;

 // Turn our params and headers into objects for easier reference

 var queryParameters = objMap(queryString, '&', '=', true);

 var headers = objMap(jqXhr.getAllResponseHeaders(), '\n', ':');


 // Blindly push to the dataLayer because this fires within GTM

 dataLayer.push({

 'event': 'ajaxComplete',

 'attributes': {

 // Return empty strings to prevent accidental inheritance of old data

 'type': opts.type || '',

 'url': fullUrl.href || '',

 'queryParameters': queryParameters,

 'pathname': pathname || '',

 'hostname': fullUrl.hostname || '',

 'protocol': fullUrl.protocol || '',

 'fragment': fullUrl.hash || '',

 'statusCode': jqXhr.status || '',

 'statusText': jqXhr.statusText || '',

 'headers': headers,

 'timestamp': evt.timeStamp || '',

 'contentType': opts.contentType || '',

 // Defer to jQuery's handling of the response

 'response': (jqXhr.responseJSON || jqXhr.responseXML || jqXhr.responseText || '')

 }

 });


 });


 }


 function objMap(data, delim, spl, decode) {


 var obj = {};


 // If one of our parameters is missing, return an empty object

 if (!data || !delim || !spl) {


 return {};


 }


 var arr = data.split(delim);

 var i;


 if (arr) {


 for (i = 0; i < arr.length; i++) {


 // If the decode flag is present, URL decode the set

 var item = decode ? decodeURIComponent(arr[i]) : arr[i];

 var pair = item.split(spl);


 var key = trim_(pair[0]);

 var value = trim_(pair[1]);


 if (key && value) {


 obj[key] = value;


 }


 }


 }


 return obj;


 }


 // Basic .trim() polyfill

 function trim_(str) {


 if (str) {


 return str.replace(/^[\s\uFEFF\xA0]+|[\s\uFEFF\xA0]+$/g, '');


 }


 }


 })();

 /*

 * v0.1.0

 * Created by the Google Analytics consultants at http://www.lunametrics.com

 * Written by @notdanwilkerson

 * Documentation: http://www.lunametrics.com/blog/2015/08/27/ajax-event-listener-google-tag-manager/

 * Licensed under the Creative Commons 4.0 Attribution Public License

 */
</script>
We have already captured some methods and forms for you, but this is just the beginning. Stay connected to learn more about what we know, and don’t hesitate to share your thoughts or ideas with us.


