Calendly is not just a scheduling tool—it’s a powerful data-driven form solution. Widely used across service-based businesses, its popularity continues to grow globally as organizations recognize the importance of seamless client interaction. In today’s world, data is the most valuable asset for business growth. Without proper tracking and analysis, it becomes extremely difficult to understand how potential clients engage with your services.
By integrating Calendly with analytics and marketing platforms, businesses can gain actionable insights into customer behavior, conversion rates, and overall traffic interactions. This not only helps optimize the customer journey but also ensures that marketing investments are guided by real data instead of guesswork.
Here’s where the real challenge begins. Tracking a Calendly form with Google Tag Manager (GTM) is not straightforward because Calendly works inside an iframe. Unlike regular forms, iframes don’t allow direct access to form submission data, which makes traditional tracking methods ineffective.
To overcome this limitation, we need to implement an event listener that can capture interactions within the Calendly iframe and pass them to GTM. This approach ensures you can accurately track form submissions, user engagement, and other key conversion events.
Lets Track a Calendly form with Google Tag Manager
The first step in tracking a Calendly form with Google Tag Manager is to create a custom tag that works as a listener. This listener is responsible for capturing data whenever a form is submitted.
To do this, go to your GTM account and create a new tag. From the options, select Custom HTML as the tag type and paste the listener code inside. Next, assign the trigger to All Pages so the listener can run across your entire website.
![]()
With our listener setup now complete, every interaction on the Calendly form can be tracked seamlessly. From this point forward, whenever a visitor engages with the form, the listener will automatically capture those activities and push the information into the data layer.
This means all relevant events and submission details become available for tracking and analysis inside Google Tag Manager. Now that the listener is active, the next step is to explore the data layer to verify that the events are being recorded correctly.

Here you can see how the Custom HTML listener pushes data into the data layer. Don’t get confused by the format of this data—it may look a bit overwhelming at first. In practice, we’ll only be focusing on two specific dataLayer variables that matter for tracking Calendly form submissions.
You may also notice some additional dataLayer variables, such as “page height,” being fired, but these are not valuable for our purpose and can safely be ignored.
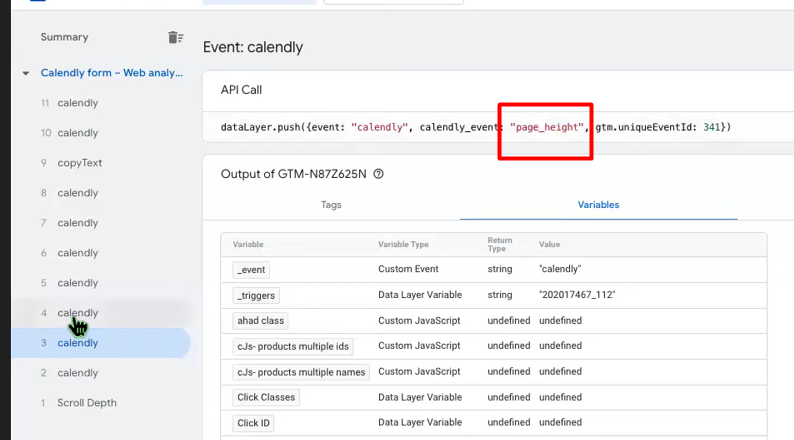
“page_height” is just extra information sent with the event that tells GTM the height of the page.
At this stage, we need to work with data layer variables instead of relying directly on events. The reason is that multiple events with the same name may fire, which makes it difficult to identify the exact one we need. Among all the data layer outputs, two variables are especially important:
- date_and_time_selected – captures the date and time chosen by the user when scheduling an appointment.
- event_schedule – records the confirmation that a user has successfully scheduled an event.
Our goal is to extract these two variables from the data layer and use them for accurate tracking. To achieve this, we first need to create a User-Defined variables in GTM. By doing so, we can access these data layer values and set up our triggers with precision. So let’s start.
To set up the data layer variable in Google Tag Manager, start by navigating to the Variables section. From there, create a new variable under User-Defined Variables. Select Data Layer Variable as the variable type, and then enter the variable name “calendly_event”. Once done, save the configuration.
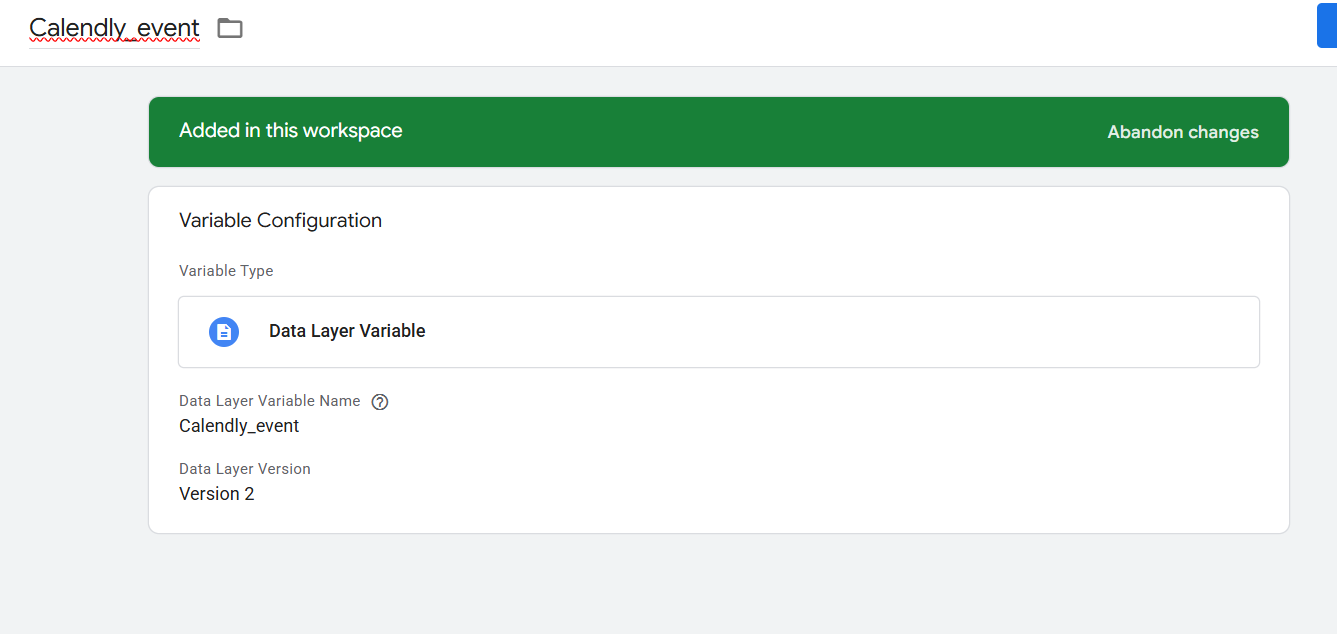
This one single variable will help us to collect our targeted 2 variables dynamically.
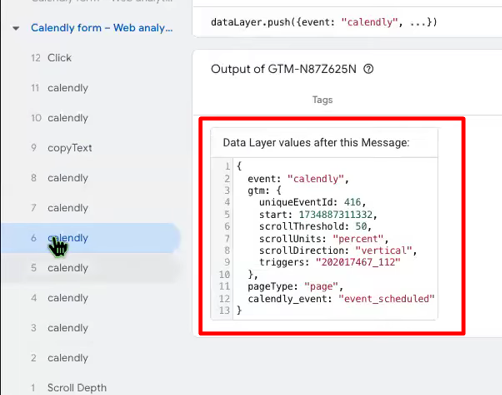
The final and most important data layer variable is “event_schedule.” In most cases, this is the primary variable used to track Calendly form submissions, as it is pushed into the data layer immediately after a user submits the form. If you find value in tracking “date_and_time_selected,” you can include it as well, but it is optional depending on your needs. Our dynamic variables are ready, and the next step is to set up the final trigger to capture these events accurately.
Now go to the trigger > Select new trigger > Select the trigger type “Custom Events”
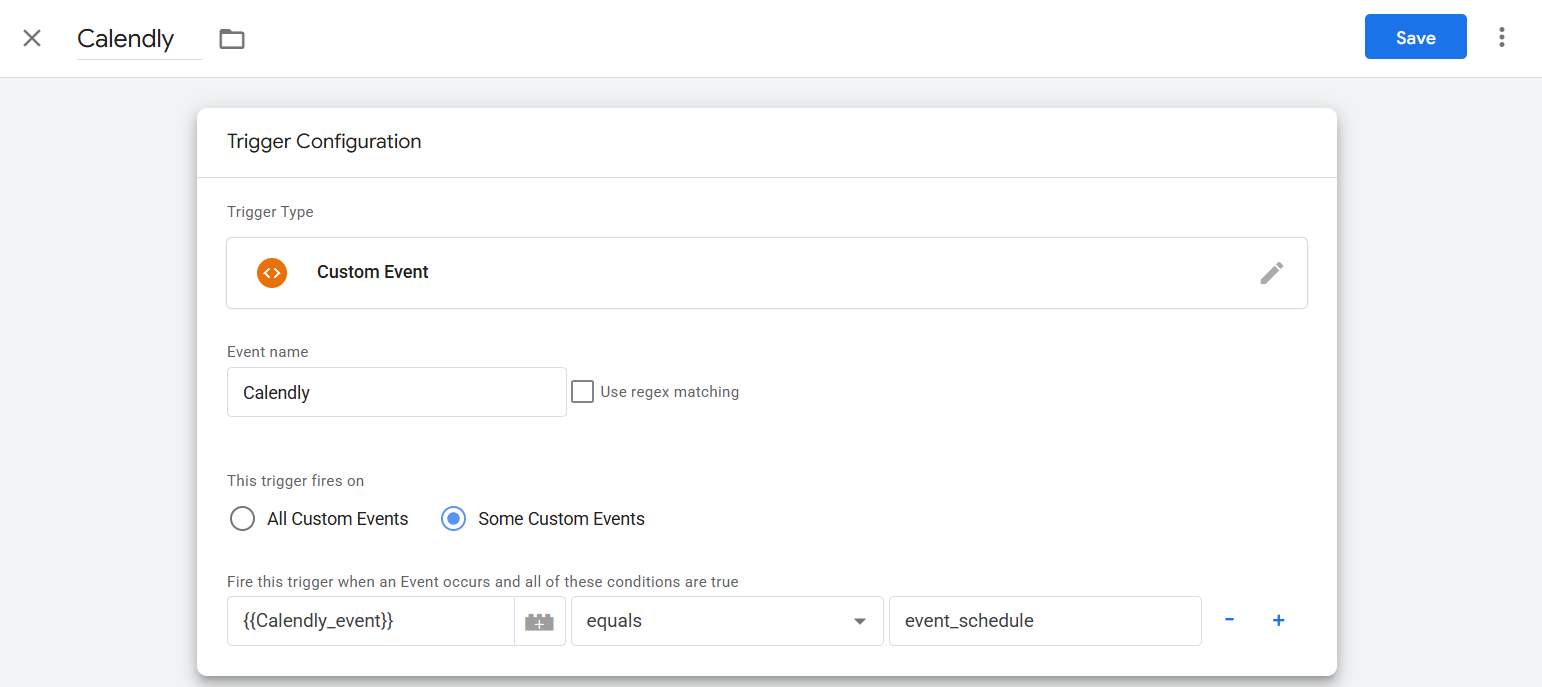
1️. Trigger Type
- Custom Event:
You are listening for a custom event that is pushed to the GTM Data Layer. This is not a built-in event like clicks or page views, but one that your website or app explicitly sends, such as from Calendly.
2️. Event Name
- Calendly:
This is the name of the custom event you are targeting. GTM will only consider events in the Data Layer that have event: “Calendly”. - Regex Matching:
You left it unchecked, so GTM will look for an exact match of “Calendly” instead of a pattern.
3️. This trigger fires on
- Some Custom Events:
You don’t want to fire this trigger for every custom event, only for events that meet a specific condition.
4️. Condition
- {{Calendly_event}} equals event_schedule
Here’s what it means:
- {{Calendly_event}} is a variable you created in GTM. Likely it pulls the specific event type from the Data Layer, e.g., what action happened in Calendly.
- equals event_schedule means the trigger will only fire when the value of this variable is exactly “event_schedule”.
- This ensures you’re not firing your tag on every Calendly interaction, only on the one where a scheduling event occurs.
And by the way now your trigger is ready. With this trigger you can send your data anywhere so easily.


